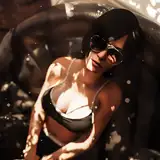
I can not remember if I ever did an extensive breakdown of how I do a piece so here is one of Late Afternoon Chilling! :D
Starting with the completely closed off linework, I magic wand select everything outside the sketch and then invert the selection. After that I usually do some small cleanup around the edges of the selection, soften (feather) it, make a new layer and fill it with a solid Lucy Color (a shade of orange). This layer will be the base that I clip all other layers onto.
When that is done I put down some flat colours. I usually put objects that are not part of the character on separate layers, sometimes even the tail. In this case her sweatpants are on a separate layer.
The next step is basic shading. Doing this is very straight forward. I just pretend to be the light source and shade parts that turn away from me a bit darker. You can see a bit more details about it on the right side! :>
When the basic shading is done I usually add the shadow layer.
This one is just a multiply layer that I set it up in a way that it only appears on Lucy (Layer Groups and the tag “Inherit Alpha” in Krita).
On this layer I block out the shadows in a warm grey tone. Sometimes I make the shadows a bit lighter on round areas, like in this case on her boobies and belly. I also add some additional darkness to the occlusion areas.
Occasionally it is more convenient to add a Transparency Mask than erasing and adding onto the layer directly, especially when I have hard edged shadow patterns like in this piece.
The Transparency Mask is pretty much an additional visibility layer that gets “glued” onto an existing layer or layer group. On that layer you can paint areas that should be visible white and areas that you want to be invisible black. In this case I wanted the light strip NOT be part of the shadow, so I painted it in black.
This already looks very cool but I wanted it to pop more so I added the following layers with these layer blending modes:
color dodge layer /color dodge
reflected light layer /normal
glow layer /normal
god rays /normal
dust particles /normal
slight vignette effect /multiply
I kept the background very simple in this piece. It is just a few shapes round shapes hinting at blankets and pillow and parts of a wall. I also added a multiply shadow layer.
And this sums up my work process. I do this more or less for each piece I paint. Sometimes the order varies a bit though. On some pieces I block in the background early on, and on others I add additional effect layers (or goop).
I hope you enjoyed this long explanation! :D
SniffSnorf
2025-05-21 18:21:46 +0000 UTCSniffSnorf
2025-05-21 18:18:13 +0000 UTCFibinochi
2025-05-21 18:01:21 +0000 UTCSeruph
2025-05-21 16:33:07 +0000 UTCC_Barkin
2025-05-21 16:14:02 +0000 UTCSniffSnorf
2025-05-21 15:22:16 +0000 UTCSniffSnorf
2025-05-21 15:21:08 +0000 UTCLord Nobleheart
2025-05-21 15:19:53 +0000 UTCCassius Marine
2025-05-21 15:11:32 +0000 UTC