There was a request on Twitter that I talk about how I take my traditional piece and process it digitally. It was in response to my Draw 6 Fanart picture, so I'll assume that the question was directed at that process specifically as I do things a million different ways and styles.
Pic 1

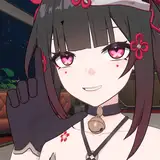
I start with a basic black and white scan done at 300dpi. Here you can see the pencils mostly erased, I've used whiteout and a white gel pen to fix mistakes and stuff. On the right is the Levels tool found in Photoshop under Image -> Adjustments -> Levels.
Pic 2

By playing around with those triangles I push the darks darker, and the lights lighter. Notice how the dull gray that was the paper is now white, and my line art is bolder. I chose not to make the lines 100% black because I wanted to keep the kind of watery texture it has for when I color it.
Pic 3

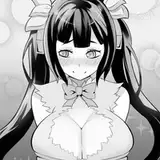
After adjusting the values, I go in and fix up details manually. Just more basic stuff like fixing anatomy and proportions, line breaks, smudges, etc etc. Note the eyes, belly, and arm. I also drew a line at the bottom of her to "seal" the outline. That way I can just use the magic wand tool without any headaches. At this point I use the "add layer style" function on the line art layer. I use a "color overlay" and pick a color I feel would match the character. It's nice because you can edit that at any time for any adjustments you want.
Pic 4

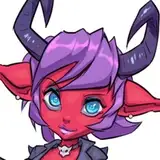
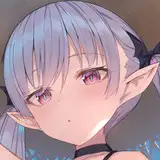
Pretty simple here as well. I mask off the character using the magic wand tool and I just plop colors down on a Multiply layer. What's nice is that the lines pick up a bit of the color too and adds variety instead of just black/gray throughout.
Pic 5

After my basic colors are down, I add a new layer and keep it on "normal". I lay down highlights and shadows (though not really any shadows on this pic) and use the color picker (which is bound to a button on my stylus for super easy access) to blend.

By setting the color picker to "All Layers" it lets me pick up the color that I see, instead of the color on the layer itself. Selecting "Current Layer" only lets you pick colors that exist on the active layer, and the rest of the options are pretty self explanatory from there.
So I just paint over what I've made so far.
Pic 6

This part is subtle, but after I'm done I select the whole image, Copy Merged (so it grabs the image as I see it), and paste in place. I set the layer as "Soft Light", apply a gaussian blur, and adjust the opacity of the layer as needed.
This is an incredibly awful and lazy way to do things, but it gives the picture an easy final polish. Honestly you shouldn't even need this step, but my color skills are weak and it's a easy way to push a picture to that next level of contrast.
And that's it. Sometimes I'll add another multiply layer on top of this picture and add heavier shadows, then add another normal layer on top of that and paint right over the picture again adding more details and refining colors. Sometimes I'll repeat those two steps 3 or 4 times, layer after layer building up the picture like a painting.
James Dougell
2020-04-13 22:31:08 +0000 UTCCreepette
2020-04-13 22:19:03 +0000 UTC