Hey, everyone! The Amazon Arrow graphic novel crowdfunding campaign is coming up in just a few days! I'm making final tweaks to my campaign graphics and coloring images around the clock. I'm not sure exactly when the launch date will be, but I am expecting it to kick off before the end of this month!
Throughout the last year I've learned quite a bit about different approaches to digital illustration in an effort to find the "look" that I wanted for the AA graphic novel. I can't just print my usual 3D renders straight out of DAZ or Poser because the colors are too muddy, it looks too generic, and it doesn't really feel like comic book art. Likewise, I can't expect to master all aspects of comic book penciling, inking and coloring overnight when it takes artists an entire lifetime to hone just one aspect of that craft. That said, as a digital artist and Photoshop whiz, there is a lot that I can do to "cheat" and create something that looks pretty darn good by combining multiple techniques.
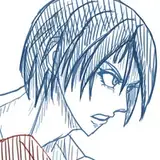
What you see here is basically the fourth step in my process.
1) Sketch and compose the page in Photoshop (though I guess this could be done on paper)
2) Pose my characters and render in low resolution from DAZ or Poser. These renders are really bad and really fast, but they show me perspective and where everything fits on the page.
3) Import into Clip Studio Paint, scale up to high resolution and draw the contour lines (see line art version linked below that I posted a few days ago). (FYI: There are filters that can do this, but they all suck and look like filters. This is a time consuming step, but there really is no valid short cut. This could alternatively be done in Photoshop, but the drawing tools in Clip Studio Paint feel more natural in my opinion, and I love drawing on my iPad)
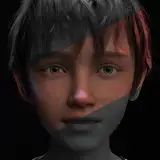
4) Combine the render and the line art in Photoshop, touching things up, moving things around, adjusting values and position to accommodate word balloon locations, etc. This results in a black and white "digital underpainting" that tells me generally where shadows and highlights will be. With everything on its own layer, I can adjust on the fly. For example, I can bring in more texture from the render, or redraw the texture if it's too fuzzy from scaling it up, or replace the texture from a photo or scan, or I can bring the line art up if it's needed to define a form, or I can wash the lines out if it interferes with a highlight. Basically, this is where I can use my Photoshop magic to compensate for the limitations in my traditional artistic skills. This could all probably be done in Clip Studio Paint, but I have far more compositing experience in Photoshop and it's faster for me to do it there.
5) Import the underpainting back into Clip Studio Paint and digitally paint and/or color the page over the underpainting. The result (which I'll probably post tomorrow) is (hopefully) something that looks like my 3D characters, but in a 2D, high-resolution, printable format that looks a little more like a modern comic book that would normally be created by a team of people that are far more specialized than I am.
Then I add the word balloons and lettering, and repeat the above steps 64 - 80 times until I have a completed graphic novel!