Hey everyone! Here's another animated base + tutorial to play with! You will require a program that allows you to arrange frame sequences but this can be at your preference!
(I highly suggest starting with something simple and free, here's a list of a few to research: https://learn.g2.com/free-animation-software )
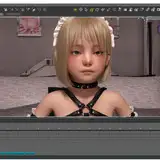
In this tutorial I will be working with Paint Tool SAI for the illustrations, and Photoshop CS5 for the animation. The base is available in the attachment tab!
PLEASE MAKE SURE TO GIVE MY OTHER ANIMATION TUTORIAL A LOOK FOR TIPS AND TRICKS AS WELL!! -- > https://www.patreon.com/posts/10-step-tutorial-37049876

Animation bar in photoshop: Window (tab) > Animation  (Depending on your program the layout may vary slightly, but the features are generally the same)
STEP 1

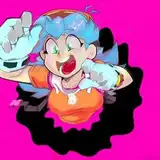
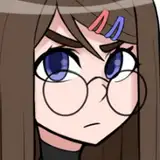
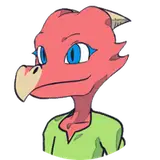
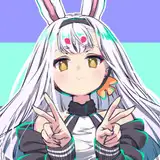
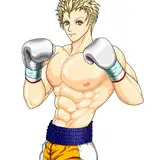
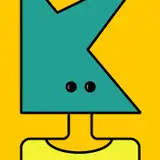
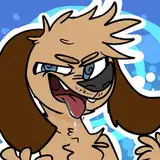
Open the base in your drawing program and customize pose 1 & 2 to your liking! This base includes some bonus body part sketches which you can add and finish off to get your desired look! You are also free to trace over or redraw the base provided if the design differs a lot from the base look, treat it like a skeleton! c:
Brush settings are also visible in the image above to get the new/ additional line art to match up!
STEP 2

Once you have customized each pose you can tidy up the file and delete any folders/files you didn't use so you just have POSE 1 and 2. Make sure to merge pose 1's folder and pose 2's so you have just 2 layers (each pose as individual layers). You will now need to make duplicates of each layer, amounts needed:
5 copies of POSE 1
3 COPIES OF POSE 2
The next step will explain placement and visibility!
STEP 3

Now that you have your duplicate layers you can start animating! You will need to place each layer in the correct position and turn off all layers that are not 'active' in the frame.
For example, frame 1 should only have have the first layer visible / switched on, frame 2 should only have the second and so on! For position, you will need to move each layer slightly away from the first layer, example can be shown below of what it will look like with all the layers on:

You can see that I move them just to the side going counter clockwise with each layer placement.

Now here's how it looks with the only 1 layer per frame! With photoshop you need to make sure each frame only contains layers that you want visible. I have intentionally slowed the frames down to 1 second on these pieces, for a nice jittery effect you will need to change it to 0.1 of a second OR 'No delay' for each frame.

To change the speed on photoshop just click on the small triangle next to the speed number! No delay gives the best jittery effect and can be seen below:

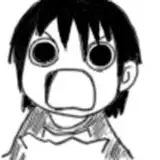
This is how it should look so far! Pent up and ready to do big screm!! >:3
STEP 4

We are now going to add post 2! Same procedure as before, move your duplicates around slightly to line everything up for the jitter look! You may also want to lengthen your animation by repeating the same frame sequences. I personally have each pose sequence lined up twice.
Below you can compare the two (with and without extended sequence) to see the difference:

Without extended sequence (About 8 frames)

With extended sequence (About 16 frames, plays each pose sequence twice)
To get a longer build up or scream just repeat the frame sequence 3 or 4 times. You will need to play around with this until you get your desired animation length!
TIPS AND POINTERS

When saving your gif files please make sure to choose 'save for web and devices' otherwise your gif will not animated and save flat like a .png.
It is always good to save copies as you go to see the progression of your animation! These will be to test out speeds, sequences etc and see what looks best!

A new window will pop up once you click it, this is the settings you will want! Make sure that you click 'original' as it will open on 'optimized' as default.
Open your animation and test it! See how it looks, if you are happy with the speed you are now complete! If not, go back into the file and adjust the frame times, you may find something that looks nicer to you!
- - - - - - - - - - - - - - - - - - - - - - - - - - - - - - - - - - - - - - - - - - - - - - - - - - - - - - - - - - - - - - - - -
TIPS AND REVIEW
You are more than welcome to redraw all the assets or simply just re-colour them! For this kind of animation I suggest little to no shading as well as it can take away from the simplistic look of the piece.
BASE GUIDE / RULES
- File is PSD, should work in most drawing programs
- Do not redistribute the base outside of Patreon
- You are free to either 'colour in' the base or redraw the piece (Trace over)
- You are free to add/ change / remove features of the character to resemble desired look! - You are free to change the species from the original base
- You are free to ask a colleague / artist to help with the base so long as its within our members.
- Make sure to check if the layer is locked/unlocked if you are experiencing issues.
SHARING RULES
- Completed compressed copy of the base can be shared online. (Your completed copy)
- PSD file can only be shared among Patreon members / Modified by Patrons only.
If you have any trouble using the base or need further explanation on a particular part of the tutorial please comment below! Enjoy!! ^^