Good evening, my dears. I am happy to introduce you to the process of creating art, which was made as a gift to my beloved wolf.
This time I will pay a little more attention to the creation of the location, I think it's curious.
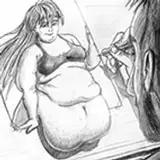
1. So, first there was an idea. We like something about light BDSM, and I thought to depict such a scene right in our apartment. It turned out to be such a rough sketch (this is me lying on our sofa, and a wolf with a whip):

2. I wanted to make the scene look like our house so much that I was not too lazy and modeled it in sufficient detail in the Blender program. Here you see the original:

It is at this computer on the right (near the window) that I am writing this text for you right now 😎
And here's what I modeled (from a different angle):

I really wanted to fit two stuffed toys from Ikea into the scene, which are very valuable for us as part of our common history. These are the Djungelskog orangutan and Ratta mouse.
An interesting detail: on the wall I have this portrait of me, painted with watercolor paints by my good friend 😼

I even placed it on the first version of the render, but then replaced it.
The first version of the render turned out like this (all sorts of lines on us are technical things that don't play a special role here, and I'll remove them later).

3. Looking at the render, I draw a detailed sketch. I do not circle the render exactly and draw only roughly focusing on the source, this gives the drawing artistry.

4. I make a neat linart.

5. I paint with flat colors. Please note that I abundantly add blush wherever possible (and especially on the ass, with red lines from the whip), it adds life and warmth.

6. Additionally, I create separate layers with fills of different parts of the body. Thus, I can select, for example, one leg or a strand of hair with a simple mouse click to work only in it (or only around it).
This greatly speeds up further work, eliminating the need to carefully select these areas each time when something needs to be done with them.

7. Suddenly I thought that two paintings with our portraits were not funny. Maybe I'll make a parody of some of the famous paintings, but with us instead of the characters?
And I found this beautiful "American Gothic", where I tried to convey the emotions of the original in our muzzles. In my opinion, it turned out to be fun 😄

In full size you can see this art here: https://www.patreon.com/posts/picture-on-wall-68007487
8. I devoted a lot of time to the interior, because the original version did not suit me. I made the framing around the bedroom door more detailed, replaced the painting, moved the glass, removed the street light from the curtains, adjusted the curtains themselves and corrected the mouse paws.

As a result, it was a lot of work, and perhaps you will still see us (and our entertainment) in these apartments 😉
9. The Blender program has the ability to render not only the main picture, but also some additional information. For example, what is called "Mist" there, information about the depth of the scene.
You can see it at the top left in these screenshots:

I use this black and white picture in Photoshop as a mask to work separately on the front objects and on the background.
I wanted to add a lot of green color to the background so that our red body parts look even brighter =^_^=
10. A rather difficult stage of drawing is the creation of a detailed volume.
I use a render image from a Blender as a basis (as a rough blank), and manually in Photoshop I correct it with transformation tools and a brush so that, firstly, it corresponds to my lineart, and secondly, it transmits all the bends of joints, muscles, strands of hair, etc. (it's good when there is knowledge of anatomy)


In these pictures, my "volume" goes beyond the lineart, but it's not scary because then I'll limit it all with a mask
11. Additionally, I add a layer with shadows in depth, this increases the feeling of depth in the final picture. This layer will be apply in "Multiply" mode

12. My favorite stage is where I apply the resulting volume layer to the underlying layers with a flat color.
I duplicate the volume layer 3 times and apply them in the "Multiply", "Soft Light" and "Normal" modes (with different degrees of transparency) as in the screenshot below:

The result is this picture:

13. I add highlights to eyes and hair.

14. Then I apply general color correction, add some edits, and then the main thing is my "branded" effects.
Chromatic aberration adds a "photo effect" to the image (as if lens lenses were used, adding a colored areole around the color boundaries).
Noise adds apparent detail and the effect of film grain.

I wrote more about these effects (and how to apply them) here: https://www.patreon.com/posts/why-do-i-apply-3-62901818
And we have everything ready! It turned out to be a wonderful gift that my wolf liked as much as the opportunity to realize what was drawn 😇

You can see the full size of the result here: https://www.patreon.com/posts/happy-birthday-3-68007169
And if you want to see all the "insides" of the source code, then here is a link to the archive with a PSD file with all the layers and overlay modes described here:
https://disk.yandex.ru/d/s6WI337WReMZtA
I hope it was interesting and useful for you. See you soon! 😉
Kotyami
2022-07-23 23:01:48 +0000 UTCKiko
2022-07-23 22:49:25 +0000 UTC