I really enjoyed drawing this mouse, and the result got a lot of likes from you. Therefore, I decided to show the process of working on this art, and at the same time tell you about a quick way to create a background.
First of all, I note that the idea was to please you with the look of this skinny ass. You know, that kind of slim build when there is a big gap between the legs, and the hole between the buttocks is clearly visible. I love this!
So, how did I do it.
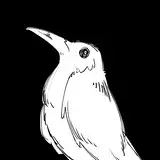
1. Since this art does not imply any complex composition, I decided to start right away with a 3D model. I already had the head of this mouse (I made the head myself using sculpting tools in a Blender), and I added a simple pose created by the DesignDoll program to it. It turned out like this:

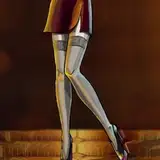
2. Environment and background. I wanted our hero to be on some abstract street, but at the same time make the background as blurry as possible, "out of focus". Since the background is blurred, there is no difference for the result whether I will model it myself (which would take a lot of time) or just take the finished photo. But in the case of photography, I would have to set the stage lighting so that it roughly corresponds to the photo.
Instead, there is a very handy tool for 3D programs like Blender: HDRI maps of the environment. These are panoramic photographs that serve as an environment around our 3D objects, and in addition, they are a light source. Thus, the light falling on our model will immediately be perfectly combined with what we see in the background.
There are many sites where such environment maps can be found for free. But I like the "BlenderKit" service most of all, because it is embedded inside the Blender program as an Addon, and you can add objects, textures and environment maps without leaving the program window.
This is how it looked in my case: by searching for the word "street", I found a suitable environment map and applied it to the scene.

3. The final render looks like this (the background was also rendered separately)

4. We have finished in 3D and are moving to Photoshop. Here I draw a sketch.

Although I look at the general forms of the render, but the lines of my sketch are more artistic. The sketch lines do not follow exactly the contours of the render. This makes the drawing livelier, more artistic and sexier.
At the same stage, I outline the anatomy so that in the future it will be easier to draw the details of the volume.
5. Based on the resulting sketch, I make a lineart.

6. I immediately make a breakdown of the drawing into separate areas, so that in the future I can select, for example, only the hand or only the ear in one click and work separately with each detail. This saves a lot of time in the following steps.

7. My next task is to adjust our render to the resulting linart. Here I manually draw all the details on top of the render image: bone protrusions, muscles, butt folds, etc.

8. I draw flat colors separately. Everything is simple here. As usual, I add a good portion of blush to add more life and warmth.

9. What we got at stage 7 (detailed image of the volume) I duplicate several times (so that I get several layers) and overlay them on top of a flat color in different blending modes (in the name of each layer I specified the blending mode and the degree of opacity):

It's a little difficult, but it gives a very good result.
10. On top of everything that turned out, I add highlights. Basically it's glare on the eyes and reflections around the hole in the ass, but here I decided to add a little extra illumination on the body too. This is how the highlights look separately from the other layers:

11. I add color to the linart and we are almost ready. You can see this in file #1.

12. For file #2, I merge everything into one layer and work on the final effects. For example, this is chromatic aberration (I wrote more about this a couple of months ago). See how much more interesting this part of the body looks with this effect.

13. At the end, I apply a little transformation (to correct the pose), make small adjustments to the background, add a little noise and darkening at the edges. And we have everything ready!

You can see the final result in the maximum size here: patreon.com/posts/sweet-booty-66889598
You can download the PSD source of this art from the following links:
File #1: https://disk.yandex.ru/d/JinWianKldIgKA
File #2: https://disk.yandex.ru/d/EcJVIY05cYJsog
I hope it was useful and interesting for you. See you soon! 😉
Kotyami
2022-05-30 03:56:10 +0000 UTCSlikfiji
2022-05-29 22:17:23 +0000 UTC