


SkebгБІгГ™гВѓгВ®гВєгГИгБДгБЯгБ†гБДгБЯгГђгГЖгВ£гВЈгВҐгБ°гВГгВУгБЃеИґдљЬйБОз®ЛгБІгБЩ
иИИеС≥гБМгБВгВМгБ∞гБЬгБ≤гАБйБОеОїгБЃи®ШдЇЛгВДжФѓжПіиАЕйЩРеЃЪи®ШдЇЛгВВгБФгВЙгВУгБПгБ†гБХгБД
еИґдљЬжДПеЫ≥гВДдЄЦзХМи¶≥гБ™гБ©гБЃгВ≥гГ°гГ≥гГИгБЃгБїгБЛгАБpixivгВДtwitterгБІеЕђйЦЛгБЧгБЯгВВгБЃгБ®гБѓйБХгБЖзµµгВВи¶ЛгВМгБЊгБЩгВИ
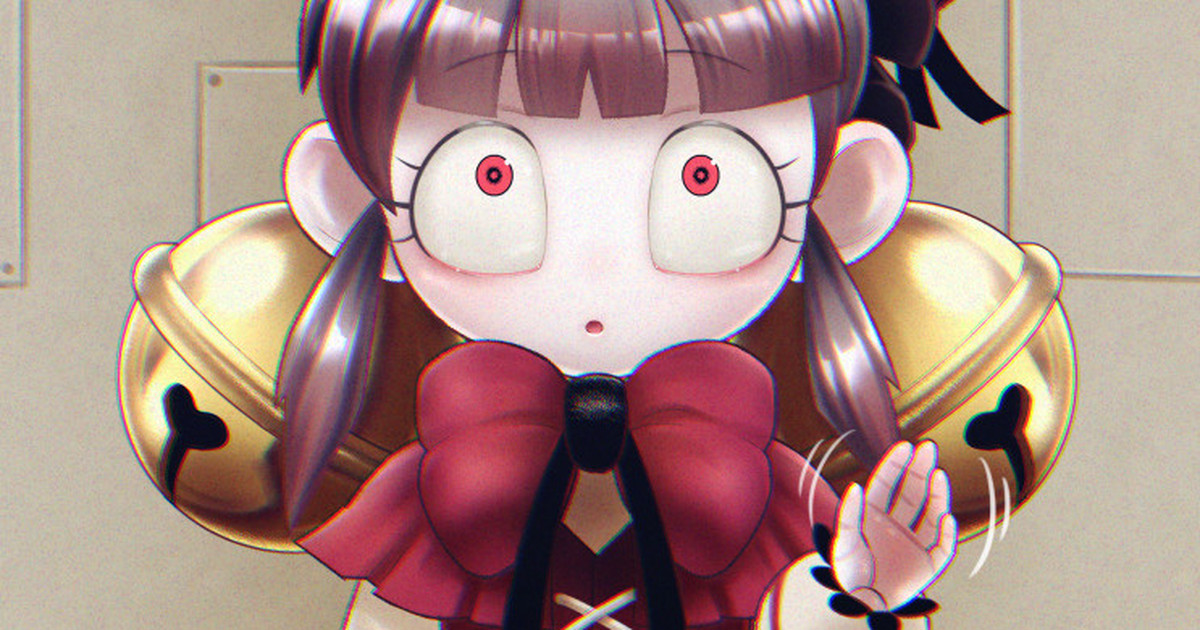
This is the production process of Lobotomy Corporation's "Laetitia",
which was requested by Skeb.
If you are interested, please read the past articles and limited articles.
You can also see his comments on his production intentions and worldview, as well as pictures that are different from those published on pixiv and twitter.
гГЉгГЉгГЉгГЉгГЉгГЉгГЉгГЉгГЉгГЉгГЉгГЉгГЉгГЉгГЉгГЉгГЉгГЉгГЉгГЉгГЉгГЉгГЉгГЉгГЉгГЉгГЉгГЉгГЉгГЉгГЉгГЉгГЉгГЉгГЉ
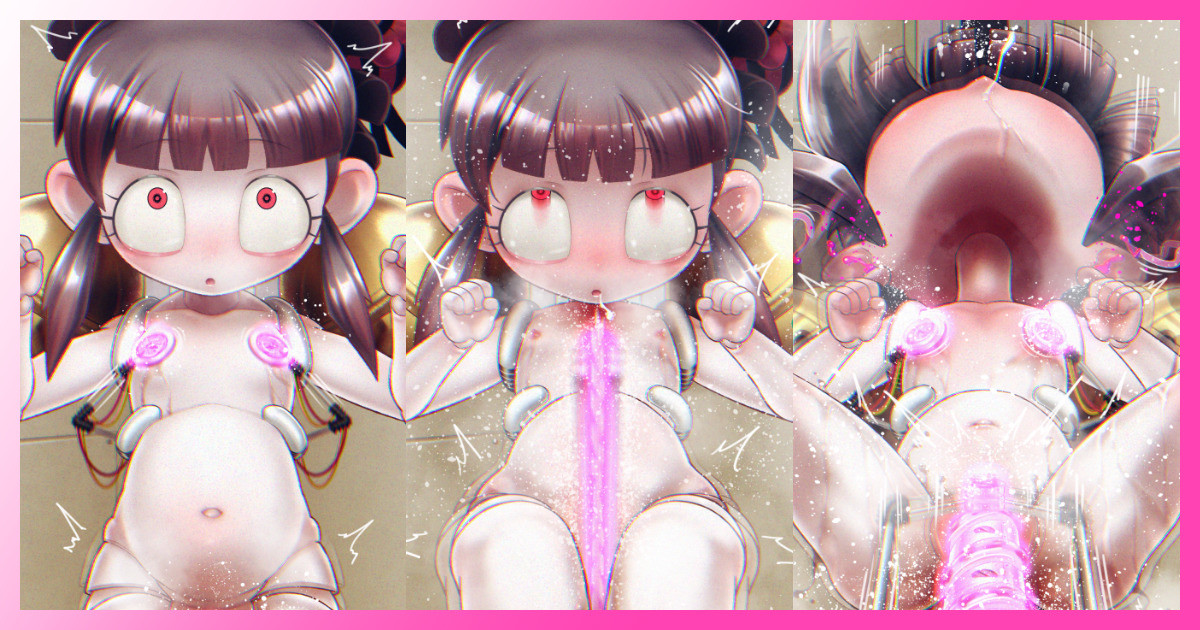
1.ж°ИеЗЇгБЧ Ideas
дїКеЫЮгБѓгВ≤гГЉгГ†гБЃи®≠еЃЪгБМжЈ±гБПйЦҐгВПгВЛгВВгБЃгБ†гБ£гБЯгБЃгБІ
гВѓгГ©гВ§гВҐгГ≥гГИгБХгВУгБЃи¶БжЬЫгБ®гВ≤гГЉгГ†еЖЕгБЃи®≠еЃЪгВТгБЩгВКгБВгВПгБЫгВЛгБЯгВБгБЂ
гБ©гВУгБ™и©±гБЃжІЛжИРгБЂгБЩгВЛгБЛ гБ©гВУгБ™гВ®гГГгГБгБ™гВЈгГБгГ•гВ®гГЉгВЈгГІгГ≥гБЂгБЩгВЛгБЛ
гВҐгВ§гГЗгВҐгВТгБДгВНгБДгВНеЗЇгБЧгБЊгБЧгБЯ
(жЦЗе≠ЧгБѓгГ™гГУгГЙгГЉгБМжЇҐгВМгБЩгБОгБ¶гБДгБ¶гБ°гВЗгБ£гБ®гБѓгБЪгБЛгБЧгБДгБЃгБІгБЉгБЛгБЧгБЊгБЧгБЯ)
This time, the game's setting was deeply involved, so in order to reconcile the client's requests with the game's setting, I provided various ideas for the story structure and the erotic situations.
(I blurred the text because it was a bit embarrassing because it was overflowing with libido)
гГЉгГЉгГЉгГЉгГЉгГЉгГЉгГЉгГЉгГЉгГЉгГЉгГЉгГЉгГЉгГЉгГЉгГЉгГЉгГЉгГЉгГЉгГЉгГЉгГЉгГЉгГЉ
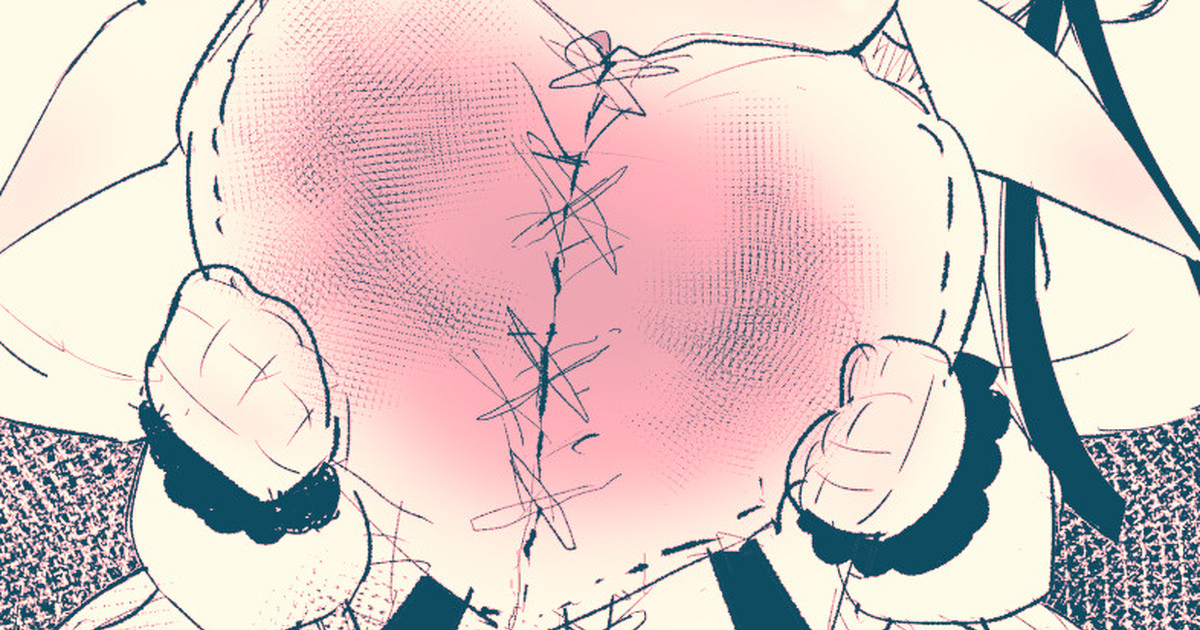
2.дЄЛжППгБН rough sketch
дїКеЫЮгБѓжІШгАЕгБ™гВЈгГЉгГ≥гБМгБВгБ£гБЯгБЃгБІ зі∞гБЛгБПеЛХгБПгВИгБЖгБЂ
гБУгБЃгБВгБ®зі∞гБЛгБПгГСгГЉгГДгВТеИЖгБСгБ¶ еИ•гАЕгБЃгГђгВ§гГ§гГЉгБЂгБЧгБЊгБЩ
(йИігГїи°®жГЕгГїй†≠гГїиГідљУгГїиЕХгГїжЙЛгГїиДЪгГїж©ЯжҐ∞)
In this case, there were various scenes, so we wanted to make it move in detail.
After this, the parts are divided into separate layers.
(bell, facial expression, head, torso, arms, hands, legs, machine)
гГЉгГЉгГЉгГЉгГЉгГЉгГЉгГЉгГЉгГЉгГЉгГЉгГЉгГЉгГЉгГЉгГЉгГЉгГЉгГЉгГЉгГЉгГЉгГЉгГЉгГЉгГЉ
3.зЈЪзФї line drawing
еИ•гАЕгБЂгГђгВ§гГ§гГЉгБЂеИЖгБСгБ¶жППгБДгБЯзЈЪзФїгБІгБЩ
гБУгБЃдїЦгБЂгВВгВЈгГЉгГ≥гБФгБ®гБЂеИ•гБЃеЛХгБНгБЃзЈЪзФїгВВжППгБНгБЊгБЩ
Line drawings drawn in separate layers.
In addition to this, I also draw line drawings of different movements for each scene.
гГЉгГЉгГЉгГЉгГЉгГЉгГЉгГЉгГЉгГЉгГЉгГЉгГЉгГЉгГЉгГЉгГЉгГЉгГЉгГЉгГЉгГЉгГЉгГЉгГЉгГЉгГЉ
4.йЕНиЙ≤ color scheme
и≥ЗжЦЩгБ®зЕІгВЙгБЧеРИгВПгБЫгБ¶гГСгГЉгГДгБФгБ®гБЂгГЩгГЉгВєгБЃиЙ≤гВТдєЧгБЫгБЊгБЩ
еРДгГђгВ§гГ§гГЉгБЃдЄКдЄЛйЦҐдњВгВТиАГжЕЃгБЧгБЊгБЩ
йИігВДйЦҐзѓАгБѓе••(гГђгВ§гГ§гГЉдЄЛ)
дЄ°жЙЛгВДж©ЯжҐ∞й°ЮгБѓжЙЛеЙН(гГђгВ§гГ§гГЉдЄК)гБЂгБ™гВКгБЊгБЩ
и°®жГЕгБЃгГСгГЉгГД(зЬЙжѓЫгВДгБЊгБ§жѓЫгГїгБПгБ°)гВВеИ•гГђгВ§гГ§гГЉгБЂжППгБНеЕ•гВМгБЊгБЩ
Place a base color on each part in reference to the materials.
Consider the top and bottom relationship of each layer.
Bells and joints are at the back (bottom of layer)
Hands and machinery will be in the front (on the top layer).
Facial parts (eyebrows, eyelashes, mouth) should be painted on a separate layer.
гГЉгГЉгГЉгГЉгГЉгГЉгГЉгГЉгГЉгГЉгГЉгГЉгГЉгГЉгГЉгГЉгГЉгГЉгГЉгГЉгГЉгГЉгГЉгГЉгГЉгГЉгГЉ
5.ељ±еЕ•гВМ cast a shadow
вЖУељ±еЕ•гВМ1жЃµйЪОзЫЃ Shadowing 1st stage
вЖУзЮ≥гГїиЙ≤зЈЪињљеК† Eyes and color line added
вЖУељ±еЕ•гВМ2жЃµйЪОзЫЃ Shadowing 2nd stage
еЕЙжЇРгБЃеЉЈгБХгГїдљНзљЃгГїз®Ѓй°Ю(жЩЃйАЪгГїй†≠дЄКгГїиЫНеЕЙзБѓ)гВД
гБ©гВУгБ™зТ∞еҐГгБЂгБДгВЛгБЃгБЛ(йГ®е±ЛгБЃдЄ≠)
еѓЊи±°гБЃи≥™жДЯ(䯯嚥гГїйИігГїйЦҐзѓАгБѓеЫЇгБДзі†жЭР)
гБ™гБ©гВТиАГгБИгБ™гБМгВЙ гБЭгВМгВЙгБЂеРИгБ£гБЯељ±гВТ2жЃµйЪОгБІзљЃгБДгБ¶гБДгБНгБЊгБЩ
зЮ≥гБЃдЄ≠гВДгБКгБЄгБЭгАБйЦҐзѓАгБЃзЈЪгБ™гБ©гВТиЙ≤гБІжППгБНгБЊгБЩ
What is the intensity, position and type of light source? (normal, overhead, fluorescent)
What kind of environment is the subject in (inside a room)?
What is the texture of the object? (doll, bell, hard material for joints)
I place the shadows in two stages while considering these factors.
Paint the eyes, navel, joint lines, etc. in colors.
гГЉгГЉгГЉгГЉгГЉгГЉгГЉгГЉгГЉгГЉгГЉгГЉгГЉгГЉгГЉгГЉгГЉгГЉгГЉгГЉгГЉгГЉгГЉгГЉгГЉгГЉгГЉ
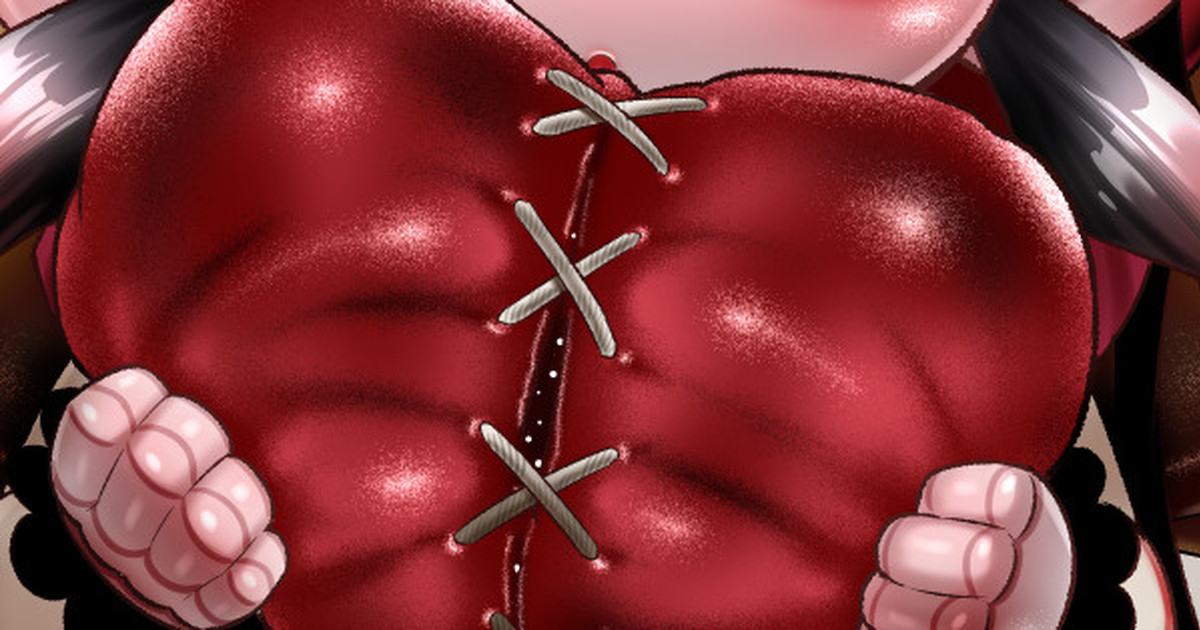
6.赧гБњгГїгГПгВ§гГ©гВ§гГИ Reddish/Highlight
жЯФгВЙгБЛгБЭгБЖгБ™гБ®гБУгВНгВДйЦҐзѓАгБЂиµ§гБњгВТеЕ•гВМгБЊгБЩ
йЂ™гБЃжѓЫгВДйИігБЃгГПгВ§гГ©гВ§гГИгБѓдЇЇеЈ•зЙ©гБ£гБљгБПеЫЇгВБгБЂ
иВМгВДзЮ≥гВВдЇЇйЦУгБЃгВВгБЃгБ®гБѓйБХгБЖгБ°гВЗгБ£гБ®з°ђгБДзі†жЭРжДЯ
гВТжЉФеЗЇгБЩгВЛгВИгБЖгБ™гГПгВ§гГ©гВ§гГИгВТеЕ•гВМгБЊгБЩ
Add reddish color to soft areas and joints.
The highlights in the hair and bells are hardened to look artificial.
Highlight the skin and eyes to give the impression of a hard material that is different from human skin and eyes.
гГЉгГЉгГЉгГЉгГЉгГЉгГЉгГЉгГЉгГЉгГЉгГЉгГЉгГЉгГЉгГЉгГЉгГЉгГЉгГЉгГЉгГЉгГЉгГЉгГЉгГЉгГЉ
7.ж©ЯжҐ∞гВТзµ±еРИ Machine Pictures and Integration
еРМжІШгБЃе°ЧгВКжЦєгБ™гБЃгБІзЬБзХ•гБЧгБЊгБЩгБМ
еИ•гБІе°ЧгБ£гБ¶гБКгБДгБЯж©ЯжҐ∞гВТдЄКгБЃгГђгВ§гГ§гГЉгБЂдєЧгБЫгБЊгБЩ
гГЦгГђгБЃеКєжЮЬгБѓClipStudioгБЃгГХгВ£гГЂгВњгГЉж©ЯиГљгВТдљњгБ£гБЯгВК
йЬЗгВПгБЫгБЯгБДйГ®еИЖгВТгВ≥гГФгГЉгБЧгБ¶ дЄНйАПжШОеЇ¶гВТдЄЛгБТгБЯгВВгБЃгВТ
гБДгБПгБ§гБЛи≤ЉгВКеРИгВПгБЫгБЯгВКгБЧгБ¶и°®зПЊгБЧгБ¶гБДгБЊгБЩ
The same painting method is used, but a machine that has been painted separately is placed on the top layer.
The shaking effect is achieved by using ClipStudio's filter function, or by copying and pasting together several copies of the part to be shaken with reduced opacity.
гГЉгГЉгГЉгГЉгГЉгГЉгГЉгГЉгГЉгГЉгГЉгГЉгГЉгГЉгГЉгГЉгГЉгГЉгГЉгГЉгГЉгГЉгГЉгГЉгГЉгГЉгГЉ
8.иГМжЩѓ Background
вЖУдЄЛжППгБН rough sketch
вЖУзЈЪзФї line drawing
вЖУиЙ≤е°ЧгВК coloring
иГМжЩѓгБѓж°ИеЗЇгБЧгБЃгБ®гБНгБЂжППгБДгБЯгВВгБЃгВТ жЛ°е§ІгБЧгБ¶дЄЛжППгБНгБЂгБЧгБЊгБЧгБЯ
зЫізЈЪгГДгГЉгГЂгБІзЈЪгВТеЉХгБПгБЃгБІгБѓгБ™гБП еЃЪи¶ПгГДгГЉгГЂгВТдљњгБ£гБ¶зЈЪгВТеЉХгБДгБ¶
еОЯдљЬгБЃгВҐгГКгГ≠гВ∞гБ£гБљгБДиГМжЩѓгВТи°®зПЊгБЧгБЊгБЧгБЯ
еОЯдљЬгБЃйЫ∞еЫ≤ж∞ЧгВТеЗЇгБЩгБЯгВБгБЂ ељ©еЇ¶гБЃдљОгБДиЙ≤гБІе°ЧгВКгБЊгБЩ
The background is an enlarged draft of the drawing I did when I was working on the idea.
Instead of drawing lines with the straight line tool, I used the ruler tool to draw lines to express the analog-like background of the original work.
To create the atmosphere of the original work, the background is painted with low saturation colors.
гБДгВНгВУгБ™ж©ЯжҐ∞гБМзЩїе†ігБЩгВЛгВЈгГЉгГ≥гБМгБВгВЛгБЃгБІ
гБУгБУгБ†гБСеИ•гГСгГЉгГДгБ®гБЧгБ¶жППгБДгБ¶йЦЛйЦЙгБІгБНгВЛгВИгБЖгБЂгБ™гБ£гБ¶гБДгБЊгБЩ
Since there are scenes in which various machines appear, this hatch is depicted as a separate part and can be opened and closed.
гГЉгГЉгГЉгГЉгГЉгГЉгГЉгГЉгГЉгГЉгГЉгГЉгГЉгГЉгГЉгГЉгГЉгГЉгГЉгГЉгГЉгГЉгГЉгГЉгГЉгГЉгГЉ
9.зТ∞еҐГеКєжЮЬ Environmental effects
вЖУиГМжЩѓзµ±еРИ background integration
вЖУзЕІжШОгБЂгВИгВЛиРљгБ°ељ±гБЃињљеК† Adding falling shadows by lighting
вЖУзТ∞еҐГеЕЙгВТињљеК†гГїи™њжХі Add and adjust ambient light
иГМжЩѓгБ®зµ±еРИгБЧгБ¶гБУгБЃзТ∞еҐГгБЃеЕЙгБЃеКєжЮЬгВТињљеК†гБЧгБЊгБЩ
ељ±гВТиРљгБ®гБЧ е∞СгБЧ赧гБњгБЃгБВгВЛиЙ≤гВТеЕ®дљУгБЃдЄКгБЂеИ•гГђгВ§гГ§гГЉгБІдєЧгБЫгБ¶
иГМжЩѓгБ®гБ™гБШгБЊгБЫгБЯгВК иЙ≤еС≥гВДеЉЈгБХгВТи™њжХігБЧгБ¶еОЯдљЬгБЃйЫ∞еЫ≤ж∞ЧгБЂињСгБ•гБСгБЯгВКгБЧгБЊгБЩ
Add the light effects of this environment to the person integrated with the background.
Drop the shadows and put a slightly reddish color on a separate layer over the entire image to blend it with the background.
Adjust the color and intensity to get closer to the atmosphere of the original work.
гГЉгГЉгГЉгГЉгГЉгГЉгГЉгГЉгГЉгГЉгГЉгГЉгГЉгГЉгГЉгГЉгГЉгГЉгГЉгГЉгГЉгГЉгГЉгГЉгГЉгГЉгГЉ
дї•дЄКгБІгБЩ
жЬАеЊМгБЊгБІи¶ЛгБ¶гБДгБЯгБ†гБНгБВгВКгБМгБ®гБЖгБФгБЦгБДгБЊгБЧгБЯ
That's all.
Thank you for watching until the end.
гГЉгГЉгГЉгГЉгГЉгГЉгГЉгГЉгГЉгГЉгГЉгГЉгГЉгГЉгГЉгГЉгГЉгГЉгГЉгГЉгГЉгГЉгГЉгГЉгГЉгГЉгГЉгГЉгГЉгГЉгГЉгГЉгГЉгГЉгГЉ
йЦҐйА£гГ™гГ≥гВѓ
вЖУгБУгБЃдљЬеУБгБЃpixivгГЪгГЉгВЄ pixiv page for this work
https://www.pixiv.net/artworks/108060659
вЖУгБУгБЃдљЬеУБгБЃSkebгГЪгГЉгВЄ Skeb page
https://skeb.jp/@spicepats/works/18
гГЉгГЉгГЉгГЉгГЉгГЉгГЉгГЉгГЉгГЉгГЉгГЉгГЉгГЉгГЉгГЉгГЉгГЉгГЉгГЉгГЉгГЉгГЉгГЉгГЉгГЉгГЉгГЉгГЉгГЉгГЉгГЉгГЉгГЉгГЉ
йЦҐйА£и®ШдЇЛ Related Articles

дїКжЬИгБЂеЛЯйЫЖгБЧгБЯSkebгГ™гВѓгВ®гВєгГИгБЃгВєгВ±гВЄгГ•гГЉгГЂгБІгБЩ гБЯгБПгБХгВУгБЃгБФењЬеЛЯгБВгВКгБМгБ®гБЖгБФгБЦгБДгБЊгБЧгБЯпЉБ жЙЛжХ∞жЦЩзД°жЦЩгБЃгВ≠гГ£гГ≥гГЪгГЉгГ≥гБЂеК†гБИгАБеИЭгВБгБ¶гБЃжЦєгВВе§ЪгБЛгБ£гБЯгБЯгВБ гВєгВ±гВЄгГ•гГЉгГЂгВТи©∞гВБиЊЉгВУгБІгБЧгБЊгБДгБЊгБЧгБЯ еПЧй†ШгБІгБНгБ™гБЛгБ£гБЯжЦєгАЕгБЩгБњгБЊгБЫгВУрЯШФ ж∞ЧгВТиРљгБ®гБХгБ™гБДгБІгБПгБ†гБХгБДгБ≠ жђ°еЫЮгБѓ6жЬИдЄ≠гБЃеЛЯйЫЖгВТдЇИеЃЪгБЧгБ¶гБДгБЊгБЩ Here is the schedule ...
SkebгБЃгГ™гВѓгВ®гВєгГИгВТгБДгБЯгБ†гБНгБЊгБЧгБЯ Lobotomy Corporation гБ®гБДгБЖгВ≤гГЉгГ†гБЃгВҐгГЦгГОгГЉгГЮгГ™гГЖгВ£ гАМгГђгГЖгВ£гВЈгВҐгАНгБ°гВГгВУгВТеИґдљЬдЄ≠гБІгБЩпЉБ I received a request for Skeb I am working on a character named "Laetitia" for a game called "Lobotomy Corporation" гБµгБЕгГїгГїгГїдїКеЫЮгБЃгВњгВєгВѓгБѓиЙѓгБПгВВжВ™гБПгВВгБ™гБДгБСгБ©гГїгГїгГїдЄАењЬгГОгГЂгГЮ...
O-01-67гБЃеПОеЃєйБХеПНгБМзЩЇзФЯгБЧ гВєгВ±гВЄгГ•гГЉгГЂгБЂйБЕгВМгБМеЗЇгБ¶гБДгБЊгБЩ гВВгБЖгБЧгБ∞гВЙгБПгБКеЊЕгБ°дЄЛгБХгБДрЯЩЗ
SkebгБІгБЃдЊЭй†ЉгВТзіНеУБгБЧгБЊгБЧгБЯ гГ™гВѓгВ®гВєгГИ&гГЦгГЉгВєгГИгБВгВКгБМгБ®гБЖгБФгБЦгБДгБЊгБЧгБЯ! I've delivered the request on skeb! Thank you for your request and boost! гБУгБЃгГ™гВѓгВ®гВєгГИгБЃskebгГЪгГЉгВЄвЖУ Page for this requestвЖУ pixivгБЂжКХз®њгБЧгБЯгГЪгГЉгВЄвЖУ The page I posted on pixivвЖУ https://www.pixiv.net/artworks/108060659 пЉНпЉНпЉНпЉНпЉН...
SkebгБІгГ™гВѓгВ®гВєгГИгБДгБЯгБ†гБДгБЯгГђгГЖгВ£гВЈгВҐгБ°гВГгВУгБЃжЬ™еЕђйЦЛеЈЃеИЖгБЃдЄАйГ®гБІгБЩ вАїжЬђжЭ•гБЃзіНеУБгГЗгГЉгВњгБЃиІ£еГПеЇ¶гБІгБѓгБВгВКгБЊгБЫгВУ зіНеУБгБХгВМгВЛгГЗгГЉгВњгБѓгГ™гВѓгВ®гВєгГИгБЧгБ¶гБДгБЯгБ†гБДгБЯжЦєгБЂгБДгВНгБДгВНеК†еЈ•гБЧгБ¶гБДгБЯгБ†гБСгВЛгВИгБЖгБЂгБІгБНгВЛгБ†гБСе§ІгБНгБ™иІ£еГПеЇ¶гБІгБКжЄ°гБЧгБЧгБ¶гБДгБЊгБЩ Some of вАЬLetitiaвАЭ unpublished diffs requested on Skeb. вАїThis is not the o...
еС≥еЩМгВИгБЖгБЛгВУ
2024-09-16 19:10:10 +0000 UTC


