How to Bend Light
Added 2023-10-23 07:00:04 +0000 UTCBlack holes are arguably the most fascinating objects in the universe. Even though we can't see them directly, we can see the influence they have on the light passing around them, as they bend the spacetime and change the direction of light rays.
SpaceSim currently does not do a very good job rendering black holes. Using the raytracer, they are simply rendered as black opaque spheres. I wanted to improve the appearance of black holes and make it as realistic as possible, while also make the renderer as fast as possible. But how?
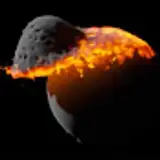
Black hole with an accretion disk, rendered with SpaceSim 0.3.

First, what I did NOT DO. I didn't make a general-relativistic renderer, tracing null geodesics in a spacetime of a Kerr black hole. This is the physically correct way to render black holes and it was successfully done for example by the DNGR Renderer, used to visualize the Gargantua black hole in the movie Interstellar. Unfortunately, it is not very useful for my purpose, because:
"Depending on the degree of gravitational lensing in an image, it typically takes from 30 minutes to several hours running on 10 CPU cores to create a single IMAX image."
Instead, I went with a much simpler solution. If the light ray is passing close to the black hole, it calculates the gravitational distortion and finds the first intersection with particles along this curved ray. There are a few corners I had to cut:
- No general relativity. I assume the light is bent by a Newtonian gravity source, which makes the ray hyperbolic.
- Only black holes affect light. Ideally, all particles should have an effect, but that's not computationally feasible.
- Finite radius of influence. The light is only bent if it gets close to the black hole, and it can only be bent by one black hole at a time. Rays passing far away from black holes are not affected in any way, which significantly speeds up the calculation.
The geometry describing the light ray deflected by the black hole is shown below.
Diagram showing the black hole in the center, the radius of influence as a black circle, and the light trajectory as a red curve.

Distance b between the center of the black hole and the line tangent to the light path is called the impact parameter. We measure it in units of the radius of influence, so that b=1 corresponds to light path being tangent to the sphere of influence. Angle φ is the angle of deflection. Zero means no deflection, 90° means the light is deflected to the perpendicular direction, etc.
Step 1: Deflection angle
Finding the path of an object flying around a source of gravity is known as a two-body problem and has an analytic solution - a hyperbolic trajectory. The direction of the object changes depending on how close to the black hole it passes. The angle of deflection can be calculated from the impact parameter using equation:
φ = 2 · atan(M/b) ,
where M depends on the mass of the black hole and the velocity of the deflected object, but for this purpose it is simply a constant. If the impact parameter is close to zero, the angle φ converges to π, i.e. a deflection by 180°, or a parabolic trajectory.
We can use the angle of deflection to determine the direction of the curved ray. Let's allow the light ray to pass through the sphere of influence and calculate the background color using the bent ray instead of the direct ray.

You can see that the black hole does not block the light from particles anymore and it correctly distorts the background, but it doesn't have any effect on particles yet.
Step 2: Tracing the curved ray
We can add the visual distortion of particles by modifying the ray that hits the black hole sphere. For this, it's necessary to calculate the point where the curved ray leaves the sphere of influence, which is again a simple geometry. Then, the pixel color can be evaluated by finding the first intersection of this secondary ray with particles in the simulation. This gives us a promising result.

We can see that the upper part of the accretion disk is distorted upwards, as the rays are bent down by the black hole. There is also the back side of the disk visible as a small image in the center, due to rays passing close to the black hole and being bent upwards.
While this already looks pretty neat, there are a few obvious issues. One issue is that you can clearly see where the influence of the black hole ends - there is a step in the outline of the accretion disk, caused by the light deflection suddenly dropping to zero.
Step 3: Finite radius of influence
In reality, the influence radius of gravity is infinite. The gravitational acceleration decreases with increasing distance, but it never reaches zero, so the rays should still be slightly bent, even if they're passing far away from the black hole.
In this simplified model, we have a finite radius of influence, equal to 3x the black hole radius. Because the deflection angle suddenly drops from a non-zero value to zero, it appears as a discontinuity in the image.
Luckily, we can easily correct this by making a simple change to the equation above:
φ = 2 · atan(M/b - M) .
This makes the deflection angle slighly smaller, but more importantly, the angle of deflection becomes exactly zero for light rays tangent to the sphere of influence, because the parameter is b=1 and the terms in the argument cancel each other.

And there we go, the step is gone!
Step 4: Filling in the gaps
The second issue is that the part of the disk inside the sphere of influence appears dark, it shows the background instead of disk particles. That's because we don't properly trace a hyperbolic ray all the way, instead we have two linear ray segments: first from the camera to the influence sphere and second from the point where the light leaves the sphere towards the sky. We miss all the particles between the two points.
Finding intersections of particles with the hyperbolic ray is difficult and computationally expensive, but we can approximate it by simply adding a third ray segment that goes through the influence sphere and connects all ray segments into a single piecewise-linear ray. What does it look like?

Alright, this doesn't look half bad. It captures the main features of black hole, but at the same time it's very fast to compute.
Of course, this is a general solution and works with any particle configuration, not necessarily just the accretion disks. So here is Earth being mirrored and creating the Einstein ring as it passes behind the black hole.

That's it for now. Look forward to the next update!