[making process]chip&marron Tim and Lavi making tips(especially colour schemes)
Added 2024-04-07 07:37:58 +0000 UTC
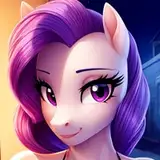
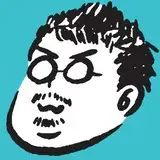
I dare to write by the brand name, but I painted Tim and Lavi for chip&marron. It's Vispo inside but it's chip&marron, that's for sure.
Vispo has long been good at dress modeling in the original figures, but it is refreshing to see them developing their adult brand.
I can't make a video this time, so just photos. Also, this will be in the adult category, so please turn right around and leave if you're not a target audience!
The product has already been discontinued, but when we re-released Tim in response to requests from overseas, it was sold out in no time. Cute is universal
┃colour schemes
Now, this Tim and Lavi, in Vispo's example, the costumes are only black in colour scheme, which lowers the production effort.
Whether it is a dress or a harness, black is a fairly safe colour, and since it also exists in reality, there is nothing strange about it. However, if you paint the figure in black, it is a bit plain. This is even more so if the hair is also black.
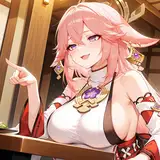
As they are sister and brother, I wanted to use the same hair colour and the same colour for their costumes if possible, so I decided on red as the main colour this time, with a red-black colour scheme for Tim's dress. The Lavi's harness is mostly red, with gold fittings.

For SM costumes, you can find out what colours are available by looking up bondage, harnesses and gag balls. In terms of realistic colours, they are red and black.
┃Colour schemes for Tim
Due to the nature of Tim's costume as a dress, the colour scheme needs to be considered carefully. As I mentioned above, black alone is a bit tasteless, so I decided on a red-black colour scheme with a sense of gravity.
 The colour scheme is roughly shown in the image but alternates from head to head in black-red-black-red...
The colour scheme tends to be boring if the same colours are used continuously, so it is designed to increase the amount of information.As for black, the black of the hair is a different colour to the black of the costume, and the red of the costume and the red of the knee socks are also different colours.

┃Colour of dress
The red colour of the dress was applied with a solid coat of Gaianotes Bright Red, then a clear red to reduce the overall saturation, followed by an overcoat of pure magenta all over, and finally shade black for shades to reduce the saturation in the shadow areas.
Finally, a matte coat with semi-gloss.
┃Colour of tights
The tights were painted by mixing clear red, pure magenta, black for shade and white to make a solid bordeaux base colour.
After a solid coat, a shadow was added with black for shade and that was it. This is also a semi-gloss coat.
┃hair colour
 The hair is made by first applying a solid coat of black for shade, then white where the highlights hit, and then a thin coat of black for shade again...
The slight violet tint is due to the fact that I have adjusted the colour of the black for the shade to be more violet. It's a lot easier to use if you adjust it closer to violet. It's easy to adjust the saturation of any colour without any problems.
Even with black, it is possible to create fine differences, such as reddish black and bluish black.
So it might be interesting to explore those fine colour tones.
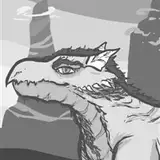
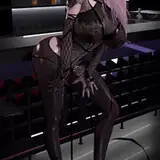
┃The Lavi's colour scheme
Now, about the Lavi, this one looks easy, but it is more difficult to mask than the Tim. After painting the skin colour, masking is done so that only the harness can be painted like this.
Paint leaks if you are not careful, so liquid masksol is used to prevent leakage (although it still leaks...). .
 After painting the red, it is time to mask the metal fittings. This is also very simple but quite tough...
Without a circle cutter, this kind of masking is impossible.
 At the moment, Amazon carries DSPIA circle cutters, so you might want to check them out. When I bought a Shadow Hobby circle cutter (with almost the same performance) a few years ago, I had to import it personally from the USA, but now it's easily available...
┃About eye painting
In the paint sample, Tim had blue eyes and Lavi had red eyes, so I decided to use the same colours. However, since the eyes were large, I thought an airbrush gradient would be beautiful, so I painted the eyes with an airbrush.
The procedure is the same as usual: first draw a draft in vermilion. There is no original illustration, so I did not use editing software to create the draft.
*note: The following work is carried out with enamel paints, with protection with lacquer clear between each step.
 After a clear coat, Lavi paints the pupil colour with clear red and Tim with clear blue, and shades the upper part of the pupil with clear black.

But as it is, the saturation of the eyes is too low to tell what they are. So I painted the lower part of the pupil with clear white, and painted fluorescent red (Lavi) and fluorescent blue (Tim) on top of it.
This is what happens when you put light in the eyes.
 The eyes are felt to be much more saturated and vivid.
When adjusting dark colours to increase saturation using fluorescent colours, it's important to use a clear white undercoat. This will save you a lot of time as you won't have to remove the paint and repaint.
After this, I applied the skin colour and did the blush colour, lip and oral gloss finish. I used UV clear resin for the lip and oral gloss this time. I usually apply lacquer clear with a brush, but perhaps UV clear resin is easier.
...and so it was successfully completed. I think the colour scheme of originally designed garage kits is a problem every time, but if you refer to figures and real-life fashions for reference, you will have less trouble in terms of colour scheme.
I feel that everything in the world is constructed and colour-coded according to a certain theory, so I would like to make a good observation of such things first.
Comments
Thank you so much
Hsiang Ni
2024-04-12 02:32:08 +0000 UTCHi,Hsiang-san, this question needs two separate answers. The first concerns shading. Basically, shade black is sprayed on by itself. Instead of adding purple afterwards, the shade black is mixed with purple from the start. The reason for mixing purple is that cyan, magenta and yellow alone will produce a greenish black when mixed. Mix in purple until the green tint is gone. Don't think about the mixing ratio. I keep a bottle of this stocked up and ready to use Secondly, how exactly does the spray feel dirty? There are usually two patterns that make paint feel dirty: rough paint particles or a rough texture. In both cases, the problem can be solved by thinning the paint with lacquer clear and thinner. Alternatively, there may be too much pressure or spraying volume when spraying. Clean shading can be achieved by anyone by painting slowly over time with paint that has been diluted to a certain degree!
SUKIMA SANGYO
2024-04-12 02:19:14 +0000 UTCHello, Mr. SUKIMA SANGYO, I would like to ask, when you usually make shadows, do you spray a mixture of transparent black and transparent purple directly on the parts, or do you mix the mixture with the original color and then spray it, specifically transparent black and transparent purple What is the mixing ratio? When I do shading, I always feel that the spray is too dirty.
Hsiang Ni
2024-04-11 17:24:21 +0000 UTC