[making process]Hokke suisan Nightingale making Process & tips
Added 2024-01-27 09:09:12 +0000 UTC
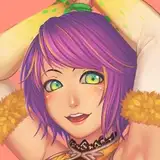
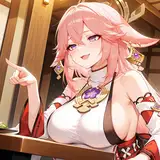
Since 2023, I have been working on and off on the nightingale for Hokke Suisan, but now that I have finally resumed work and completed it, I would like to summarize the production process.
This time, only fantia and Patreon supporters will be able to see the production video.
┃Parts check - surface treatment and some parts that require processing
Now, before you start working on the garage kit, what you need to do is to check the parts.
Look at the condition of the parts and check where there are burrs and gates, while making sure that all the parts.

This nightingale is commission. Not available for parts request as it is quite old, having been sold in 2019. Also, the white resin had yellowed slightly over time.
Some sculptors make kits in ivory color resin instead of white resin, but the yellowing of the white resin is slightly different in color from the ivory.
Ivory color resin can be painted normally without surfacer less painting method, but when white resin is yellowed, the color becomes a slightly greenish yellow, which is a little strange, so we have to be careful. This is not to say that it is impossible to paint surfacer less painting method.
If the ivory color resin turns yellow, there is no way to do it without white surfacer. It would be better to paint it with a pseudo-surfacer less painting.
┃Make your own syringe parts by yourself
The syringe parts were a bit difficult to use as is.

This is because when we looked at the actual parts, we found that the distortion was so severe that it was difficult to use them as they were.
After spraying the surfacer, it looked like this.

So I had no choice but to make my own.

This homemade part was used as the basis for replicating the resin parts.

I am happy to say that after a lot of trial and error, I was able to make parts that were just barely usable.
If you are interested in how to make and duplicate the parts, please read the first article in this series.
If you are interested, please read the article. You will see that it is surprisingly easy to duplicate simple parts like this.
┃Filling in steps in an efficient and time-saving way
Garage kits are subject to burrs and mold deviations due to replication. It is not uncommon to find large bumps like this.

If you file these areas, they will lose their original shape as well, so try to fill the bumps with cyanon as much as possible. Sanding only the filled area is easy because it will not lose its shape.

This is hardened and sanded with a hardening spray.

Cured cyanon is hard so I sand it with a #260 sponge file.
Seam lines in tight spots like this are easy to remove with a funtec figure engraver or a godhand spin blade.

After removal, it is just a matter of filing with a sponge file. See, it's easy, isn't it?
...And so, the very simple and time-consuming process of surface preparation for garage kits is repeated endlessly for all the parts.
So it is ideal to come up with a way to work with the shortest possible efficiency in mind, even if only a little. I know I introduce this every time, but if you have a better method, please try it.
I am sure there will be times when you don't know what it feels like and sanding too much, but that's just part of the experience.
I'm sure I'll be able to figure out how to recover it in time, so it would be great if I could enjoy that as well.
By the way, RC Berg's cast kits often have seam lines in the smallest details, so I often feel that the work time increases when dealing with them.... It hasn't changed since the old days, and it probably won't change in the future....

Incidentally, this is a hook to attach to the skirt, but it looked like it might break, so I reworked it with brass wire.

The hooks for the syringe belt are also reworked with brass wire. This way is more secure when assembling.
I did the usual things except for making the syringe parts by myself. To be honest, the surface treatment and processing of these parts may have been the hardest part rather than painting...
Make the colors you need from the materials (explanation of each painting process)
I am working on a coloring spec sheet and it is proving to be very useful.
Here is the coloring specification I made when painting Nightingale.
┃Make your own coloring specifications using Photoshop or other tools based on the materials

The paint job was generally based on this, but I carefully read Hima-san's production notes and photos as a reference. The resin had turned yellow, so I applied the skin color only moderately because it would have looked strange if I applied too much.
I thought it would be easier to make the skin color look relatively beautiful because I made the color difference of the costume more pronounced.
┃There are colors that can only be produced with fluorescent colors, so use them aggressively
In coloring, highly saturated colors that cannot be achieved with clear or solid colors alone can be realized with fluorescent colors.
Fluorescent colors are only clear paints in a single color, but if the base color is white, the colors will be extremely good. Therefore, when painting clear parts, it is recommended to paint the base with a little bit of clear white to improve the coloring.
Since the gloves are not clear parts, I painted them alternately with skin tone and fluorescent yellow-green to make them look clear. Fluorescent yellow-green is a bit strong green, so I also added fluorescent yellow.

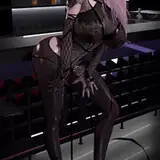
The bra part? is painted with fluorescent pink and magenta.

As for the underwear, how did you come up with this structure? Genius? It was difficult to reproduce the design.
It was quite thrilling to paint the underwear in fluorescent magenta, then mask it off and paint fluorescent yellow-green over parts of it. To be honest, it was quite difficult to adjust the paint color here.


As mentioned above, clear parts are painted with a little clear white undercoating to reduce transparency. One of the reasons is that clear parts often look beautiful when they are about translucent; PVC finished products usually have clear parts with low transparency, too. Therefore, it is easy to increase the degree of completion by referring to them.
After that, just repeat the masking process and paint the gloves and belts!

This is an example of a painting job that took several hours of masking and only took a few seconds...

I think it is good to consider the masking workflow and do it efficiently, so once the first layer is painted, the second layer is masked and painted as it is.
If you are concerned, you can remove the masking once to check the condition. However, it may be a little difficult because you have to mask it again...
┃Texture painting starts with silver undercoat using tights
Tights were used to create textures for sleeves and other metallic areas.

In X, I only posted the results this way.

https://twitter.com/sukimasangyo2/status/1747205509407801437
The actual working method is as follows.
1. Stretch and attach the tights to the wire (thicker aluminum wire might be better since it requires some tension).
2. Place the tights perfectly on the part to be painted and paint (if there are gaps, it will not be a texture painting).
This is all there is to it. (If there is a gap, it will not be painted with texture.

First, make something like this.
Stick it perfectly to the part and paint it.

For convenience, we can only paint from one side at a time, so when we finish painting one side, we will add texture to the other side in the same way.
By the way, the base of this texture is silver. The original illustration is quite saturated, so I thought it would be better to use silver + fluorescent color to bring the atmosphere closer to the original illustration.

After creating the texture, I used pure magenta, fluorescent pink (or fluorescent red), pure violet, and pure cyan for shading.
Near the edges, I used more cyan and violet.

It is easier to use fluorescent colors for such highly saturated colors, so I recommend that those who have put fluorescent colors away on the shelf and think that they are not used much should pull them out and try using them again (as I did).
It was difficult to make the mesh along the collar without gaps, so I made a jig with brass wire and proceeded little by little, but the texture was almost invisible...

The belt portion was similarly painted using a wire jig in this manner.

The first layer of texture should be applied thickly. If the color is light, it will disappear when the second layer of color is applied.

I personally like the texture, which is not too clear, but not too light. (In the image above, the buttons are painted black by mistake, but they are originally the same color as the belt, etc.)
Eye painting process

As for the eye painting, I omitted it this time because there was no need to prepare it digitally or to do a preliminary drawing in vermilion.
This is because the three-dimensional mold of the eyes was deeply made from the beginning, so there was no need to bother with simulation.
So after painting the skin color, I started painting the eyes directly. As I imagined, I was able to proceed to the end without re-painting, which was quite efficient.
However, it is a case-by-case basis, so I think it is better to build up an appropriate workflow according to the situation.
First, I drew the eyelashes, orbital line, and mouth line like this.

If there are no problems so far, clear coat and draw the inside of the eyes and eyebrows.

It doesn't matter as long as it matches the image of the original illustration.
The hair color was kept to a light pink because I thought it would change the atmosphere if it were too dark.
The eyebrows must be painted a little darker or they will be invisible (the same thing that happens when eyebrows are matched with blonde hair color), so I made them a darker color that is clearly visible.
After that, I paint the whites of the eyes and make eyelash while painting the color of the eyes.

Then, mask the eyes and add blush with enamel clear red on the lips, eyeshadow, ears, and chin. The eyeshadow should be applied thinly, just above the outer corner of the eye, at a level where it can be seen or not. If it is too thick, it will be too harsh, so use a thin layer.
Some characters add blush to the blush, but omit it for Nightingale, as it is not necessary.
For the lips, airbrush only the lower lip.

If the upper lip is painted, the figure will have coddled lips in the case of anime-style figures, so this is prevented. Incidentally, the lip line should also be painted in brown or other colors.
Black is too assertive and does not blend well with the mouth, while red or mucous membrane clear colors are close to the skin tone and lip color system, so they tend to blur the impression of the mouth and cause a sense of discomfort.
Brown can solve both of these problems, so I personally think it is a good choice.
The side profile of the lady-in-waiting completed by applying a brush of gloss clear to the lips after the matte coat. You can see that the blush of the eyeshadow, which was applied vaguely and widely, has improved the blood color.

Dignified

If it is checked from various angles and there is no breakdown, it is OK.

The eye painting is now complete, as there seemed to be no problems.
Then, the whole work is finished with the assembly.
The bangs were divided into two parts, but I glued them together to make one part. It looks more comfortable.

So, this is the Nightingale produced by Hokke Fisheries.
I have the impression that HOKKE's sculpting is very detailed as well as meaty (vocabulary: 0).
I have been using Hima-san's nightingale production diary as a great reference for my work. If you make a nightingale in the future, I would like you to read not only this article but also Hima-san's work diary.
I would have liked to try my hand at making a clear resin casting of the syringe, but it is impossible, so I am really impressed with those who can do it by themselves.