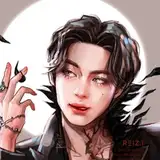
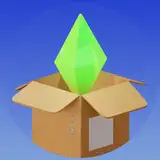
In Owari, I made color references note like this.
Place the material illustrations on the left side, use the color picker and gradient tool to classify the colors of the main parts on the right side, and write notes in the extra space. (For memos, just write what you think is necessary at the time. If you think it is unnecessary later, you don't have to do it.)
This process will give you a general idea of the colors you need, so there is no harm in doing it even if it is a bit tedious. You will save time, effort, and paint because you won't have to reapply meaningless paint. Highly recommended.
This method is published by Imomu-san on his blog, so please refer to his blog as well.
https://imomusipan.hatenablog.com/
Imomu-san's X
After making this document in advance and mixing the colors, there were no major deviations from the image, and to be frank, we were able to finish the work without repainting. Preparation is really important, isn't it?
As I will explain later, even with eye painting, it is much easier to create a hand-drawn image using an LCD tablet on a photo in advance.
When I draw and photograph a picture using only my experience and intuition, it often turns out to be different from the image. So I redraw it again and photograph it, and it is still different! Repaint it again! AAAAAAAAAhhhhhh!!!!!!
... and this hellish loop can cost you a lot of time.
However, if you do a careful check on the PC, you can easily prevent this problem. I am reminded of how much more efficient digital preparation is.
Once the references are ready, the necessary colors are made by toning or overcoating over the base color.
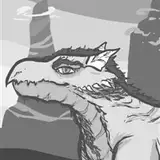
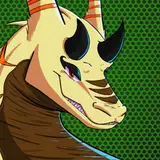
┃Horn
In the original illustration, it looked textured with bumps and slippery, depending on the material. So I decided to close the color by using a glossy finish.

A reddish-brown base color is created, and clear black is layered over it to create a deep color.

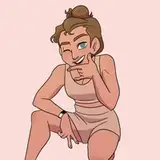
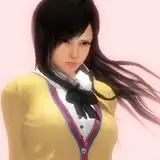
┃Skin tone
As shown in jose's tweet, applying a color close to the skin tone of the original illustration would make it look bleary.
https://twitter.com/josenoshin/status/1733063873370914982

So I made it a healthy reddish brown.
This time, instead of the usual skin tone tones, we decided to match the brown color.
The base is a clear pale brown from Lascius and 059 (safresh pink) from Gaianotes.

Clear pale brown is mixed with pink as well, as it has a slightly strong orange tint by itself. After painting the base color, overcoat with gloss clear and pure magenta diluted with solvent.
The part on the left side of the image is the base color, and the right side is the magenta overcoated. If the magenta is too strong, the skin color will look strange, so thin the paint as much as possible.

After that I also thinned and overcoated the clear black to reduce the saturation a bit.
If the saturation is reduced too much, it may not be good for the skin tone...? It may be a little difficult to judge.
┃Hair
Hair color is ivory with a little bit of pure green mixed in. If the saturation is too high, white is mixed in to dilute it. Highlights are white-only.

I tried adding shadow to the ends of the hair, but it only muddied the color, so I modified it, saying it might not be necessary.
┃Dress
Instead of leaving the resin white as it is, white is painted on the entire surface first. The white pigment overlaps with another pigment to create a unique color.

After that, it's fun to make shadow colors and skin color transparencies on the belly. Well, it becomes almost invisible...
┃Decoration
For the decoration of this tailpiece, the client wanted a strong glossy finish, so we first sanded it thoroughly, then primed it with white and gloss-finished it.
After that, I used Gaianotes Premium Mirror Chrome to apply a glistening bright chrome paint, and then painted with Kreos Super Rich Gold, diluted considerably so that only a mist would ride on it. So although it is gold, I tried to make the color slightly lighter and closer to a white gold-like color.

If the gold paint is applied too thickly, the luster of the premium mirror chrome will be lost, so I think it is best to use it in moderation.

Incidentally, if you apply Premium Mirror Chrome to Gold from a black base, you will get a heavy gold like this.

This is good for the atmosphere, but we decided that it does not suit this example, so we modified the color to a brighter one.
The hair clip for the twin-tail hair is a bit difficult to mask. All I can say is, ”Good luck...
If you peel off the masking after hard work, you can fix it with an embossing heater if there are marks (dimples) from the masking.

However, if heat is applied all at once, bubbles will appear on the painted surface, so it is best to diffuse the heat while waving the heater to avoid this.
Even if the paint does not need to be repainted, if the paint is heated slightly with an embossing heater, it will soften and swell, and the masking marks can be returned to a level where they are hardly noticeable.

┃Scarf
The scarf was specified as a single beige color, so I just made the color and painted it as is.

The sculpture was painted in a single color, but because it has a lot of movement, I did not need to add any shadows to give it an atmosphere.
The clasp on the back is painted gold for the heart, and the band is painted the same color as the horn.
┃Sandals and anklets

I think Ivory was used as the base color with a slight white overlay.
I don't think this is a particularly troublesome part, but the spacers for the clear parts can be polished with a #4000-#10000 God Hand sponge file and clear coated to make them smooth.
I did not want to make a hole for the holder when painting, so I put double-sided tape on the bottom and clear-coated it. I mixed a trace amount of violet to prevent yellowing.
┃Apply skin tone matte before metallic

I painted the entire piece like this. I wanted to bring out the glossiness of the gold ornaments, so I matte-coated the skin color first. This step is very important for the finished product, so it is important not to cut corners.
(I omitted the masking of the left leg decoration part because you can see it in the video.
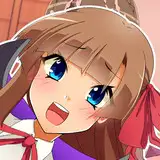
As I have already uploaded to Youtube community and X, I changed the method of eye painting in Owari this time to first take a picture of the face parts without any drawing (preferably in a tentative state) and then use an LCD tablet or something to make a draft on it.

I imagine that you first draw a draft to get an idea of the image, and then hand-draw it to reproduce it in parts.
I feel that it is a good idea to draw with the eye and the overall balance in mind.
At this point, the balance may still be unstable or feel different from the image, so it is advisable to work on it until you are completely satisfied with it. Since it is digital, it is quite easy to make corrections!
And when I actually write it on the parts, it will probably be slightly different from the image.

When the actual size of the eye socket area was also considered in the drawing, it was found that the eye line comes slightly lower than in the draft. The eye socket line is also too lower than in the original illustration. Furthermore, we found that the width of the eyes is too long.
These were corrected and the result is as follows.

By narrowing the width of the eyes and straightening the orbital line, the eyes no longer look droopy.
I don't have a photo of the process, but I edited the second photo directly and adjusted the balance in the photo.
Then I used that as a reference to make corrections to get this state in the third photo.
The power of digital editing is amazing. I was able to cut down on the time I wasted using brushes and finish masters in the preliminary drawing. Since Owari has one eye hidden, I think it is perfectly fine to just draw the left eye. Only those who want to paint the right eye should paint it.

After the primer is drawn, coat it with lacquer clear and create a gradient on the eyeliner and lines on the other parts of the eye line.

Then I paint the inside of the eyes, the whites of the eyes, and the shadows of the whites of the eyes.
I used to use the color of the resin itself for the whites of the eyes, but as the number of clear coats increases, the whites of the eyes gradually turn yellow.
So recently I have been painting the whites of the eyes with enamel. For the same reason, I recommend painting the whites of the eyes as late in the process as possible to avoid yellowing. I also paint the whites of the inside of the mouth in the same way with enamel.

Once you have painted something like this, you can then apply the skin color...

I think it is better to put blush around the sides of the eyes to give a more ladylike impression. The color I use for blush is Gaianotes Enamel Fluorescent Red. I tend to use fluorescent red for blush and lips rather than clear red these days because of its good color.
After this, I mask off the face surface, paint the hair color, and matte coat. Don't forget the moles around the mouth.

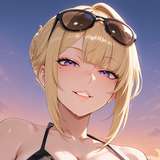
When finally assembled, the face looked like this.

I hope that the eyes are not too harsh or too soft, and that the expression has a moderate gal-like quality.
Actually, I was able to paint the eyes without much trouble. After all, if the preparation is done well, there will be much less trouble in the later stages of the process.... I decided that I would continue to carefully prepare for the painting process.
If you have any questions after watching the video or reading this article, please feel free to comment and I will be happy to answer them!
SUKIMA SANGYO
2025-02-25 11:14:46 +0000 UTCjinuzukt
2025-02-25 11:12:28 +0000 UTCSUKIMA SANGYO
2024-07-17 14:56:52 +0000 UTCSL.ice
2024-07-17 12:38:58 +0000 UTC