![[making process] Azur lane Owari making Process & tips1](https://img5.xaiju.com/storage/6/hq/bx/d38796-019e8e83-afa0-75b0-9c4e-39d55c0c272c.jpg)
![[making process] Azur lane Owari making Process & tips1](https://img5.xaiju.com/storage/8/ef/fh/d38796-019e8e83-afac-776d-b5ff-a19f4215a598.jpg)
![[making process] Azur lane Owari making Process & tips1](https://img5.xaiju.com/storage/2/mp/vk/d38796-019e8e83-afb8-7c71-9af6-dbd8903b04b2.jpg)
![[making process] Azur lane Owari making Process & tips1](https://img5.xaiju.com/storage/1/ua/nq/d38796-019e8e83-afbe-78a9-97c8-47986844164a.jpg)
![[making process] Azur lane Owari making Process & tips1](https://img5.xaiju.com/storage/2/dn/vq/d38796-019e8e83-afc5-7baf-a4f1-e4e56c1f82dd.jpg)
![[making process] Azur lane Owari making Process & tips1](https://img5.xaiju.com/storage/2/ia/la/d38796-019e8e83-afd2-7efe-8121-a39e64b7ee92.jpg)
![[making process] Azur lane Owari making Process & tips1](https://img5.xaiju.com/storage/5/kj/ku/d38796-019e8e83-afd6-76f6-b5ef-29a5c426bef2.jpg)
![[making process] Azur lane Owari making Process & tips1](https://img5.xaiju.com/storage/8/uv/wo/d38796-019e8e83-afda-7e8d-b263-2279f6ae81d6.jpg)
![[making process] Azur lane Owari making Process & tips1](https://img5.xaiju.com/storage/11/cz/ml/d38796-019e8e83-afdc-7f9d-a7de-a474219e8036.jpg)
![[making process] Azur lane Owari making Process & tips1](https://img5.xaiju.com/storage/4/kk/vn/d38796-019e8e83-afe4-75f6-9f89-c051e09eb8de.jpg)
![[making process] Azur lane Owari making Process & tips1](https://img5.xaiju.com/storage/4/qk/su/d38796-019e8e83-afe8-7d26-bb42-69182f4f079e.jpg)
![[making process] Azur lane Owari making Process & tips1](https://img5.xaiju.com/storage/12/xz/xr/d38796-019e8e83-afee-70e3-9d57-b2f541c19d2d.jpg)
![[making process] Azur lane Owari making Process & tips1](https://img5.xaiju.com/storage/7/cr/nc/d38796-019e8e83-aff4-7e27-9705-8c0326895d30.jpg)
![[making process] Azur lane Owari making Process & tips1](https://img5.xaiju.com/storage/7/dg/xj/d38796-019e8e83-affe-7748-b923-8ad7ab11a9d1.jpg)
![[making process] Azur lane Owari making Process & tips1](https://img5.xaiju.com/storage/8/xt/kj/d38796-019e8e83-b002-7060-ba29-f8d349ee4205.jpg)
![[making process] Azur lane Owari making Process & tips1](https://img5.xaiju.com/storage/1/dh/kc/d38796-019e8e83-b009-7d9f-b1bb-b3acfdd3ba7a.jpg)
![[making process] Azur lane Owari making Process & tips1](https://img5.xaiju.com/storage/5/pw/lc/d38796-019e8e83-b00e-7d2f-ba97-5083349435af.jpg)
![[making process] Azur lane Owari making Process & tips1](https://img5.xaiju.com/storage/7/rt/nk/d38796-019e8e83-b010-7d20-9c6c-a84ee398b462.jpg)
![[making process] Azur lane Owari making Process & tips1](https://img5.xaiju.com/storage/4/ji/fa/d38796-019e8e83-b018-7663-8016-4852768025d6.jpg)
![[making process] Azur lane Owari making Process & tips1](https://img5.xaiju.com/storage/8/tk/zu/d38796-019e8e83-b022-717a-b7ce-0163e3f835ef.jpg)
![[making process] Azur lane Owari making Process & tips1](https://img5.xaiju.com/storage/10/hh/ju/d38796-019e8e83-b025-7337-b71c-755465668f4c.jpg)
![[making process] Azur lane Owari making Process & tips1](https://img5.xaiju.com/storage/3/ib/zl/d38796-019e8e83-b027-78dc-a34f-901806e3bd94.jpg)
![[making process] Azur lane Owari making Process & tips1](https://img5.xaiju.com/storage/10/li/nr/d38796-019e8e83-b030-7897-bb05-efb2ca2da0f7.jpg)
![[making process] Azur lane Owari making Process & tips1](https://img5.xaiju.com/storage/11/ba/ld/d38796-019e8e83-b036-7038-b81c-f3bb5198ee08.jpg)
![[making process] Azur lane Owari making Process & tips1](https://img5.xaiju.com/storage/6/bl/zn/d38796-019e8e83-b03c-75ff-a746-598f5cf54aac.jpg)
![[making process] Azur lane Owari making Process & tips1](https://img5.xaiju.com/storage/7/go/uy/d38796-019e8e83-b04b-7aba-a398-404ae706353f.jpg)
![[making process] Azur lane Owari making Process & tips1](https://img5.xaiju.com/storage/3/yt/zk/d38796-019e8e83-b054-7e2a-8a6b-bb0f949ad03c.jpg)
![[making process] Azur lane Owari making Process & tips1](https://img5.xaiju.com/storage/3/jt/np/d38796-019e8e83-b057-7346-9157-19678570e668.jpg)
![[making process] Azur lane Owari making Process & tips1](https://img5.xaiju.com/storage/1/iq/dr/d38796-019e8e83-b062-7b7a-ae8f-d2935a9643ed.jpg)
![[making process] Azur lane Owari making Process & tips1](https://img5.xaiju.com/storage/10/eo/ip/d38796-019e8e83-b068-7f6d-bcce-b50ea36d50fa.jpg)

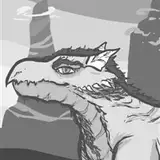
This time I assisted in painting Owari sculpted by jose!
The official coloring photos are uploaded on Jose-san's X (twitter) page, so please check there!
Jose's X
https://twitter.com/josenoshin
Sale page
https://josenoshin.booth.pm/items/5287625
The dryfit photos were in a temporary state, with some areas still to be corrected.
These are photos of the tentative state, so the following points have not been corrected.
・There is too much space between the left hand and the waist.
・The angle of the horn decoration is not vertical.
These points are often overlooked, so please do not forget to correct them.
Q.What is the first thing to do with a garage kit?
A.YES parts check !!!!!!!!
So, as usual, let's do a parts check.

This is what the parts for this Owari look like. There are four clear parts in the photo, but actually only two. These are foot spacer parts.
I heard that jose-san duplicated these parts by himself, not without a expert company, but there were almost no parts that I had trouble in building. Good replication!
As with the other kits, any misalignment of steps can be filled in with cyanon and evened out with a sponge file.
The most difficult parts to file are the twin tails and the rounded ornaments at the tips. Please file those areas especially carefully.
If I had to say so, I would say that there are three points that will need to be processed.
・Gate treatment and reshaping of braided scarves (if possible)
・Cutting off the horn ornaments.
・Adjustment of the angle of the left arm (so that the back of the left hand is closer to the waist)
I will look at them one by one.
The first is the gate of the muffler. The gate is placed in such a way as to destroy the detail, so I thought it would be necessary to reshape that part. The gate is not a very noticeable part, so I think it's okay to just roughly reshape the gate.

First, roughly scrape off the gate with a Funtec figure engraver and a design knife.


Both are sharp blades, so to avoid injury, work as little as possible and with as little force as possible.
After rough removal, reshape with cyanon.

The slightly different color is the part processed with cyanon. The braided detailing can be done to give a certain atmosphere. As with the gate processing, I used a figure engraver and a design knife for the shaping process.
The second is the horn ornament. This is a bit difficult to surface and paint if it is left as is, so I cut it off and attached it with brass wire afterwards to make the work from filing to painting easier.

As you can see, the antlers and ornaments are integrated into one piece...

It is a good idea to use nippers to cut it off drastically, then do the filing work, and then do the shaft hammering work. At first glance, it may seem like it is just more work, but in fact it is easier because you do not have to mask the horns when painting.
I am also experimenting every day to see if I can work more efficiently if I can imagine the work a little further ahead and build the procedure accordingly.

There is also a seam line on the inside of the muffler part, so in order to file it, I heated the part in hot water and bent it. Smaller parts can be bent with an embossing heater, but larger parts like this muffler are difficult, so submerging the parts in hot water for about one minute is the fastest way to do it.
After the filing work is finished, just soak the part in hot water and it will return to its original shape on its own. Easy!

As you can see from the tentatively assembled photo, the left arm may be a little far from the waist if the kit has not been modified in any way.
To adjust this position, simply heat the joint between the left arm and the body using an embossing heater to immediately return it to the designated position.

If the product is to be snugly attached, it is easy for the color to peel off due to rubbing during assembly, so it is not a problem if some space is created.

Don't be in a hurry if it cracks. It will only take a little more time and effort.
As you can see in the video, necklaces and anklets are thin parts, so they are prone to cracking during the filing process. You can put them back together quickly by using cyanon, but we recommend that you work carefully so as not to break them as much as possible.
Now, these are the parts that might be a little difficult?
Overall, there are only a few parts, and I have the impression that as long as you file the parts properly, there is no particular problem with this kit. If you have any questions, please let me know in the comments.

We hope you will enjoy it!
CupCake
2023-12-14 06:31:04 +0000 UTC