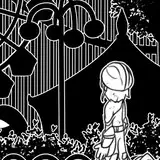
I assisted Eldora Model in the sample making of Thea. Here, I would like to share with you the process of making this kit.
The kit looks simple but is actually surprisingly challenging, so if you know your way around, please give it a try.
Eldramodel official BOOTH page
This post is supplemental. The video shows almost the entire production process, so please watch that first.
・Overall making
https://www.youtube.com/watch?v=f8an071sg6k
・Eye paint
https://www.youtube.com/watch?v=u9NjKreFZ2w
As usual, we start by checking the parts.
There are 26 parts in total, 12 of which are clear cast.

Since about half of the total is clear cast, spend about twice as much time sanding and shaping the clear parts as the white cast.
Sanding the white resin parts first will keep you motivated.
For parts with large bumps like this, sanding after filling with Cyanon will prevent the curved surface from losing its shape.
Here is the sanded state of the thigh part.
The bumps are generally no longer visible. This kind of step filling is very hard work, so take your time. This is a test casting and may be improved when the product is sold.
As for the white parts, you can treat it in the same way as described above, filling in any bumps as they occur.
And next, let's talk about clear resin.
Clear resin has the following characteristics when compared to white resin.
It takes longer to sand because of its hardness.
When clear resin is used, it is difficult to see the areas that need sanding.
The filled-in areas are noticeable.
Therefore, we have to be very careful in processing the clear resin.
Thea's hair in the front and back, as well as the corners, are very fine and can break if force is applied unexpectedly (in fact, it did break).
UV resin for crafts or light curing putty can be used as a repair method in case of breakage, but since the adhesive strength may be weak, it is preferable to repair it as inconspicuously as possible by applying a small amount of Cyanon from the back side....
Even with clear resin, for example, if it is an effect part such as water expression, it is no problem to roughly process it, but hair, for example, is a part that easily catches the eye, so you have to work hard to process it.
1. Lightly sand the area where the seam line is located.
2. Apply gray surfacer and check areas that need sanding again
3. Sanding
4. Apply gray surfacer again and sand.
Repeat this until you are satisfied that the split lines and scratches are gone, then remove the surfacer and paint.
...This is the kind of work that requires a lot of patience.
UV resin for crafts or light curing putty should be used for the filling (to be done after all sanding work is completed), but be careful not to repeatedly soak the putty in a solvent to remove the paint, as this may damage the clear look in that area.
This time, I painted to reduce transparency, so she was able to hide it well.

This area of the back hair should be shaped with the precise use of a design knife or figure engraver.

In tight spaces like this, homemade sanding tools come into play.

After sanding is finished, repair with clear UV resin or light-cured putty, which is also a repetition of heaping and sanding.

Saying this is all you need to get through the day probably isn't an overstatement, so go for it!

By the way, the process of filling air bubbles is exactly the same for clear resin. If you find air bubbles, open a hole, inject clear UV resin or light curing putty, sand and blend, and that's it.
And even after that is done, apply the surfacer again to check the condition, and if there are no problems, remove the surfacer and move on to the painting process. It may be faster to watch a video of this process.

Incidentally, the cowlick indicated by this arrow is molded as a single piece with the bangs, but it is easier to work with if it is split. If you want a clear look, it is better to leave it as it is, but if transparency is not important, there is no problem with splitting it.
There should be almost no trouble with the body, but you may have trouble assembling the hair dry fit.
Since gaps tend to form around the back of the hair, it may be easier to make it fit nicely if you fill in the gaps to some extent, assuming that you do not want to make the top part transparent.

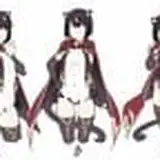
I will also include a photo of the tentatively assembled state for reference in the dry fitting.


SUKIMA SANGYO
2024-06-19 02:33:24 +0000 UTC3amsleep
2024-06-19 02:31:02 +0000 UTCSUKIMA SANGYO
2023-01-19 08:18:57 +0000 UTCkat
2023-01-19 08:08:53 +0000 UTC