The world is now in the age of bunny wars!
While bunny figures are being produced like demons, Asuna Bunny Girl ver. by Tomogomafu's prototype was sold as a garage kit.
It was re-released just a few days ago on September 15, but sold out in a little over 2 minutes. It seems that there will be another re-release in October, so if you missed it, be sure to check it out!
So this time, I would like to summarize the production process of my Bunny Asuna from the video capture.
The blog of Muramasa-san, who was in charge of the example, includes color recipes, so be sure to refer to his blog as well.
https://muramasa03.hatenablog.com/entry/2022/06/17/210000
The table of contents of the production process is as follows.
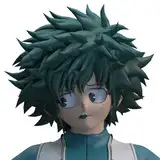
The key to the surface treatment of Bunny Asuna this time is, of course, the hair, which is divided as precisely as a puzzle. Most of the surface treatment and mating checks will be spent here, so let's do our best. Although the production video shows it in a lighthearted manner, a considerable amount of time is spent on this process.
◗ Parts check
So we started with a parts check.

There is nothing special to pay attention to for basic parts such as the body, but for the hair, you need to be very careful from the beginning.
As you can see, there are quite a lot of hair strands, and it is difficult to determine which part is which. As you can see, there are quite a lot of hair strands, and it is difficult to determine which part is which just by looking at it.
Therefore, it is safer to read the instruction manual carefully before starting work. People who built GK, don't read manuals too much. hahaha
Also, be careful not to accidentally throw away parts of the belly that are not listed in the parts list of the instruction manual.
https://twitter.com/tomogomahu/status/1545294227575214080?s=20&t=yIJ1XamgGxGI6UDYrsoH4Q
◗ Surface treatment (sanding)
After checking the parts, sanding is used to remove burrs and tabs on the surface and dig up buried parts until temporary assembly.
Since it has been a while, I will first summarize the tools that are often used for sanding. You can use whatever holders you like.
*I have told you about Artima7 and AT alternatives in previous posts, so please refer to those if you are interested!

I basically sand Artima 7 with Kami Yasu (#240) attached with double-sided tape. The #240 might seem rough, but it doesn't seem that rough when set on Ultima, so I use it most frequently.
I sometimes use the spiral wheel for deep areas, but so far I have rarely used it for resin casting. It is probably more useful when polishing 3D printer output items.

The fine recesses are hand-held and sanded with the conical bits that come with Artima 5 and 7. I can't put it on the holder every time because it is a pain in the ass. hehe

The tabs, which are likely to be gouged off to the body part when cut with nippers, are carefully sharpened with a zirconia bit.


Work while changing the direction in which the bit is applied.

Once the tabs is dropped, we will do the side process with Artima 7.

Processing tabs seems easy, but it is surprisingly difficult. If you cut too much, you should prepare it by heaping up cyanon. tabs are on every part, so you do the above work on almost all parts in parallel with the removal of seam lines. When you think about it, assembling rubble is a lot of work...
Sometimes there are seam lines in places where you think it would be better not to have seam lines, so it is appropriate to have not only one, but three or four sanding tools.
Scrape with the tip of a 超硬 scraper...

Gentle sanding with a 神ヤス...

Equalize with a sculpting knife...


It doesn't matter what sanding tool you use as long as the final product is clean, but you should be able to handle it smoothly and without losing its shape by being able to change between multiple tools.
If the shape is lost, you can mix cyanon with baby powder to make it look like putty and then reshape it. It is good to work on it as you go along without getting nervous.

This body part also has a split line running over a crease, so I want to treat it without destroying the shape of the crease as much as possible. I used an AT + diamond bit. A zirconia bit would cut too much, but a diamond bit does not cut too much, so it is useful in places where careful processing is required.
The bangs have both split lines and tabs, so they also need careful processing.

The seam lines and tabs that are visible on the surface can be handled with nippers and god yass, but the tassels between the tassels of the bangs are difficult to handle. (This is not limited to asuna bunnies)


It is appropriate to treat these areas with a sculpting knife or a long, thin piece of sandpaper, but be careful not to overdo it or the shape will collapse (it is difficult to repair, so be careful). Sometimes this part is gouged out by the silicon mold for replication, and in that case, it is necessary to replenish a little bit by dabbing a toothpick or something with Cyanon.
If there are only a few burrs, it is probably a good idea to shave them off with a design knife. If the shape is broken, it will be noticeable because it is a forelock. It is better to have a little seam line left than to have the shape broken, so don't overdo it.
In the image above, I use Super Acilex sandwiched between my usual sander, but if you hold it under tension, it will stretch, so regular water-resistant paper might be easier to use.

These intricate areas are easier to handle with a figure engraver.
While 超硬 scraper is good at parallel planing, figure engravers are good at vertical planing. If you enjoy GK, you should have one of these because it improves the efficiency of engraving and cannaing work in deep areas.

Moving the cutting edge in the direction of the arrow easily removes burrs. In contrast, the 超硬 scraper is useful in processing split lines such as the back hair.

A carbide scraper is more efficient for canvassing large areas like this. Most of all, though, Artima7 is faster if you don't need to make a flat surface.

I think the cone of zirconia bits is a good way to make progress when used to remove these tabs.

There is no other way to handle the back of your hair than to take the time to do it. Do it carefully!
Basically, sand with Artima 7 and switch to the appropriate tool each time, such as a sculpting knife, design knife, or scraper for narrow areas. It is very important to change tools because using only one tool can take a lot of time, and forcing the sanding may cause the shape of the piece to collapse!