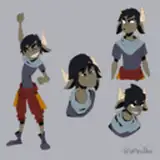
![[Photo & Making process]Princess Connect! Re:Dive - Kokkoro sculpted by Tsuru no yakata](https://img5.xaiju.com/storage/8/jl/sg/d38796-019e8e93-a2ca-70aa-932f-b3f86d633216.jpg)

■Removing tabs & Seam lines
Let's start with a parts check first!

Let's start with a parts check as usual.
Since there is a lot of mold release agent on this coccolith, it needs to be polished thoroughly.
I noticed later that in a case like this, where there is a lot of mold release agent adhering to the surface, it seems that soaking in thinner for about 5 minutes is not enough to remove it.
Therefore, it would be better to polish the entire surface lightly with a sandpaper before proceeding with the work.
This brush, which appears at the beginning of the video, is a brush with the handle cut off so that it can be placed on the finger. I made it because it was a hassle to switch to a brush every time I wanted to remove the powder that comes out when I polish.
I saw on my timeline that Tokichi (sculptor), who had been frozen on Twitter like me, had made this brush. It was very useful, so if you need one, make one!

The edge of the coat has a seam line, so it can be dug out with a liner saw as needed.

The space around the fingers of the hand is also slightly filled in, so detailing is done with a liner saw/file.

Although there are seam lines, it is like there are none, so it can be quickly polished and assembled.

As you can see, the hair is a clear part, but personally I am not a fan of clear hair. To be more specific, if you try to make use of the clear hair, the head parts become transparent, so I can only imagine using the clear hair on the tips of long hair....
For PVC finished products, it would be better to leave the clear texture locally (only at the tips) and then use a solid surface to prevent transparency...that's usually how it is done.
And the second body also proceeded to tentative building.

I wanted the neck decoration (hemispherical) to look clear, so I scraped it off and replaced it with UV craft resin.
Put it out in another place and place it on a piece of aluminum foil with a toothpick to make a hemisphere, and cure it with a UV penlight.

......The video tells you that this is the case, but the actual process is different.
In actuality, the part that has been shaved is coated with mold release agent, and UV resin is dripped over it to form a hemisphere, which is then irradiated with UV light for a moment (about 2 to 3 seconds).
The reason for this is that it is easier to make the hemispherical shape by dropping the resin directly on the part (no need for unnecessary processing afterwards).
The reason why the UV light is only used for a moment is to make it easier to peel off the resin; after about 10 seconds of exposure, the resin is completely stuck to the part and cannot be peeled off. However, this is a problem when painting, isn't it?
These are things you won't know until you actually try it, so please be careful if you want to use UV craft resin for detailing.
This hemispherical part is closed entirely with clear, then a thin coat of pure cyan and green is applied. Then, Hasegawa's Mirror Finish is applied to the back side, and finally glued to complete the process.

Also, the cane that Kokkoro is holding in her hand was divided with a modeling saw because we only wanted the head part to look clear.


Splitting it up in this way will save time and effort in masking. If there is a way to look at the situation and make it the shortest and most efficient, let's split it up or do whatever it takes.
■Painting
Now here comes the painting part.

If you use alligator clips, the holding power is weak and it is easy to fall off while painting. Therefore, I use a homemade handle made by drilling a hole of Φ1 in a bamboo skewer, sticking a Φ1 brass wire in it, and gluing it in place.
I heard that this is the basic method for garage kits, but I finally arrived at this method about 2 years after I started to use Gareki for the first time.
The way to make metallic colors such as gold and silver look even better is to mix metallic colors together, or use a metallic master.
You can read about such things in model magazines.
However, I have recently noticed that even gold and silver colors can be made to look better by simply creating a gradation.
So I'm incorporating that in this Kokkoro-chan as well. As you can see in this image, I shaded both ends of the silver I sprayed on the cane with clear blue.

I think that how to reduce the number of solidly painted areas will determine the quality of a figure, so I thought that it is necessary to pay attention to such details when looking at the various types of "decoration master" (A paint sample is called a "Decoration master" in Japan.) that have been released recently.
I think it is necessary to pay attention to these details when looking at the various types of Decoration master that have been released recently. I think it is important to watch and learn from the work of professionals, and to think and practice how to do it by yourself.
The clear part at the tip of the cane is too light for clear blue, so I used three colors: pure cyan, pure green, and pure yellow.


Although not recorded in the video, the tip part was clear coated and then polished with Kinyasu #6000 and #10000.
Parts that make use of the clear look tend to look not so good unless they are clear coated and polished to eliminate unevenness....
Once I had a smooth surface, I masked it with Masksol and sprayed it with gold!

The pattern on the costume was masked by tracing it with masking sol this time, but since the mold is quite deep, it could have been masked by simply applying masking tape and sliding a knife through the grooves. I think it is up to your preference.

This part is almost invisible from the front, but the masking effort was extremely high, so it was quite difficult...

I'll also give you an example of a costume failure. This one had to be repainted because I made the green color too dark (right part in the image).

Once build with this, the costume became darker and duller as shown in the image on the left. Compared to the completed image (right), you can see that the impression is quite different.

It is easy to make extremely dark and light areas clear in order to create a solid gradation of shading, but it is difficult to do so in a small or narrow area because it will simply become darker.
In the case of Kokkoro, it was especially difficult because if the green color of her costume were too dark, it would give a completely different impression.
I painted the hands like this.

The gold rings on the fingers are brush painted.
It was too much trouble to mask this part of the coat with masking tape, so I applied masksol by brush. I think this way is probably faster. It is important to choose the right one for each case, though.

Surprisingly, it applies beautifully like this. I don't know what the solvent in masksol is, but a twitter follower told me that you can dilute it by mixing it with purified water sold at the pharmacy, so I used that to dilute it a bit and applied it.

Incidentally, all of this is done after spraying the matte finish, masking, and then spraying the gold. This is because, although it is easy, if you spray the matte finish last, the gold will lose its luster.
If you coat with flat clear (semi-glossy) like Gaia's EX-04, you can still get the metallic look and matte finish, which is good.

Masksol is easy to use, but its drawback is that the paint film is scattered so, it is necessary to remove the scattered paint film by sticking it to the surface with a masking tape...

For now, if it can be cleaned up, it is OK.
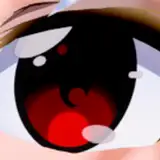
So, let's talk about the eye painting process.First, as usual, I draw a line drawing in vermilion as a preliminary drawing.
Eyebrows are not drawn because they have already been sculpted.

Install the parts and check for any discomfort.

If all is well, clear coat and put a gradient on the lashes. Clear coat this as well when you are done checking.

Apply the base color for the eyes. Clear coat if this is not a problem as well.


With the base color clear-coated, mask off the base color part using the circle masking tape of the HIQ parts, and airbrush the middle and top parts, respectively. This process does not have to be done with an airbrush, but can be done with a brush.

If this looks OK, clear coat.

Once this is done, you can then trace the underdrawing and draw in the pupil lines. If this also looks fine, clear coat.

I wanted a gradation that would darken the upper part of the eyes a little, so I sprayed enamel black diluted with lighter fluid. I also added the shadows of the eyes.
I used zippo lighter oil for all enamel airbrushing.
If it looks fine, coat with clear. Total number of clear coats so far is about 5.

Once you get to this point, all you need to do is draw in highlights and such.

Set on the body and check.

It looks good, so this is the end of the eye paint. Clear coat a little thicker.
If you spray the clear coat too thickly, it will melt the enamel paint and ruin it, so spray a few times and then put it in the dryer for 10 minutes.
After that, increase the amount of spraying to make it glossy. It is a small detail, but it is always important to pay attention to it, otherwise it is hard to redo the work you have done.
After the clear is cured in the dryer, apply the skin color. Be very careful not to make any difference from the color of the body. If you apply too much, you will not be able to put it back, so it is recommended to apply it a little thinly.
Once the skin color has been applied without any problems, apply a clear coat. Finally, add blush and mouth color.


It looks fine, so that's it for this eyes painting. I generally aim for no more than 10 clear coats, but if I try to make complicated eyes, I inevitably end up with more clear coats.
The process after this is first water polishing with #10000 Kamiyasu. After that, the eyes are simply masked and matted. After matting, apply lacquer clear to the mouth and other mucous membrane areas to get a nice glossy finish.
The finishing process is easy once you get used to it, but if the clear coat has not cured or if you gouge the pupil with a knife when removing the masking, all your hard work will be lost, so concentrate on your work.

The rest is assembled and completed.
Kawaii!