Like in the previous attempt - rigging (or skinning) is the most tedious and painful stage. But still, it's easier to do the second time, as I've collected enough experience and info to ease the time I spend rigging her.
First challenge I've encountered - Where to place bones on her face and how? Despite making this model for Unreal Engine, I need to make a Blender version first. And in Blender you can use a better solution where you draw "deforming loops" using bones, where in Unreal you should use single bones scattered across the whole face. In the first few attempts, I've tried to replicate the original model bone placement but quickly realized that I need something more flexible. Then I've remembered one tip from a rigger from Blender Studio - draw dots in the places that are most likely to be deformed, and then connect them using the bones. This helped a lot and now we have a pretty good face rig.
Also, there is an alternative way to deform the face - ShapeKeys (or MorphKeys). It's often used in models for SFM. I could go with it, but I prefer using rigged face instead of shapekeys. Thus, no one said you cannot use a combination of both in your rig :).
Besides the face, everything was going smoothly.
Now it's time for the second challenge - Painting Weight Groups. This is where I'll spend most of the time. While rig is a collection of connected bones, weight group is the connector between the rig and mesh, which tells how each bone affects the mesh. This one can take from a few hours to a week at worst. Thing is, Blender has pretty good weight group generator, second thing - it may give you unusably bad results. Sadly, in my case I got awful results. Main difficulty in this stage is to make good deformations in places where limb will bend.
And here goes the MVP of weight painting stage - Corrective Smooth Baker.
A little bit of explanation. Corrective Smooth modifier (or DeltaMush in Maya) is a modifier that can make your model deform like a candy even if you have worst weight groups ever made. It corrects vertices that deform in a wrong way and kinda smooths your groups. That's why original model is still usable and doesn't break as easily as it should be. At the same time, it's a reason why I can't use it in Unreal because you cannot transfer modifiers from Blender into UE.
It's addon that takes your model and bakes Corrective Smooth modifier into it. So you can have benefits from modifier without actually using it. So why it's a MVP? - It fully fixed issues I had with hips area. I've spent quite a while on that part, and finally my troubles ended.
And welp, my idea with fixing proportions using rig didn't work. Shoutout to Shmi Skyrunner who pointed on importance of keeping proportions like in original. And indeed, keeping old proportions was a critical thing. While I was working on rig I tried to make her legs shorter and with this small change she begun looking a lot closer to Hoodwink. And after that I've encountered an rig issue with her feet which forced me to flatten her foot, which not only made rig work better but made her look even closer to the original model. And that's not all - now she does feel like something small, unlike original nsfw model where you can't really tell that she is <1m tall.
But now we have one quite critical issue - she isn't compatible with all in-game sets including her own clothing
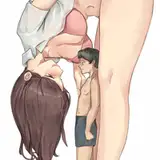
In last image you can see how model was progressing from original nsfw model to current iteration of mine version.
For now I'm focused on creating this model. I'll continue working on MA1 when I finish this model or until making this model become way to hard due to Blender bugs.
Shmi Skyrunner
2025-03-03 23:27:47 +0000 UTC