Series Playlist
It's still the 20th somewhere 😌
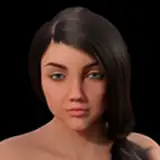
This is part 1 of the tutorial, it covers making a skin blend for Sims 4 in Photoshop. The next part will be in Blender going over the material set up.
Important (I show this process in Part 2): A part I forgot to add in the video is since the layers are still Smart Objects, you can replace the images. So let's say you're midway through making the skin blend and you decide you want to change the Daz face texture you're using. You don't have to start over, just right click the layer, click Replace Contents, and select a new Daz face texture. This will replace every layer that was using the original face texture. Sometimes it's not a perfect replacement and you will have to edit some of the layers. This will only work with similar textures, so replacing Daz with Daz textures. For example, it won't work if you were trying to replace Daz textures with Sims, they don't line up.
Program Links:
Skin Texture Resources: Daz 3D , Texturing.xyz , 3d.sk , character models from other games
Other Useful Tutorials:
I went pretty fast during the demonstration part of the video (sorry about that!). If you're a complete Photoshop beginner, here are some helpful tutorials.
How to use Photoshop layer masks for beginners
The Science of All 27 Blend Modes in Photoshop!
How to Use Adjustment Layers in Photoshop
How to Create Smart Objects in Photoshop
Notes:
Again I want to apologize that this tutorial is late. I went fast on some parts, so if you need any help please message me!
Do you have to use Photoshop? You can use any program that has similar features, such as layer masks, blend modes, and adjustments. I'm the most comfortable with Photoshop so that's what I used.


![[チーム]アップルパイ](https://xaiju.com/istorage/54636.jpg)