Making Balloons in Photoshop and Clip Studio Paint
Added 2021-06-03 21:00:03 +0000 UTC
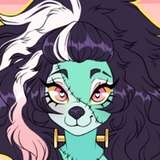
[ ^ The same page, lettered in Photoshop (on the left) and Clip Studio Paint (on the right). ]
Chapter One of DD4 is all scanned, and I’ve finished laying out the pages with their panel borders (more on that in another post). Right now: a look at my preliminary experiments in lettering in Clip Studio, and a comparison of its tools with Photoshop’s. And then, since patron seanwangart asked about my Photoshop balloon-making technique, a step-by-step for balloon-making in Photoshop.
NEW SOFTWARE TIME!
I was hoping Clip Studio would offer a cleaner, more precise, easier-to-revise option for lettering this comic. It’s got great tools, but its advances seem to be offset by some disappointments.
The text tool feels like the biggest shortcoming. I like that I can vertically centre the text within the bounding box (along the Y axis), but I don’t seem to be able to draw a bounding box for the text when I am creating the text? And there must be a setting that will let me wrap the text within the bounding box but not chop words in half while I’m doing it.
I thought the Balloon Tail tool would make it faster to make balloon tails, but I spend as much time fiddling with the shape as I did in Photoshop. It’s nice to not have to clean up the balloon/tail intersections, but I wish the stroke weren’t rounded where the tail meets the balloon. If I have to go in and sharpen those points, I’m back where I started with Photoshop.
I was looking forward to the flexibility of having vector balloons—it would make revising easier—but if I still have to create separate raster layers to make the fills, then I’m stuck in the same workflow as I have with Photoshop, where I have to make my changes to the balloon path, then bake it to the separate balloon fill layers. I was hoping Clip Studio would have some sort of dynamic way to create these effects. Sure, I can take the Balloon Stroke layer, duplicate it, and change it from “stroke only” to “fill only,” but occasionally I have balloons that need to be painted-in, and I can’t paint on a vector Balloon Fill layer.
Long story short, it seems like regardless which app I’m using, there’s still a bunch of tweaking and manual work to be done. Clip Studio seems fast and stable, which I like, but I am already very familiar with Photoshop, and even though for some reason it can often be a clunky old piece of junk, it’s still more refined in some ways.
CLIP STUDIO

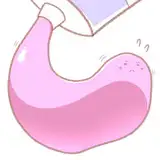
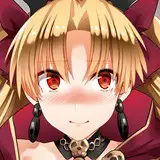
[ ^ A closeup of the balloons using Clip Studio. ]
Yay
- Navigation and control is reasonably quick once you know the shortcuts
- Control points make sense.
- Great customization of balloon stroke brush settings.
- Automatic joining of balloon tails to balloons
- Nice to be able to preview the balloons exactly as they’ll look as you’re making them.
Boo
- To change transformation modes (skew / scale / free transform) on an individual balloon, I have to adjust that behaviour in a palette menu? Why can’t I just hold down option/command/shift etc.?
- Stroke is rounded where balloon tails meet the balloon.
- Balloon tail control delivers unpleasant curves.
- The benefit of having flexible balloons is lost if I still have to make separate above- and below-panel-lines “balloon fill” layers.
- Text tool does not include Photoshop’s nice optical kerning.
- Text tool’s box wrapping ignores words (it doesn’t seem to interpret spaces as word demarcations), so makes it easy to cut words in half when adjusting the bounding box, carrying individual letters to the next line.
- If I make changes to existing balloons, how do I copy or apply those settings to a new balloon sub-tool preset?
PHOTOSHOP

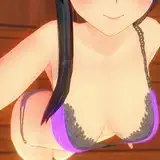
[ ^ A closeup of the balloons in Photoshop. ]
Yay
- Text tool has good optical kerning, and though I like the typeface that I use, its kerning metrics seem suspect sometimes. So the optical kerning is handy.
- Manipulation tools (select, skew, rotate, scale, etc) feel more fluid and intuitive, though of course this could just be practice.
- Interface is cleaner and easier to read at a glance.
- I don’t know how to explain this, but the object-handling and masking system seems easier to understand, or more clearly communicated. It feels easier to understand how everything fits together.
Boo
- Subscription model.
- Cleaning up balloons and tails is tedious and time-consuming.
- Revising balloons is fiddly and time-consuming.
Of course, I'm open to the likelihood that many of my Clip Studio feelings are a result of a lack of familiarity. Obviously, The Thing You Know is going to feel safer and more appealing. I have only spent a morning making balloons in Clip Studio. I'm happy to hear about things I overlooked, or easier ways to accomplish what I'm talking about.
Making Balloons in Photoshop
Here, now, are the steps I take to letter in Photoshop. Some people will tell you not to letter in Photoshop, but that’s an oversimplification. I like having my balloons interact with my panel borders, and I like painting inside my balloons, and those are easiest to do within Photoshop. Of course, if you’re sending a comic out for print, laying out the text within the balloons should absolutely be done in the page-layout app you would use to prep the pages for print. But that can be done later. Right now, let’s get some text on some pages.
1 - Make yourself some layers, one to eventually receive the “stroke” of the balloon, and two separate layers to receive the “fill” or contents of the balloon. I put one of those above the Panel Borders layer (for balloons that ride overtop or cover the panel border) and one below (for balloons that sit “within” the panel, beneath the border).
For the sake of this demo, I’ve added the “TEMP” layer—just a white Solid Color adjustment layer set to 50% opacity—to make things easier to see.

[ ^ Balloon layers added, and their relationship to the other elements in the page. ]
2 - Select the pen tool. In the top toolbar, set that pulldown menu to “Path.” Set the squaresies-looking pulldown menu to “Combine Shapes.”

3 - Start drawing a shape.

4 - If you go to the “Paths” palette, you’ll see Photoshop has created a “Work Path” path layer for you. From the hamburger menu at the top-right of that palette, select “Save Path…” (and give it a name if you like). Why do this? I don’t remember, but I like it.

5 - Keep drawing balloons and tails. While using the pen, hold OPTION (or ALT) and hover over a bezier anchor (the little square things) to get handles to adjust the curves. If you hold COMMAND (or CTRL) while using the pen, Photoshop will temporarily switch to your most recently-selected Direct Selection tool—either the black solid arrow cursor or the open white arrow cursor. Hit SHIFT-A (by default) to cycle between these. The Black cursor will select an entire path shape and is useful for moving path objects around the canvas. The white arrow cursor is useful for selecting individual points on a path and manipulating them.

5a - All the usual selection and manipulation operations here work like they do elsewhere. For example, using the black arrow cursor, hold down OPTION (or ALT) and drag a balloon to duplicate it. Use the Direct Selection tool to drag squares around multiple objects to select them all.
6 - Photoshop can seem to behave unintuitively when you are manipulating paths. For example, if you hit DELETE, it might not delete what you want it to. I think it gets confused between what you have selected in the Layers palette and what you have selected with the path tools. Experience will guide you, and Undo will be your friend.
7 - Let’s make some balloon outlines. First, in your Layers palette, select only your Balloon Stroke layer.

8 - Choose a brush with which you would like to stroke your balloons. I tweaked one brush especially for this purpose, so that’s what I’ll be using. Play around and experiment.
8a - Here’s a weird and important point: before you make your balloon strokes, make sure the tool you currently have selected is the brush tool. Not the marquee, not the lasso, not the pen, not anything else. For certainty’s sake, sometimes I like to draw a little bit of nothing outside the canvas (where it is not actually recorded) just to tell Photoshop “we’re using this brush, you got that?”
9 - In the Paths palette, click the “Stroke path with brush” button at the bottom (the button that just looks like a circle). On the “Balloon Stroke” layer, Photoshop should have traced your paths with the brush you have chosen. It might look messy, with overlapping elements. We’ll worry about that later (though you can also use the “Merge Shape Components” function on your paths if you want to reduce this cleanup work).
To see what I’m talking about in step 8a, run a quick experiment: clear out your “Balloon Stroke” layer, change to the Marquee tool or the Lasso tool, THEN click the “Stroke path with brush” button and see the difference. If your Photoshop functions like mine, you’ll see a notable difference. It’s been like that for a decade. It might just be an issue with the brush I’m using though, maybe your mileage will vary.
10 - In the Layers palette, select your first “Balloon Fills” layer. In the Paths palette, click the “Load path as selection” button at the bottom (looks like a dashed circle). Photoshop should A) create a selection in the same shape as your paths and B) hide the Path 1 path layer. Fill the selection with your choice of balloon-fill colour. Repeat for the second “Balloon Fills” layer.

11 - Cleanup. I go to my “Balloon Stroke” layer, erase unwanted lines, and sharpen the balloon tails. Then I address the intersection of the balloons and the panels, working with the two “Balloon Fills” layers to put the balloons above or behind the panel borders as desired.

If this sounds like an irritating way to spend your time, you are correct! It is.
11a - If you’re playing around with all this and you don’t need to be seeing your Path 1 path layer anymore, click in any free area in the Paths palette. It’ll deselect the Path 1 layer and hide it.
12 - That’s it! For the sake of ease and visual consistency, I will copy-paste these paths into the next page and keep on going.

13 - You can also set up an action to perform the tedious parts of this process, like the layer creation and the part where you stroke the path and fill the balloons. But again, make sure you run the action while the right brush tool is selected.
The first time through, this can seem like a lot of work and a lot of detailed fiddling. Take it from me, though: after a few hundred pages, it becomes second-nature. :)
Comments
I see what you mean about the font kerning being suspect. the "ta" kerning in "captain" looks wrong to me. Really shouldn't need to fix that in your drawing program, the font should be fixed (which is what I've had to do on a couple of occasions). If you find a change for any tool, and you don't want to change the original, copy the tool and rename, then click on the wrench to make your changes. I'll have to play with my copy to see if the corners for the balloon/tail corners can be squared up.
kaitou
2021-06-06 02:52:58 +0000 UTCMan, I love these posts, they're so helpful. Thank you ✌👏
Krystal Blackmouth
2021-06-04 13:50:04 +0000 UTC