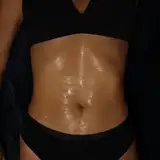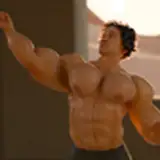
hey folks! as promised, here's a little peek behind-the-scenes for patrons -- an experimental "inflating" animation, and the technique that went into it.
i started with the fully-inflated sculpt, with wayyy too many polygons. I then shrunkwrapped it down to the proportions of a normal human torso (referenced), taking care to smooth out the geometry and making sure things mapped appropriately (arm to arm, boob to boob, etc).
the next part was the hardest -- using blender's various sculpting tools (snake-hook and smooth, mainly) to pull the polygons of the inflated arms/legs out into proportional arms/legs, with the upper & lower parts of each limb appropriately mapped. the geometry turned into a hot nightmare at this point, so it was important to smooth and keep the quads as close to regular as possible -- don't want sharp ridges or bumps appearing mid-inflation.
each of these transformations was mapped as a "shapekey" in blender, as well as going from 0 to 100% inflated. this gave me a set of 0-1 dials i could turn (and animate!) to inflate the model over time, even when it had an armature inside it. for obvious reasons, the human-shaped model is fully poseable, but it gets progressively less so as it inflates, hah.
some of yall might have already seen this on Twitter, but i hope y'all enjoy it! unfortunately blender 2.8 turned out to be a *bit* too powerful for my laptop, but hopefully once i have enough for a proper desktop, i'll be able to make content like this more often (and at a more ambitious scale)