![The Dungeon: Crossroads Chamber [22x16]](https://img5.xaiju.com/storage/8/kb/fr/d38796-019e9044-d0d6-7b37-85ca-27912013e472.jpg)
![The Dungeon: Crossroads Chamber [22x16]](https://img5.xaiju.com/storage/9/sr/zo/d38796-019e9044-d0e6-76e0-9958-2114b63fac66.jpg)
 Welcome back Fellow Darkish!
Weary from your battle with the monsters, you press onward into the chamber, your boots clicking against the ancient mosaic floor.
Ahead looms a finely carved statue—its cryptic engravings may hold the key to choosing the correct path.
The challenge, of course, lies in deciphering them.

REWARDS
22x16 Map
Gridded and gridless versions
Original, Original No Statue versions!
22x16 Map
Gridded and gridless versions
Original, Original No Statue, Blue Portal, Red Portal, Haunted, Haunted No Statue, Massacre, Massacre No Statue versions!
Printable PDFs
22x16 Map
Gridded and gridless versions
Original, Original No Statue, Blue Portal, Red Portal, Haunted, Haunted No Statue, Massacre, Massacre No Statue, Light Off, Light Off No Statue, Blue Portal No Statue, Red Portal No Statue, Blocked Gate, Blocked Gate No Statue, Frost, Cursed versions!
Printable PDFs
MAP DESCRIPTION
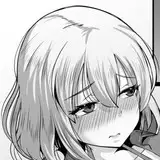
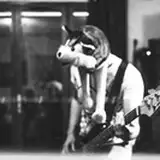
Behold the Crossroads Chamber, silent and unsettling.
A long, rectangular hall stretches before you, flanked on both sides by an elevated platform. Two low staircases descend from a circular clearing at the center, inviting you to ascend. At the far end, twin exits stand side by side—indistinguishable and offering no obvious clue as to what horrors or treasures lie beyond.
The mosaic underfoot is lavishly detailed, hinting at the significance of what awaits. From its center rises the grand statue, its inscriptions a tangle of forgotten runes. Should you manage to translate them, you may uncover vital hints to guide your progress—or learn secrets of the dungeon’s creator and its hidden past.
NOTES
Crossroads Chamber: A dynamic battlemat whose layout can swing the tide of combat. Positioning—whether you’re on the raised platform or tucked behind columns—can grant you a deadly advantage… or leave you horribly exposed.
The Statue: Its pedestal and open book are etched with mysterious script. You decide if your players understand the language outright, or if they must solve a riddle to unlock its counsel, adding just the right dose of challenge.
The Two Paths: This first major fork could alter the course of your entire campaign. One door might conceal easier foes, better loot, or secret boons—if only your party solves the statue’s puzzle correctly.
The Vases: These aren’t merely decoration. They might contain water… flammable oil… ancient relics… or something far more sinister. It’s up to you whether a curious tap reveals a boon or a curse.
The Braziers: A well-placed spell—or a hefty strike—can shatter their chains, sending them crashing down upon unsuspecting enemies.
The Foes: Goblins, cultists, skeletons, Minotaurs… choose from a roster of creatures to tailor the fight’s difficulty to your group’s prowess.
Tactical Positioning: Niches, columns, and the raised platform all offer cover and height. A ranged attacker perched above can pepper your party with arrows before ducking into shadow—forcing your players to expose themselves if they dare to retaliate.

Welcome Back, Fellow Darkish!
We delve deeper into the dungeon with Crossroads Chamber, a room teeming with complexity, multiple routes, and a mysterious statue to keep your players guessing.
Stay tuned: we’ll soon release additional chambers so you can begin assembling your own bespoke dungeon—choosing entry points, sequence of challenges, and the very level of peril your adventurers will face. Mix and match these maps as you see fit, crafting endless possibilities.
We can’t wait to unveil the next areas of the dungeon. We hope you’re as thrilled by the idea of a modular, player-driven dungeon as we are!
Let us know your thoughts on this map and the Dungeon Project in general by leaving a comment—your feedback is vital for long-term endeavors like this.
That’s all for this map, dear Fellow Darkish!
We wish you great adventures and NAT20s,
The Darkest Maps Team