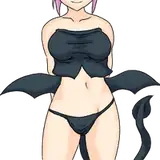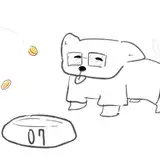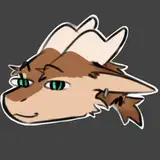
I wanted to share some of the tools I use from sketch to inks to color (since it's a lot like how I approach artwork for Slasher U!) I'm working on some character artwork for a client's video game, and above, you can see each step of the character design process so you can follow along!
PROGRAM: Clip Studio Paint
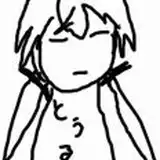
These are done with a blue-color pencil brush - I use "Perfect Pencil with Tilt": https://assets.clip-studio.com/en-us/detail?id=1712564
I love that pencil brush b/c it perfectly mimics the feel and drag of a soft pencil (think 4 or 6B), and the tilt means you can tilt your stylus to the side for shading, gentle lines, and all kinds of nuance!
The pencil color is blue because A) it's much easier to see while inking and B) out of habit! Did you know that in IRL comics, the original non-photo-blue pencil was chosen for pencilling, because it was a pure color that could be easily removed when scanning the inks? The "non-photo" part of the name means it's a keyable color that can be omitted from photographs when developed!
I always try to sketch on a background that's 50% or less black, so the white of the canvas doesn't burn my retinas to death, lmao
I use the built-in CSP brush, "Real G-Pen", with the Stabilization set to 2. The brush size depends on the canvas size - the # on the brush size is your maximum width, so you're gonna wanna pick a size, draw some heavy-pressure lines to see how thick your brush will get on the canvas, and then adjust the sizing to find your desired max thickness. Here, on a 3000px high canvas, I believe I used a max of 66 (I think??).
So the "Real G-Pen" is a recreation of the IRL Japanese inking nib, the "G nib", popular in manga inks. The difference between the G-nib and other Western nibs such as the Crow quill or the Hunt nibs is its ability to turn and draw curves and circles. With a western nib, you have to do a lot more fancy footwork, page rotating, and destruction of your wrists and elbows to get the sweeping curves and circles a G-nib can provide.
In CSP, I find that the "stabilization" setting corresponds to how firm your nib is, so if you're used to inking with a total softy like the Hunt #56 or other copper nibs (hi hello these are my fave), you're gonna want to turn your stabilization down to like 0 to 2 or 3. If you're familiar with a much firmer nib, or markers like microns with less flexibility, a higher stabilization might work better! I find that higher stabilization just kills the life in my lines though, so I keep it at a 2 or less.
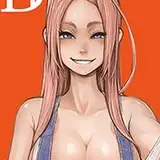
For base colors, nothing too fancy here! If an image has a background, I typically color the background first before selecting foreground colors, so the colors can be complementary and congruent. (If you eyedropper the colors from the SU characters, you'll find the "True" color is often a lot muddier, green-leaning, and desaturated than you'd expect)
To start, I use the Lasso tool to select areas to cover with flat color, and fill them. Then, once it's all flatted, I'll start new layers for shading.
The shading used in SU and above is pretty much a set-and-go process:
1. Using the Lasso tool, select areas you wish to shade, on a new layer. Use a fill color that's at 100% SATURATION ranging on the spectrum between green to pink (so, deep blue or purple would be A-OK, yellow would not show up as well. I typically use "RGB Blue" or a very very intense purple, think Sabrina the Teenage Witch cartoons or Invader Zim)
2. Set the layer setting on the shading layer to one of the following: "Overlay", "Soft Light", or "Hard Light". These settings affect how light passes through your layer.
3. Adjust the opacity of the layer til you achieve the desired shadow intensity.
4. To fine-tune your shadows, open up the Edit > Tonal Correction > Hue & Saturation adjustments panel and slide the Hue around until you find a shadow color you like. Remember to keep the Saturation at or near 100%!
You can then adjust the opacity, color, and switch between the three layer settings above to get the perfect look.
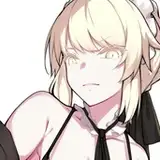
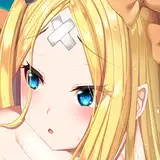
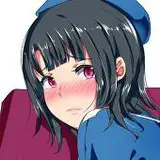
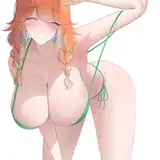
The big secret I use to make my characters come to life (besides stem cells and Chemical X) is a light layer of blush!
Select the Airbrush tool and select the Soft airbrush. Make your brush size about double the size of your character's cheekbone - so that it extends roughly from the jaw to upper cheekbone. A bigger airbrush will look classier on that shading, but going TOO big will lose the airbrush altogther!
Pick out a color complementary to your character's colors, in the red-pink-purple spectrum (I typically go with a variety of reds, unless you're Juno). If you're a makeup diva, you already know how to match and select different blush colors to different underhues and skin tones. If you're not, a quick tip is: Match the undertone of the blush color to the undertone of your character's skin tone (e.g., if you're painting Harry Dubois you wanna go for a rosy-pink red; if you're painting Cleo from Clone High you want a more russet or brick red)
Gently airbrush blush onto your character's cheeks, nose (optional), elbows, and knees (plus any other optional body parts that could flush due to natural variation - like titties. Yes I am artistically recommending you put blush on drawn titties.)
You can then pop open Edit > Tonal Correction > Hue & Saturation and fine-tune your blush color, as well as reduce the opacity for a more natural look. Then, go in with a soft eraser to define and clean up!
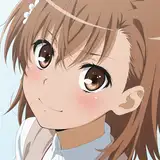
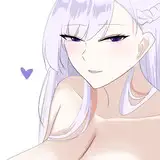
For hair, sparklies, and other glossies, I typically use the Real G-Nib to draw highlights in pure white on a new layer. Then, set the layer to one of the following: "Color Dodge", "Glow Dodge", "Add", or "Add (Glow)". For hair highlights (like on Sawyer in SU), I usually use Glow Dodge! For doing splashy, obvious highlights like on a wine glass, I tend to either just keep the layer setting at Normal. For sunny or neon highlights like you'd get in Cyberpunk 2077, I tend to use Add (Glow).
I draw a LOT of goths (yay yay yay), and don't always have enough time to render every last buckle lovingly, so here's a selection of my favorite accessory brushes you can use!
Knit Brush for sweater textures: https://assets.clip-studio.com/en-us/detail?id=1710261
String of Pearls (use gradient maps for endless effects!) https://assets.clip-studio.com/en-us/detail?id=1968023
Sequin Brush: https://assets.clip-studio.com/en-us/detail?id=1890359
Iridescent Texture Brush (I used this on a lot of Laila's gowns): https://assets.clip-studio.com/en-us/detail?id=1867165
Mermaid Bright Powder (another banger when used with gradient maps): https://assets.clip-studio.com/en-us/detail?id=1717662
Ornate Chains: https://assets.clip-studio.com/en-us/detail?id=1792864
Fishnet Brush: https://assets.clip-studio.com/en-us/detail?id=1837646
Cookie Lips (I used these for Yoshiko in Act 2 and for my Monster High portraits! Best used with gradient maps): https://assets.clip-studio.com/en-us/detail?id=1787336
Grommets: https://assets.clip-studio.com/en-us/detail?id=1763567
Pyramid Studs: https://assets.clip-studio.com/en-us/detail?id=1793139
Freckles (hands down MY FAVE freckle brush and the singlehanded reason Mike's body looks sooOOooo good): https://assets.clip-studio.com/en-us/detail?id=1700027
Brocade & Rope: https://assets.clip-studio.com/en-us/detail?id=1730733
Ruffles: https://assets.clip-studio.com/en-us/detail?id=1696782
Lace: https://assets.clip-studio.com/en-us/detail?id=1720008
Chain (more like jewelry chain but looks super sick sized up all Hot Topic like): https://assets.clip-studio.com/en-us/detail?id=1703878
Night Brush set (I use the sparkle ALL THE TIME): https://assets.clip-studio.com/en-us/detail?id=1497196
Hope this has been a helpful breakdown!! I loooove sharing brushes and hate gatekeeping lmfao, so if you have any art questions I'll try to answer them as best I can! <3