XaiJu
IanHubert
IanHubert

patreon


Tutorial: Modeling Little Tech Greebles from Images

A quick rundown of a bunch of the techniques I've been using lately for all these greebly (nonsense detail) bits! There's almost always a more efficient way to do what I'm doing at any given moment, but that's part of the fun of it :)

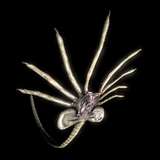
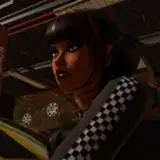
Also, spent some time today and made this little control panel (with HEFTY ol' tubes coming off the back, haha)! I think it's going to work well for a few HyperBole POV/Helmet Cam shots. Actually- I want to model some motorcycle handlebars to add on there, and maybe make a standalone image, like a POV shot of this thing parked at a drive-in restaurant or something. We'll see!  I also have all these modules set up with little noise modifiers, so they should wiggle pretty good in motion. THAT SAID- I haven't figured out how I want to approach the needles, yet. my plan right now is so paint out the original needles from the image texture, then add in some new ones with some constraints to govern the whole thing, but I'm not sure how ambitious I'm feeling just yet :/

Talk soon! 


Tutorial: Modeling Little Tech Greebles from Images

Comments

omg you are insane. THANK YOU

You can save the original image through the UV editor from some of his greeble asset blend files. He reuses a lot of these images.

I actually took the biggest screen shot I could find from this video and used it : )

how did you get his image?

Hi Ian, you are amazing at Blender and an inspiration to so many of us! I am having a hard time from minute 6 and 40 seconds of the video. I actually used the same image you used and it still doesn't work for me. Is there a way you can possibly revisit this technique for us intermediate users please? :) Thanks so much!!

So awesome!

https://goo.gl/maps/tPQF8irthAEsJLna6

Hey quick question! on minute 8:15 you flipped the selection of the UV project but I cant see how it was done! what are the keys to flip the selection? many thanks!

Going through old videos and found this resource, David you’re a treasure!

Tim Evans

wow

Since watching these amazing tutorials, I have been shooting a bunch of textures for modelling. I hope that its ok to include a link here https://photos.app.goo.gl/eNYLohsMdh57NR4j6 there are almost 5,000 images at the moment. If you are able to import he shared folder into your own Google Drive then you can perform searches as well ;-) There aren't as many switches and dials yet, I need to go to an air museum :D

David McSween

im also having trouble finding images lmao.

i am also having trouble finding any images

I like to search for old engines, especially tractor or aircraft engines :) For smaller stuff, I like to look for a labeled diagram of something (just to find out what things are called) and then search for whatever looks most interesting, stuff like fuses or tappets or pistons.

What are you looking for? Textures.com has many textures, go to pexels.com for great free stock backgrounds. Want a one click fix for great materials? Activate the BlenderKit addon to instantly apply them to your creations.

Fun fact: HDRI you are using is made in Poland :)

hey can someone help me with understanding the best keywords to search when finding textures to create objects such as these? having trouble knowing what to search for

The hyperbole scene is looking SICK btw, its like techno speeder quidditch

Nate

How i love to chill out by doing stuff in blender on one monitor and watching a video of yours like this on the other one. It rly soothes me

Nate

Yet again it's amazing that you've accomplished these shots single-handed! Out of curiosity what sort of workstation are you doing all this on? I rarely see any lag or slowing in your videos so I assume it's got plenty of grunt...

Pete Burges

I thought I will learn blender by supporting you. But TBH so many techniques you are using are also applicable in other packages. I really love your nitty gritty approach to everything - its not about the software, its about creating something!

Frank Frohnhoefer

This looks phenomenal. I feel that my patreon dollars are well spent learning from you in this way. I long to make things that look so good with the ease that you have. Thanks for showing us insight into how you work.

Also, Ian, now I have screwed up life, thanks to all this! See, now instead of enjoying a movie, I start see CG gotchas, wrong green screen keying, lack of light wrap, repeated parts all over the place etc etc. Before was only complains like "bass is muddy", "voice is out of tune", "quantization could be better", "snare sound like crap". Now this... :-)

Haha, indeed, on the second photo clearly not best cylindrical texture projection. But on the other hand, you do not see it! And nice part that on the last photo with that array of displays you clearly see scaled-up and multiple times reused parts. But you see it only because you know what to look for. And yet they look completely different. Magic of CG!

Awesome to watch the master at work : )

Hi Ian! Thank you so much for sharing your knowledge. You are trully inspiring. I’ve wanted to do for a long time some sort of short clip/film but it’s difficult to wrap up all together. Apart from all the technical stuff, which you show us here in a really good way :) I would love to see some tips on the thinking process of the creation of a short film/clip, or an specific shot of 10sec. Like, you crearly have a whole world created where environments, characters, props... all matches. And I found this really interesting... and difficult! I know this is something to develop through years!

KitOps maybe? Haven’t used it much though, so I might be wrong.

Tim Evans

Does anyone know of an asset manager for blender? It seems so cool to be able to create all these little greebles but am i always restricted to having to append hundreds of blender files whenever i want to build a scene? Ideally there would be some kind of drag and drop asset manager so i'm wondering if anyone has found something like that?

Awesome! Super helpful. Thank you!!

yep

Patrick Lever

these are my favorite types of your videos when your just modeling stuff.

Love it. Love it. Love it.

Doug Brown

Does anyone know what specs Ian is running on his PC?

Ahhhhhhh- oh man, that looks super useful, if I can reconfigure my muscle memory, hahahaha- I need to remember to use the "Shift+Z" option to make it just slide around on the other two axis, too. Thanks for pointing that out!!

Ian Hubert

I haven't played with it yet but I'm so excited to! It looks ridiculously useful!! Between that and the eevee object motion blur- I can't wait.

Ian Hubert

Oh dang yeah that IS a great resource. I don't know if you remember, but I often think back to when you were showing me the little details in the injection molded plastic bit at your work in Mukilteo. I'm stoked to try out that script!

Ian Hubert

PAUL SPOONER you know every sweet trick! SHIFT 7!!!! HOT damn. That's... that's amazing. I had no idea. Also never noticed that "view" option int he drop down! Thanks again :D

Ian Hubert

AH! I'll have to try that later today! :D

Ian Hubert

what computer are you running to make this possible?

Awesome video as always! Also just discovered in 2.9 (you may already know this) they've added a keep connected option for when editing meshes, it won't distort UVs... totally changed my workflow, figured worth a share for anyone who also loves the image based modeling Ian does! https://wiki.blender.org/wiki/Reference/Release_Notes/2.90/Modeling

Gehrig Campbell-Dempsey

Wow. After watching the hyperbole shots it's Amazing and very tempting to see dynamo. Very Exciting...

akim mohideen

Woah, that scene is really coming together!

John Zwick

Thank you so much for this Ian, your 6 odd attempts were definitely worth it! I've been wanting to learn how to make these instead of always lifting them from your other scenes and I might finally get around to building my own library (you're right, it pays to pay attention to modelling them once since you use them a million times!). Thank you again :D

Aman Bhargava

you should definitely make a house making tut

thats a great tutorail, so can you make some tutorias, to improve render resoults?

I'm always impressed by how low in memory his scenes are as well.

Didn't watch the whole video yet, had to solve some problems on my computer today haha But you mention you like to set the view so that you don't have to reach the Y key so often, a little tip that helped me A LOT when moving from 3Ds Max to Blender and having to adapt to pressing keys to only move the object in one axis only: You don't have to! >If you press G to move a object, and while you move the mouse hold down the Scroll Wheel button. This will show a white line guide that will snap in one of the 3 axis you direct the mouse to. This is very helpful, and I find it easier than pressing the XYZ keys. -I also works for Scale and Rotation as you can imagine... It helped me a lot when migrating from MAX, I hope it will help other people too ^^

That shot of the cameras looks so crisp! So excited for Hyperbole. Could we get some more overview stuff like how you go about taking these assets and making scenes out of them, or which parts you design for a specific scene and which you just kitbash?

Zachary Macintyre

That moment of “flip the UVs back on themselves to preserve detail” had me spraying my Irn Bru across the room! <3 much helpful, many thanks!

For ideas on what engineered parts look like, my go-to is mcmaster.com they have great search tools, for example if you search for cable supports, you will find that "routing clamps" describes the part you are looking for. if you are feeling lazy, you can even download the dxf and import it into blender and use that as a direct reference for your modeling. If you want just a random page from their catalog for inspiration, I wrote a script for that: http://tryop.com/mcm_page.py Can be really handy for climbing out of a design rut. Just ran it, and this page came up, which seems unusually helpful: https://www.mcmaster.com/3612/

Paul and Anna Spooner

To insert the cylinder at the same angle as the face, select the face and press shift numpad 7 to align the view to the face, then when you add the object select "view" from the align drop-down in the add object menu.

Paul and Anna Spooner

WOW! I don’t know how you are able to render such detailed scenes full of Greebles like this. From specs you posted in the past I have a similar rig but even in Eevee scenes like this would have large per frame render times or just completely crash for me. Is it just keeping your image texture sizes bellow a certain size?

Mike L. Taylor

This is super helpful and awesome stuff! Thank you, Ian!

Mario Taylor

Love it. Thanks!

Tim Evans

Hey, great as always! Not sure if it helps or not but when you did the first project from view action in the bottom left popup there is an option for ortho, would that help with the aspect of the image?


More Creators