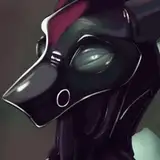
this character is an angel of death, charming on the surface but cold and analytical underneath, and the prompt suggested either a graveyard or church as the background, so this was the perfect candidate for one of my favorite types of drawing which is "character staring at you ominously". I've done a couple graveyard backgrounds for fullbody commissions so in my hubris I thought a church would be a great idea (:
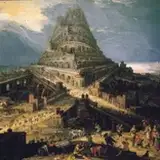
luckily we have a few local churches that I visited to gather references from- these are the two pics I used:

but first I explored a rough idea based on a pic from unsplash that had some interesting diagonal shapes in the light falling through church windows, and it ended up feeling like... too casual and human... I realized I wanted to include his wings and portray him less on a human level.

so using one of the pics I took, I sketched this idea instead! I liked the idea of elevating him literally above human level by having him sit above the viewer, and also having him sitting in a bright heavenly light but looking down into darkness.

I cleaned up the sketch and traced lines over the background- I usually try to reference backgrounds instead of tracing them to learn more, but I really didn't want to draw the window freehand haha. I referenced the stone details a little more loosely, and also added his other wing in to try to balance the composition more. looking back I think I lost some of the feeling of him leaning back by making his left arm slightly curved, oops.

I blasted through the lines like a madman while listening to an audiobook about wolves (important part of the process)

colored everything in, and more stone details! I blacked out some of the top to reduce the amount of detail there and keep the focus lower, and hopefully help with the sense of depth.

I put down a light warm grey multiply layer at 100% over him for the shadows, and used a similar placeholder color on a regular layer on top to do the highlights. then roughly threw in some color variations on the stones to paint on top of later.
once I drew the second wing in, I knew I might have problems making his raised hand visible, and surely enough there are problems! but his lowered leg is hard to see too which I overlooked- so at this point I started thinking I'd need another light source to it clearer.

I shone some more light through his wing to make his hand more visible- I have no idea whether so much light would show through dark feathers (probably not) but I think it looks ok! I also changed the layer mode of the white light to hard light at this point, and roughed out another light source from below in a warmer color, on a hard light layer at 50% opacity.

I figured the warmer light could be coming from candles, so I threw in some candle flames- I liked the idea of including fire at the bottom for symbolic hell reasons. I also cleaned up most of the warmer light on him, added a few darker spots in the shading in black, rendered all of the stones in the background using the pic as a rough guide, and added the shapes of the ghostly smoke coming from his pipe.

I finally changed the color of the window light on him to a blueish grey to better show his cooler local colors, and to make it stand out a bit more from the window. also cleaned up some spots of the warm light I missed, added some shadows to his coat tails, refined the candle flame shapes, colored in the smoke, and added some glow from the window with gaussian blur, which I went over here and there with brush strokes.

I colored in some of his lines, which always surprises me with how much more finished it makes a piece look! also added the interior lines of the windows using my second pic as a reference, and rendered the candle flames.
if anyone's curious about how I did the candle flames- I duplicated the light yellow layer, put it below the original layer and recolored it to the darker orange, and stretched it up with free transform so it would show around the light yellow. then erased part of the bottom of each layer so the background and orange would show through, then duplicated the orange layer again, gaussian blurred it, and set the layer to soft light for the glow.

and then the final touches! I made the candle flames a tiny bit bigger to take up more empty space, added thickness to the interior window lines in the intersections to make them look a bit more imperfect like real soldering, added some black shading to him that I missed before and lightened the dark shading on his shirt, added some outlines to the smoke to help with contrast, and added light from the window to his glasses.
I also added a light grey gradient stretching down from the top, on a screen layer at 20% opacity, to brighten up the top of the wall and make it seem like it's further away, and finally with a tonal correction layer on top of everything, I adjusted the hues to add a bit of green to the lighter values so the entire thing wasn't so uniformly warm.
I've only recently started using tonal correction to adjust colors at the end of my process- maybe I'll make a simple guide about it later but I learned how to use it with this video! https://www.youtube.com/watch?v=T7Pu1uCFjAc

I saved the process for this because last time I tried to record a timelapse for a fullbody piece clip studio nearly quit on me, but I just updated it and it looks like timelapse files should be smaller now so I'll record the next one! hopefully this was a good read though, let me know if you liked it!