Hi Folks
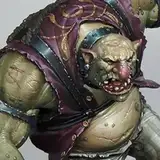
here is the second episode of our Goblin Mercenary from Spiramirabilis Miniatures.
In this episode, we will not only talk about layers and glazes while we paint the scarf-like fabric that is wrapped around the neck of our Goblin

but we will also talk a little more about the topic of Judging miniatures.
I am sure that if you have had a look at the Painter development sheets from the last Pdfs. you might have realized that it can be harder than expected to judge your own abilities.
If we have a look at this graph here to see what mechanism makes it hard to do that!

It also explains why many of us have constant up and downs when it comes to how we feel about our own level of painting.

We might expect that our ability grows equally over time,but in reality, we experience more ups and downs.
This is because,we have to take a closer look to see how our ability grows. Next to the ability to paint miniatures ourselves we also develop an ability to evaluate and judge miniatures and both of these curves are not related as you might think.

When we start a new craft the learning curve mostly starts rather slow. We first have to get the basics down before we can truly enjoy ourselves.

At the same time, we soak up all the pieces of information we can get.
We look at pictures of models on putty and paint or social media.
And our ability to evaluate a well-painted model grows faster than our own skills.
Once we have the basics down our abilities seem to go through the roof and we are happy with what we are able to achieve.

We are entering the "ART HIGH". It's important to not get too cocky in those phases because the more time you spend the more you will realize that there is more to learn. You see new art and other artist creating masterful pieces- once again your ability to evaluate art grows again.
But brace yourself ever so often after the high there comes the "Art Low".
The "Art low" can have several reasons and one of them is your evergrowing ability to judge and evaluate art.
If you find yourself in a low, there are a few things that can help to overcome your blockade, we will use this series to explore different methods.
And as discussed in the last video, one thing that you can do to push yourself out of the "Art low" can be to focus on your weakpoints and and fight it one by one, technique by technique and topic by topic.
This brings us back to our goblin!
It can help to have more fun painting if you choose the most fitting technique for the element you want to paint.
But what does that mean...
Last time we used the wet blending technique to paint the face of our goblin because the skin tone that I wanted to create consisted of many, wild color blends and long transitions from one color to another.
For the next element that we are going to paint the situation is quite different.
We are painting the fabric that is wrapped around the goblin's head.
If we look at the fabric we can see it has relatively geometric wrinkles that catch the light quite equally on the top.
That leads to relatively short color transitions.
This is why I choose to paint it using a combination of layers and glazes.
I said we will dedicate one main technique to each part, but as I said here in this case we are working with a combination of layers and glazes.
Both techniques can be used to paint a gradient on their own.

For the layering technique, you place opaque tones that you have mixed on your pallet next to each other on the model.
To be able to create a somewhat smooth blend you need to mix a lot of intermediate tones.
Glazing:

For the glazing technique, you apply translucent layers of paint. You kind of stack them on top of each other to create a gradient.
You have to work quite carefully and make sure every layer is dry before you can continue. You also have to avoid too much paint gathering on the surface to avoid stains.
If you stick to only one technique it might take a while to have a smooth-appearing blend.
This is why Layers and Glazes are a great pair and complement each other very well.

Example:
If we take 3 layers for example and place them next to each other
we can see that it is not enough to read as a smooth transition

This might work better for small blendings because the eye helps to let the colors appear like an actual color transition.
But if we want to create a blending on a slightly larger surface we need a few more intermediate tones.
Let's say we need would need at least 10+ layers to get a smooth-looking transition ( depending on the size of course).
But if we take our 3-layer situation from before and use intermediate tones as translucent glazes in between the layers, overlapping to both sides, we can soften out the transition in no time.

Alright, enough of the theory, let's have a look at how that works on the model:
We first start to introduce our layers Starting with a fully opaque basecoat. Once we have placed our highlights with 3 different shades we are using intermediate glazes to soften our transition.
After that is done we are creating a bit of texture.
We want to go for a simple sack linen look, that creates an interesting bit of texture contrast toward the face.
We are again using the layering technique to place our texture lines.
After that, we are using a few thing glazes to tie things together.
Once we are happy with the look created we are using again the layering technique to paint on some freehand flames.
Alright.. can't wait to show you the whole process of the model!
Thanks for your support and have fun watching!
Oh btw. Great to see that a few of you are trying out to level yourself with the pdf sheets and challenge yourself and share it on our discord server.
Ben Komets
2022-10-13 11:43:42 +0000 UTCJoe Barlow
2022-10-13 11:40:58 +0000 UTC