
Hi Folks!
For most of us, miniature painting is a hobby, a leisure/ free-time activity.
Yet it is not only normal but very common, that we fell also pressure.
And we can feel a little overwhelmed or have the feeling we are stuck on a plateau in striving to become a better painter.
As a painter or an artist you want to be able to tell the stories that are in your head but to be able to tell those stories in a way that someone wants to enjoy them, we first need to overcome a seemingly endless list of technical barriers, self-doubt and even fear.
Fear might sound a little harsh, but there are many aspects that are causing different fears.
We fear that we can't do justice to the sculpt, and the miniature goes back to the shelf. We fear that we can't compete with the boxart or other gorgeous versions out there, and the miniature goes back to the shelf.
Maybe you also simply feel you want to wait until you stepped up your technical game before tackling a certain model, there are a ton of good reasons that let our pile of shame grow.
Most of these fears result from two main reasons, both settled in insecurity.
First, we avoid certain topics or materials that we imagine seeing on the figure. We would love to paint that big knight on horse entirely in NMM, but my NMM looks like a grey rock, so the figure goes back to the shelf.
Or you would love to paint that big orc that only wears a loincloth but you don't manage to paint a convincing skin tone.
If you think about it there is only a very limited number of topics or material that we see on almost every single model.
Make a List:
Check what materials are out there, and which are the most important ones. Mark which ones you feel comfortable with and which ones could still need some attention and further investigation.
Skintone
Hair
Fur
Metal surfaces - NMM & TMM
varnished/painted surfaces
Leather
Wood
Bases
Eyes
Scales
OSL
Face your fears:
Work with your list and try to choose your future projects a little more strategically. Paint what you fear, whether it´s skin tones, NMM, leather, or OSL. Choose a project where the topic of your fear is inevitable.
Check references, and how does the material look in real-life. If you feel stuck check your favorite artists to see how they painted a similar model or material, and try to understand how a certain look is achieved.
Collect those references.
The second cluster that causes a lot of anxiety is caused by technical barriers, whether you feel unsure of what technique to use or how a technique works at all.
Especially when you are at the beginning of your painting journey it can be overwhelming because there are seemingly endless techniques out there to learn.
But if we have a closer look there are only 9 main techniques:

Make sure to get yourself familiar with all of these.
It will tremendously freeing if you minimize the technical barriers.
Please keep in mind, that you don't have to become a master of all techniques, but you should be able to choose what technique works best for you.

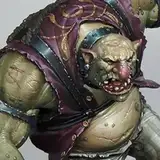
We will use the fantastic Mercenary Goblin Bust from Lucas Pina / Spiramirabilis Miniatures as an example.
One of those precious miniatures that is waiting on a lot of shelves for various reasons ;)
We will go through this model bit by bit, explaining the different techniques, each part of the model will have one main technique.
Face: Wet blending
Cloth: Layers and Glazes
Armor: Stippling
and so on...
We will start with painting the face of the goblin.

To really create a unique character it is important to create a personal choice of color. The choice of skin tone can help tremendously to define that character. For all-natural materials, it is advisable to incorporate zones of a different color. Natural material like fur, skin, wood, or hide is seldom uniform.
We are choosing the wet blending technique to paint the skin.
we are first introducing the color blends to define the different colored areas.
We are starting very rough first, with heavy, opaque paints.
Once we are happy with the general placement we are refining the transitions bit by bit.
Once we are happy with the color placement and the smoothness of or material color for the skin, we are going finer and finer placing the highlight using the respective color and white.
It's important to note that the placement of highlights is detached from the placement of skin color before. We are doing it also in the wet blending technique. This helps to not get overwhelmed by a very colorful situation.
In the video, we will discuss some of the pros and cons of the wet blending technique. I guess the face is painted 90% using wet blending,
but you can also see that almost non of the techniques work on their own,
... a layer here and a glaze there. This is a good example of why it's important to make yourself familiar with our 9 essential miniature blending techniques. But we will discuss that as well in the following videos.
We will be also working with a very limited palette(3 color + 2 tones ), the goal is to create a colorful yet harmonic end result, with an interesting play of saturated and desaturated colors.
Alright, I hope you enjoy this video and it encourages you to pick a sleeping beauty from the shelf and start rocking!
Thanks for your support!
John Yuh
2022-11-21 23:39:16 +0000 UTCBen Komets
2022-10-13 09:53:51 +0000 UTCBene Weimer
2022-09-22 15:58:32 +0000 UTC