Throughout the years, a problem I've consistently dealt with in my artistic journey has been trying to balance style and anatomy. When I was younger, I often felt like I had to over-compensate for one when the other was lacking, and more often than not I would try to use references to make sure my anatomy was solid to make up for the lack of stylization. This was a good strategy at the time and it certainly helped me expand my understanding of human anatomy, but it brought about one fatal flaw in my work: unintentional stiffness.
To clarify, stiff poses are not inherently a problem when they're used with intent. For example, if the character you're drawing has a very rigid personality (think a drill sergeant) it may be totally suitable to draw them in this type of way. Concept art meant to showcase the design of a character may also be intentionally stiff. But in my case, I wanted my poses to be fluid and dynamic - I just didn't know how to draw with those things in mind.
I made it a mission of mine to figure fluidity out without sacrificing anatomy or style. I still have a lot to learn about this subject and I constantly practice in hopes of getting better, but I've picked up a few things overtime that I think may be helpful to any other artists struggling with stiffness in their poses.
One of the most common ways to break down poses is to draw a stick figure. A lot of artists dismiss the idea of using stick figures because of how rigid they are - the common complaint is that, since they're just made up of straight lines, your pose is almost guaranteed to be very stiff as a result of using them. Instead, many artists opt to draw gesture lines instead, which are much more fluid and organic. However, learning to effectively use gesture lines can take a lot of study and practice before it looks really good.
In my own work, I tend to use a fusion of both.

This is an example of how I might break down a standard silhouette. I like to use what I call Joints and Noodles.
Joints are the "hinges" of the body. These include the shoulders, knees, hip bones and elbows, along with smaller joints like wrists and ankles. Regardless of what your pose looks like, these joints are what hold the pose together and control how the body parts are positioned. In this example, I marked some of the key joints in red.
Noodles are the "sticks" of the stick figure. However, I call them "noodles" because I don't ever draw any of them as straight lines. Unlike a stick figure, whose goal is to draw the bones of a pose, my "noodle figures" aim to draw the gesture of each area of the body instead.

Using joints and noodles to construct a figure, I can easily turn a stiff pose into a more relaxed one by treating the joints like handles.

The human body naturally follows a rhythm of curves going in and out thanks to the curved shape of our spines. This may not be obvious from a front angle, but if you take a look at the body from a side angle it becomes clearer.

Because of this, our eyes tend to find poses with this "in and out" curve more natural and pleasant to look at. It can be helpful to keep this in mind when drawing bodies of different shapes and sizes; no matter how your character's height or weight is distributed, their spine will still follow this shape.

Knowing this, we can push the idea even further and create fluid poses.

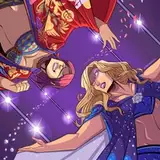
As you can see, the character on the right has a much more interesting pose than the one on the left, despite them both being in a standard standing position. This is because the character pose on the right utilizes curves and "in and out." It gives the impression of energy and liveliness, like the character could start moving at any second.

Now that we understand the importance of curves in posing our characters, we can really get creative with how we use it by utilizing contrast and parallels.
The opposite of push is pull, so those two things contrast against each other. The same logic applies to curved versus straight lines, left versus right, up versus down, etc. etc.
Parallels are two things going in the same direction - two curves bending the same way, for example, are parallel.

It takes a lot of practice, but once you learn the rhythm of the human body you can find visually interesting ways to change that rhythm without disrupting it. Try pairing together parallels and contrasts in your poses to give them some visual excitement.
Another factor to consider when making a pose is rotation, or how the body twists. Similar to the joints mentioned above, there are key points on the body that can be shaped to make more interesting poses. Specifically, these are the parts of the body attached to the spine: the neck, ribs, and waist.
Humans very rarely turn their entire body all at once when moving, so our poses should reflect that.

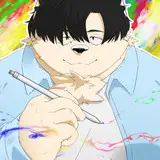
Here, my character has his head facing forward, his chest turned to the left, and his waist + legs turned forward. It looks as though he was facing away from the "camera," but it caught his attention so he turned his head to interact with it.
There is one factor to keep in mind when making unique poses. Sometimes, seemingly for no reason, your pose may feel a little "off," as though the character is weightless in space and doesn't really have their feet on the ground. This can usually be attributed to balance.
In human bodies, the center of gravity is just above our pelvis. You can imagine that there's a vertical line going straight through it, splitting us into two halves. Our two legs are what we use to keep our balance and stay upright, so they carry our weight on either side of that line. Although no human body is really 100% symmetrical, the weight distributed onto either side of the line should be equal when we stand straight up. If you've ever stood on one foot for a while, you can feel your body start to lean in the direction of your lifted foot because your balance is thrown off and it's attempting to regain it by approaching the center line of gravity.
So, how does this apply to posing?
When we pose a body in a drawing, that same concept of balance and gravity applies. In fact, it works in tandem with the ideas of "in and out" and contrast + parallels mentioned earlier, as whenever the human body loses its balance it tries to regain it by compensating the opposite way.
If your character sticks their leg up in the air, their other leg will move closer to that invisible line of gravity to keep their balance. This idea of compensation can be a great way to fix poses that feel "floaty" and amplify already dynamic poses to feel more grounded in reality.

To be honest, I don't always consider the factor of balance when drawing poses, since it can be a lot to think about on top of everything else and the other principles talked about in this guide sort of overlap with it already. But when I'm struggling with a pose feeling too floaty, I try to approach it like this:
If one part of the body is leaving the center line of gravity, how will the rest of the body compensate to keep the balance?
From there, I can use the other principles to "fix" the pose into something more grounded.
---
I hope this was a helpful read! I plan to make a part 2 that discusses perspective, dynamic angles, and more in the future. In the meantime, you can find more of my guides in the Guide tag!