or: Let's draw!

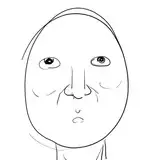
Ok, my drawing skills have a limit. But you don't need much you to get this done.
Let's get the texture going. I like deep rich colors. Looking at Anubis texture, the upper fur is decent but does not convince me. The characters in the artbook convey very short horsehair which is fine by me.
I use a Trystan as the base skin for this character. I apply Altern8 skin shader with high transparency which gives me a great base to work off. Skin Shaders really depend on lights and personal tastes. I find that this one responds greatly to rim lighting.
I still want the fur similar to what Anubis had. However, I also need the nozzle of a horse. Looking through the anthro collections I settle on Tors head. I create a Geoshell using Sy Skin Transform. You'll notice everything going white. In this case, I go into the materials, select all surfaces, and turn the opacity to 0. Then I turn the face and torso opacity back to one.
Tors skin cannot be directly applied to the shell because it's an H.Material (hierarchical). The trick is to load Tor, go into his surface, right-click the torso, and copy the selected material. The paste the material into the shell torso surface. Do the same with the face.
If the surface does not take the material, an Uber shader has to be applied first. There should be a shader in Shader Presets/Iray/Daz Uber in the library. Apply that to face and torso and then copy Tors surfaces. In order to darken the skin, I dialed in RGB 85,85,85 in the Base Color of both surfaces. Again, this is an experimentation value. Turn on Iray preview and see what looks good. Diffuse Overlay color is RGB 192,192,192.
So, now you'll see sharp edges on the upper torso. SY Skin Transform has a partial answer to that. It utilizes opacity maps to blend one skin into the other. In this case, those maps won't do. I've attached a new map. Load this into the opacity for the torso and the fur will look much better.
I started out with the existing t2stage2 texture. I inverted in photoshop because it was doing the exact opposite of what I wanted. Then I worked with a large brush and low hardness as well as a large eraser to paint in the areas I wanted the fur to go as well as soften the edges. Pulling in the G8M template for the torso also helps with the back. I wanted the fur to go from the head all the way down the back to make it look like a ridge or mane growth.
Part 3 here: https://www.patreon.com/posts/kitbashing-part-41441211