Hey everyone!
During this series, my focus was on capturing the energy of the original references through expressions and dynamism. On top of that, I added a small twist commonly found in my illustrations related to depth. Let's break down each step so you can apply this to your illustrations.
Expression Energy
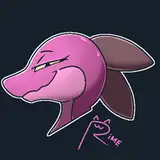
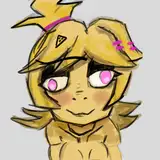
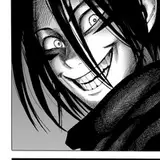
Expression in characters can be represented through body posture or facial expression. Both work separately and together to create interesting gestures. In the context of these series, I've chosen animals with particular head positioning and gaze - they are looking at you, the viewer.
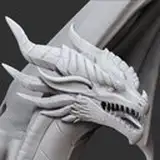
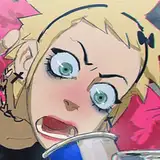
Given the context of these animals as predators, if you are a person with a certain level of awareness about the danger behind, you may think "they will eat me" or assume they think "I'm going to eat you". One way or another, this is the energy the stylized interpretations must have. So, how do we capture that energy?
In my view, energy comes from the eyes. An intense gaze of a small pupil, and sometimes this exact small pupil getting slightly cut in half by the eyelid, creates this sense of calm mixed with fear. When replicating this energy in your drawings, keep in mind this simple but essential distribution of lines in the eyes; it can help you a lot
Dynamism
I add dynamism by building shapes with curves and ovals. In this series, for instance, during the first phase of anatomy, instead of building guides like cubes or straight lines just to set the proportions/perspective right, I suggest body shapes with very organic ovals and curves. This approach allows me to create a sense of weight and movement, making it seem like the character is in the midst of action.
Our brain recognizes what a circular shape is, but an oval suggests this circular shape object is moving, creating a sense of dynamism and gravity. You can spend some extra time fixing proportions and perspective after this, but at first, try using ovals while sketching.
Perspective Depth
Last week, I had a small gig where my employers asked me to experiment with perspective in a few concepts. They referenced some of my previous works, such as this one: https://www.instagram.com/p/BltGPw1BpOB/.
The key to creating perspective compositions is dividing the composition into three layers: front, middle, and back. Although I typically begin with the "middle layer," let's discuss the importance of each layer, starting from the front and moving towards the back.
The Front Layer is where you place objects that appear larger in comparison to those in the middle and back layers of your composition. These objects are often superimposed, blocking the view of elements in the middle or back, thereby creating a sense of scale. Their size gives the impression that they are "closer" to the viewer. In this series, I frequently achieve this effect using hands or additional elements to create the illusion. It can also be beneficial to position small, key information in front of highly complex compositions.
The Middle Layer is where I typically place the focal point of the composition, capturing the viewer's attention. The sense of depth in the composition arises from the size of the elements in the front or back layers, rather than solely from this layer. In this series, the crucial information resides in the head. From there, you can envision a "sphere of influence" that extends from the head to the waist. Everything within this radius falls into the middle layer, including the head, neck, shoulders, arms, chest, torso, belly, and even elements outside the body that are in close proximity.
The Back Layer, although not intended for background compositions, encompasses objects that appear smaller in comparison to those in the other layers. In this series, I frequently include body parts like legs in the back layer
Here are clearer examples of this three layer rule:
Character Focus: https://www.instagram.com/p/CtJ0FFQsvqw/
Front Layer: Head
Middle: Hands, Torso, and Mirror (face)
Back: Legs and Shoes.
Full Illustration: https://www.instagram.com/p/Ce1zoZ2sQbO/
Front: Arm/Hand
Middle: Main Character (face/torso), second character (face)
Back: Theatre ceiling.
Feel free to experiment with various objects, whether they are connected or not. The crucial factor is the size of these objects in relation to one another. It is this size relationship that generates a sense of depth in the perspective of your composition.
Conclusion
Next time you want to improve your illustration skills with interesting references, keep these three tricks in mind to capture the overall mood and add your unique touch to the composition spectrum. If you decide to give them a try, feel free to share your progress in our Discord Channel. I'm highly interested in seeing how you apply these ideas.
Tomorrow, I'll be sharing the process video of this series along with the files for you to delve more into the tricks previously mentioned. They will be available for Mastering Maestro tier and above. Feel free to upgrade if this tickles your fancy! ;)
Welcome to all new patrons!. Feel free to drop any questions here in the comments, via DMs here on Patreon, or in our Discord group. I'll be more than happy to answer and track your progress.
If you found this article useful, please drop a like or a comment! I appreciate the feedback and criticism as well, as I strive to improve and provide you with the best.
For more information, check out our Patreon FAQ: https://ramonn90.myportfolio.com/faq and Patreon Catalogue: https://ramonn90.myportfolio.com/work
Your support makes this content possible! Thank you.
Ramon Nuñez
2023-07-11 15:03:39 +0000 UTCJordan Weston
2023-07-11 10:21:31 +0000 UTC