Inked Originals and Tutorial
Added 2025-06-09 21:00:07 +0000 UTCI am home again after three long weeks on the road and the comic will resume as normal next Monday as scheduled. I am absolutely beat, so the next week is for sleeping and playing catchup on some stuff.

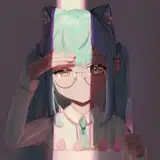
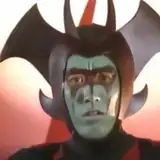
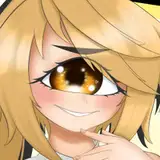
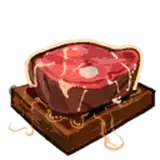
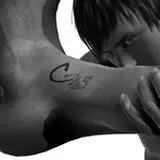
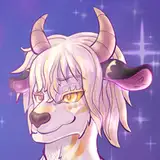
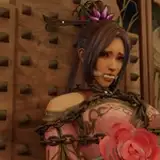
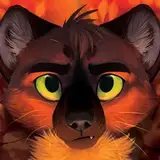
In the meanwhile, here’s the original art I did for Volume Two’s Kickstarter! These were all done earlier this year, the character requested by the KS backer. They're done in a mix of pens, ink and pencil.
At the bottom, I have a breakdown of how I did these, supply list, tips of the trade, etc (and how you can try it out too, if you want!)
I did 10 in total, and in no particular order:


=== WIP BREAKDOWN ===
I really hope this breakdown inspires someone to pick up some pens or ink. I’ve got some art school methodology to drop on you that will hopefully cut out some of the nebulous parts of the process and maybe open it up for you to try. No matter your perceived art skill, making stuff is fun (and it really can be cathartic in trying times.)
Supplies-
I use Arches Hot Press paper (more on that in a second.) For pens, I’ve grown really fond of Molotow Blackliner technical pens, for paint brushes I get the cheap synthetic boys from my local art shop (just don’t buy ones with janky tips and you’re golden.) For “painting” ink, I have a huge bottle of Speedball.
I also used graphite transfer sheets and blue painter's tape. Those are kind of ubiquitous and any brand works-- transfer sheets you can buy in packs like this or just a single large sheet loose from art stores. (They can be reused a lot and if you're paying more than $12 a pack in 2025, you might be getting the wrong thing.)
Arches Water Color Paper
Hot Press = smoothest paper with a little “tooth”
Rough/Cold Press = more “toothy” or rough paper, which holds more paint.
For ink/pens, I use Hot Press, but certainly experiment.
Full disclosure, Arches blocks are pricey. (They also come from France, so tariff pricing hasn’t done us any favors here in the US.) However, I would argue it’s worth it for the paper. I don’t think you need the best of everything to make great art (certainly not as someone playing around or learning) but paper is among one of the pieces that makes a huge difference in the final product.

Arches paper is sold buy the sheet, but it also comes on the block. That’s important for one reason— it’s pre-stretched paper. So, if you leave that top sheet on the block and get it wet with paint, water, whatever— when it dries, it will still dry flat, so long as it’s on the block. When you are done painting, you cut it off the block and boom, you have a (almost mostly) flat watercolor/acrylic/ink painting (rather than one that dried all wibbly.) If you’ve ever worked on paper with a wet medium, you know what I mean.
I would love to have shown you a picture of one of my Arches blocks, but my dog has developed an insatiable desire to eat (blank) Arches paper. Which, isn’t surprising, because Arches is made from rabbit hide, so uh…keep it away from dogs, etc.
STEP ZERO: MAKE A SKETCH
Okay, I didn't document this. I do my sketches digitally, then prepare the file to print onto thin copy paper. I use that plus graphite paper to trace it onto the Arches block. So, you can do the same and sketch something digitally then print it, or just use a regular sketch from a sketchbook (though I still recommend making a copy of that, since your sketch will probably get messed up during the transfer process.)
[If you really just want to try inking but are struggling for an idea or where to start-- grab some old public domain image of an animal or a flower. Obviously don't claim the drawing as your own, but there's a reason adult coloring books took off. Sometimes you just want to color or ink or try a technique to see if you like it without getting bogged down in "I need a good idea". It's okay to just get to the bit you want to do because the process is enjoyable. It's not like people who like puzzles first go out there take a photo, mount it to cardboard, then cut them up before starting.]
Anyway, let's assume you have a sketch ready to get onto that Arches block.
STEP ONE: TRANSFERING TO THE BLOCK


Using a mechanical pencil, I trace the lines of the printed out sketch, which presses through the graphite paper, and transfers the graphite onto the Arches block below. I find this part very tedious and it's my least favorite part of the process, hah. And a heads up-- what you use to trace matters. I started with a finer point pen and it pressed the graphite way too hard into the Arches, making it impossible to erase later. The blunt head of the mechanical pencil applied less pressure.

Here is is all traced, double checking for spots I missed. Once I take off the painters tape and remove the sketch, I will never be able to line it up correctly again, so it's best to be sure. (In the top, you can see how much more fine and hard-pressed that one stick is-- that's where I started tracing with a pen before switching to the blunt mechanical pencil.)

Erasing the excess pencil/graphite marks from the transfer paper. (I use kneaded erasers.) I like to get it as faint as possible so it the graphite lines don't show as much in the final. I also use a blank/clean sheet of paper under my hand to decrease the chance of smudging into the areas I want to be white. Graphite is, as you can imagine, very smudge-prone.

Erased as much as I could (graphite transfer paper doesn't erase quite like a regular pencil mark) and wow you can really see how much more graphite the pen pressed through the transfer paper into the Arches on that one stick in the top left. That's after thoroughly trying to erase the lines.
STEP TWO: INKING
 I use the Molotow Blackliner technical pens (I used mostly .05 - .5mm) to draw in the thin lines and smaller details that I'll have a hard time getting with a paintbrush: faces, hangs, little spots of white, etc.
 Oh, and you know what-- don't make things harder than they need to be. I am constantly referencing the digital version I mocked up on my screen. Using reference makes things so, so much easier to learn. Instead of your brain focusing on reinventing the wheel or desperately trying to remember how something should look, you can focus instead on technique.

 Here's everything inked with the pens. My aim was to have sharp lines or corners and I just didn't want to leave much to chance with my brush work.
I feel like artists portrayed in popular culture always go on and on about the freeing nature of just "letting go" with wild abandon when making art (often said while wearing paint-smeared overalls) and yes, that's definitely part of the experience sometimes. But... you can also be in total control of the process, too. You can find/learn/create all kinds of methodologies, whether technical in nature or more about "happy accidents." Art scratches both sides of your brain. Whatever works for you then and in the moment.
If I'm doing work specifically for someone, sometimes I get stressed out and start to feel art paralysis (ie, imposter syndrome). It helps a lot to have a clear, precise guide to follow for myself (here, the digital sketch and mock up.) There's less room for me to "fail" and the anxiety lifts and I can actually get stuff done and enjoy the process.
 Anyway, it's Speedball time!
PART THREE: MORE INK
I just use a small flat brush and a small round, and Speedball straight out of the bottle (in a little paint tray, I'm not insane). If you want to do ink washes or greyscale, you can absolutely mix it with water. (Just make sure whatever pens you might have used are going to act how you want them to when wet.)

(Flat paintbrush for filling big spaces.)

(Round brush for details or really fine points.)
 (Touch ups with pens for precision lines.)
 All done!
Thoroughly wash out brushes with warm water and a little teeny bit of hand soap. Any india/permanent ink like Speedball will stain paint brushes black so don't sweat it too much. Good rule of thumb is to just have a couple brushes you only use with speedball/ink.
STEP FOUR: REMOVING IT FROM THE BLOCK
Once it's fully dry, use a razor blade (or a thin, sharp knife or whatever) to carefully cut the piece of Arches paper off the block.

 Ta-dah! See how flat it still is, even though I used a lot of ink? You can even do a full watercolor and it'll come out almost completely flat once dried on the block. (That tip alone is about a semesters worth of art school.)
Anyway, that's the power of Arches blocks.
If anyone has any questions about the process, feel free to ask here in the comments or drop me a message!
Couple bonus WIPS of inking:


Comments
I'm really surprised nobody picked Swift. I was honestly expecting the round to be mostly Swift and the pups, so I chose Red not wanting him to be left behind. Well that, and he's one of my favorite characters Ah well, it's good to see Egg and Sprig also getting attention. That's the problem, there's too many great characters in this story. It's hard to narrow it down to just one. Maybe next time we'll see Swift and Sibyl get their much deserved piece too
treefiddy
2025-06-16 06:00:21 +0000 UTCThis is amazing, I've been wanting to get back into drawing for fun. I might give it a shot with these pointers.
Cmeowz
2025-06-09 21:22:22 +0000 UTC