It's been a while since I've really talked about what I use and how I use it? And with this easy little Inktober entry seemed like a good opportunity to show you what tools I use and tell you a little bit about my experiences with them! You might know some of them already from previous posts like this.
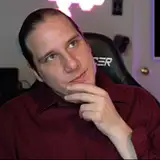
First of all, let me show you what my current desk situation looks like LOL......

It is a whole entire danger zone, there's liquids everywhere, ready to get kicked over by one wrong move! I'm actually surprised no accidents have happened yet. There's a lot more going on on the sofa I'm sitting on, since that's where I store most of my paper and paper towels and what not, because I have so little space on my desk OTL
It's a whole mess and I always have to spend a lot of time cleaning everything up so I can use my tablet again 💦 One day I hope to be in a position to either have an entire room with a bit more space for all my art supplies or at least a big enough desk that can fit all of it comfortably. But this works for now!
Now to the tools I use for this year's Inktober:

I hope youcan read these okay, I should've made it a bit bigger @ _@)
I am not very experienced with traditional inking (despite inking 2 entire Free! doujinshi with a Maru Pen a few years ago loooool) so I don't really have much advice to offer but I did notice some things while working with a pen nib this year! Mostly because the ink I have is a different one from what I used to use.
My biggest problem has always been that I felt like the Maru Pen got stuck in the paper a lot and I didn't understand why, because in video tutorials etc it always ran across the paper so easily and smoothly....! I thought I was holding the pen wrong or just didn't know how to apply just the right amount of pleasure. But now I think I figured out that the ink I used was to blame!!

It was either Black 1 or Black 2, I can't remember which and I don't have them anymore but the ink was a bit thicker than the one I used for the most recent drawings. And suddenly I have no problems with the flow of the pen anymore! It could just mean that I've gotten a bit better over the years, of course but my best guess is that I've just been using ink that didn't work for me. Remembering the countless pen nibs I trashed because I thought they were just not working properly hurts my brain now, haha.
Anyway, what I learned from this is that the type of ink can definitely influence your work, so it's good to try different ones! I can't afford excessive experimenting right now but when my current ink is empty, I'll surely try and buy some different types when I have the funds.
About the pen:
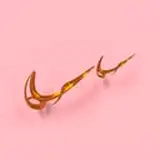
I only own two different types of pen nibs, the G-pen and the Maru pen:

(image taken from here)
Again, I have no real knowledge about the theory behind each of them but I think G-pen is generally used more often by most artists (not sure if that's mostly Japanese mangaka or also comic artists in the west? these tools are all remnants from my hardcore I WANNA KNOW WHAT PRO MANGAKA USE time, and I never looked into what western artists use, lol) and is easier to handle when you're beginning to use pens! lines are a bit on the thick side, while Maru Pen can achieve super, SUPER soft and thin lines, which I love. Very useful for small details. However, it's also a bit harder to control and when not used to it, lines can end up being a little bit shaky. But that's actually something I've come to like quite a bit and I prefer the thin shaky lines over the thick, more controlled ones!
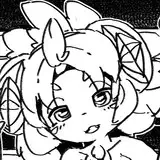
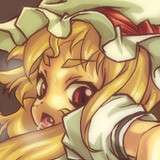
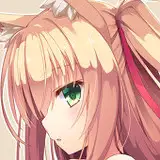
Also to note - even if you look at your lineart when it's still kinda basic and you think "eh, this looks wonky and bad". Do work on it more! Add detail, wait until you've added some contrast, screentones or colours, the lines tend to look much much better then!! (example following below)
Now, to my actual process:
Recently, I started doodling quick thumbnails, just to jot down the motif I want to draw and to quickly collect ideas and not wasting too much paper for that. I can usually fit 7-10 ideas on one DIN A4 sheet. My thumbnail for this one looked like this:

quick and easy, also messy. I'm always jealous when I see other artist's thumbnails and they're so clean and nice and have contrast and are just generally already super pretty!! HOW......
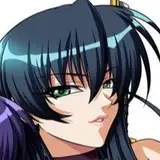
From there on I started sketching it a little bit bigger, paying a little more attention to detail and features:

Sometimes I'll use this stage to also add some black areas to see what the image would look like with more contrast. Doesn't necessarily mean I'll end up doing it like this, though.
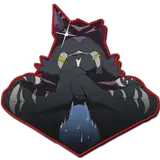
Now to tape the sketch to the light table, tape my Deleter paper on top and start inking:

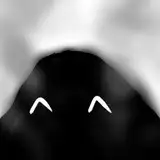
See what I mean? These lines look kinda awful! So messy and wobbly, especially the hair.....
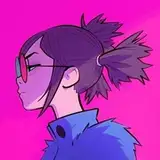
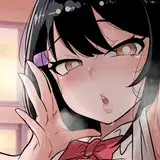
But then I grab my brush pen (Faber Castell PITT artist pen SB) to flesh out the hair and suddenly it looks much less worse:

I also use my pink pencil to mark where I want the black of the shirt to be, I like to leave some white highlights on the top borders of the frabric to not make the areas too big and black and daunting.
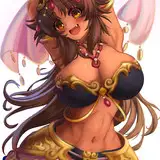
And that's basically it!
Hatch a little bit to make the black edges appear a little softer and then throw on some white gouache because shiny white dots need to be everywhere.
And done.

Ahh, I'm really enjoying these drawings...! It's also a little adrenaline kick every time because you never know when ink will start dripping from the pen uncontrollably or when you'll sneeze and mess up! So much fun (❛ᴗ❛)
kandismon
2018-10-23 03:59:45 +0000 UTCkandismon
2018-10-23 03:55:23 +0000 UTCCottonAlpaca
2018-10-13 22:33:07 +0000 UTC