My animation style is by no means complicated, and it provides good results. This tutorial will be about animating simple idles in photoshop. There is no re-drawing involved, all you'll be doing is warping individual body parts. I used this animation style for Oquonie, although I did have to re-draw some of the legs to make proper walk cycles. Examples of animations I've made in this style can be found here for reference.
Download the psd included in this post to better understand how I organize my files.
First, I draw a rough sketch of what I want in photoshop.
Then, for clean up, I think of what I want the character to do. It's also important to know your limitations, for Oquonie it was simpler to have 3 frames drawn in total for all animations. For the idles, I draw one pose only. Then, I duplicate the pose to create two additional frames, and animate each elements with the move tool, free transform and warp tool. The sprite animation will be 4 frames total, with one repeated to complete the loop. Here is a more detailed description:
Frame 1- the character's pose at the start, your first key.
Frame 2- in-between of 1 and 3.
Frame 3- the final key pose (or most extreme pose)
Frame 2 -a re-use, so the animation can loop back to 1.
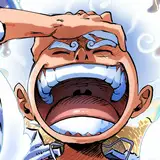
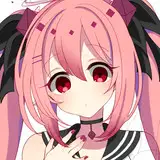
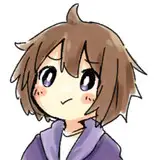
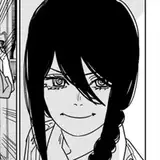
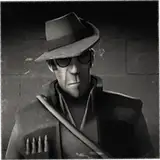
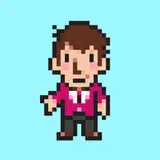
The simple idles I make will usually involve a character 'breathing', with the body rising with every breath, and relaxing afterwards. This will affect all parts of the body in different ways: the head will rise, and the chest will expand which in turn, will affect the arms and the lower body. I tend to exaggerate this in my animations, every part moves, often in a subtle manner. My idle for the tutorial character, is a light up and down animation with the character grinning.
Here is how I work:
I create folders for each element that will be moving. For the tutorial character I separated the head, eyes, eyebrows, nose, mouth, glasses, left arm, right arm (separated into two parts), torso, the Nintendo switch, the back and front leg. Depending on the effect that you want, you might want to separate things further, like strands of hair, ears etc. I do a clean up of my line art, with everything separated into folders.
Example of the content of a folder:
-Line art layer
-Shading lines layer
-White base layer
Clean-up is done with a default photoshop brush, the rough round bristle brush size 25. I use this brush for most of my line drawings.
On another layer I draw shading lines. I use these for the darker parts of an image, for shadowed areas, or for areas that need volume definition. I use size 12 for the shading lines, and will vary the pressure of my pen depending on the tone that I want.
Then, I do a white fill under it all so that the layers underneath won't show through it.
ANIMATION TIME
At this point, I start to create smart objects from all the parts I want to move independently of each other.
Do this by selecting all the layers, right-click > convert to smart object.
Doing this will help me preserve the original art. To make animating easy I merge the content of each folder together, that is, unless there are parts in there that will move independently of each other. Say you wanted the forearm to tilt up slightly, the forearm would be kept separate of the back part of the arm within the folder and have its own line art, shading line and white base layers. Again, this depends on the complexity of your animation (mine tend to be simple).
Once all my pieces are ready, I group all of the smart objects into one folder and call it "1". This is my first frame and my key pose. I then duplicate folder "1" and rename it to "3", this is frame 3 and will be my final key pose.
For the final key pose in this character animation, it will be the moment when the character's movements are at its most extreme. For example: the mouth will be open at its widest, the head will be in its highest (or lowest) position, the eyes will be at their thinnest (or widest, depending on the desired effect) etc...
Animation is done in two ways:
-The first, is by moving the parts individually with the move tool (such as an up and down movement of the head). I also do rotations to arms, legs etc. Note that when I do rotations - or scaling - I move the anchor point of the element to a new location. For an arm, near the shoulder at its centre.
-The second, is by warping individual parts of the character with the warp tool: edit>transform>warp. I do this to make a character smile, to give the illusion the character is breathing by pulling the chest outward etc.
Note: This can result in a loss of sharpness, but the animations I make are HR, and the motion subtle enough that it will not show. If I used vector I wouldn't have this problem, but when I draw digitally I prefer to keep a hand-drawn look.
If I want to have my character smiling wider for instance, I will stretch the mouth out with the warp tool. A smile will affect the shape of the head, I usually warp the cheeks outward to emphasize the smile. I will also warp the shape of of the eyes, and move the eyebrows. I also like to give my idle characters and up-and-down motion, so I will move the head up a bit. This means I also need to move all of the other pieces to match this motion.
Frame 2, or the in-between frame, is just the middle point between frame 1 and 3. I don't move the parts of the character precisely in the middle of the 2 frames, I usually move the parts so that they're closer to frame 3. This frame acts as a sort of 'dampener', or a slowing of the movement. This animation is crazy short and it won't make a huge difference if you just in-between frame 2 in the exact middle, but for a longer animations it's necessary.
To complete the animation, in photoshop, you can test it by opening the timeline: Windows>Timeline
In the timeline, click on "create frame animation". Returning to your layers tab, hide all of your folders except frame "1". Create another frame in the timeline, hide "1", and make "2" visible in the layers tab. Create another frame for "3" in the timeline, again making sure all other folders in the layers tab are made invisible. Finally, create one last frame in the timeline and make "2" visible again in the layers tab. This frame will make your animation loop.
In the timeline, select all of your frames, click on the little downward arrow on of the frames and change the timing to 0.2. The first frame I set to 0.5 because i like there to be a pause. In the little dropdown menu, select the "forever" to make your animation a loop. You can preview your animation by clicking the play button in the timeline.
To export the animation:
File>Export>Save for web
Make sure to export the animation as a gif, and there you have it! An idle animation that requires well... no re-drawing what-so-ever. Easy right?
Hope you enjoyed this tutorial! Let me know if you have any suggestions/questions. I've never made tutorials before, but I would like to make more and I want to make sure that they are helpful to you all.
Best,
Rekka
Hundred Rabbits
2017-11-26 20:47:43 +0000 UTC4567866435
2017-11-26 11:20:35 +0000 UTC