There is an opinion that the eyes are a mirror of the soul. And the iris with the pupil is the "heart" of the eye. So being able to draw them beautifully and juicily is a very useful skill. But how to do it? Let's figure it out.
Below I will show you my eye drawing process using the example of this cute picture with Judy Hopps. For several years of drawing, I have found several simple and useful techniques that allow you to simply achieve a very pleasant result.
It may seem that there are a lot of points here, but I just tried to describe everything for you in as much detail as possible. Everything is simpler than it might seem.
So, let's go.
01. Here I will not describe in detail the process of creating art in general, I will focus only on the eyes. Here is a brief summary of this preliminary process:

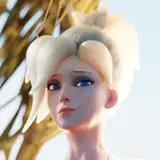
02. Up close, the picture looks like this.

Everything is fine here, but the iris and pupil are just flat roundels so far. How to revive them?
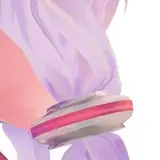
03. What I discovered not so long ago: the outer edge of the iris is blurry. Look at this photo of the eye. We can see that the edges of the iris seem to be "immersed" inside a translucent whites of eyes, and we do not see any sharp boundary between them.

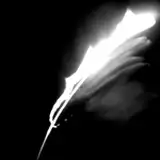
04. I noticed the blurring of the edges when I saw the trailer for the game "Kena: Bridge of Spirits". I suddenly saw how cool it looks, just look at this cutie:

05. If we make the edges blurry too much, it will look bad. If we blur the edges just a little bit, the effect will be invisible. Therefore, we will do both options at once!
I duplicated the layer with the iris, so that it turned out 2 layers: the lower "Iris 1" and the upper "Iris 2". We blur the upper one a little bit, and the lower one is much more. Also, we will make the pupil blurry just a little bit.

06. It turned out to be SOFT and pleasant, and the color of the iris seems to penetrate into the space around it.

07. Now let's do the lighting. To begin with, let me show you how it works in general:

On our spherical convex eye, the iris looks like a concave plate with a hole-pupil in the middle (to be precise, in life it is more like a flat plate, but in drawing it is better to imagine it concave inside).
From above, our concave iris is covered by a convex transparent cornea, which gives us a glare.
Thus, it turns out that if the light source is located somewhere on top, then the iris itself (like a concave plate) will be better illuminated at the bottom, but the glare on the cornea will be at the top. Let's do it with our example.
08. Let's select a layer with our less blurred "Iris 2", double-click to open the layer properties and add a gradient to the layer to smoothly darken the upper part of our "plate".

09. We will also turn on the "Inner Glow" effect to add a dark smooth rim along the contour. Please note that both in the previous and in this paragraph, the overlay effect is the "Multiplication" mode. After that, click the "OK" button.

10. Now double-click into the properties of the pupil layer. Let's add an outer rim to it so that it looks like its edges more smoothly turn into an iris.

11. In the properties of the same layer, we will add an inner shadow to show that the pupil is exactly the hole. And click on OK.

Everything we did before was on layers with flat colors. On top of them in my file are layers with volume, and on top of all this we will create a new layer for applying highlights. Let's call it "Glare in the eyes".
12. A very interesting technique that I often use on glare.
a). Double-click on the layer to open the properties of the layer and remove the check mark in the line "Transparency Shapes Layer". And click "OK".

b). Let's choose the "Color Dodge" layer overlay mode. Choose a soft brush with a very light color (for example, light yellow). And look! On this layer, the brush draws in a very interesting way, similar to a strong glow. It looks great!

13. Now draw neat highlights on the cornea at the top (the light falls from somewhere on the top left), and the glare of something reflected at the bottom:

14. Temporarily hide this layer and create a new one (with the same settings: with the check mark disabled and with the "Color Dodge" layer overlay mode, as in paragraph 12), let's call it "Iris". Let's make the texture of the iris with these lines:

15. With the help of an eraser, we remove all unnecessary. It's simple: we got the texture of the iris, but not too detailed, so that it does not stand out from the general style.

16. Let's create another layer of the same (with the settings as in paragraph 12) and add even more highlights: down the iris and a little bit on the edges of the whites of the eyes, because they also shine.

17. Turn back the layer with "Glare in the eyes", and we got beautiful eyes! Everything is ready!

18. Then, of course, we add all sorts of effects: we adjust the shape, add chromatic aberrations, a little vignette, add noise (I described these effects in one of the previous posts), and we get a ready-made beautiful face with big glowing eyes:

You can see all these layers and dig into them by downloading the PSD source of this drawing from this link:
https://disk.yandex.ru/d/GdDSrE9GovvscQ
I hope it was useful and interesting. See you soon ;3