Time for a short behind the scenes again. This time, let's not talk about something I've figured out how to do. And one of the many things that fits that description is illustrations. Why talk about something I'm not actually good at? Well, I guess it's to say it's okay if you pick your battles when it comes to developing skills, stuff can still come out alright? Or maybe, just for the hell of it, because I still had fun making them.
Usually I'd talk a bit about what techniques I use, and what neat tricks I figured out, but since I don't know much, I'll just note that I use Paint.Net a lot, because it's super simple and quite intuitive, and I know a ton of keyboard shortcuts by heart. And it's free (although I did end up buying a license because I use it so much it felt weird not to).
I do have Gimp, which is great and surprisingly complete, and I own a copy of PaintShop I bought on a humble sale once that comes with it's own bunch of cool tools I rarely need but are still handy to have. But 99% of my image editing needs are met by Paint.Net.
Let's have a look at some of of the illustrations that are featured in Light of my Life.
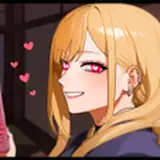
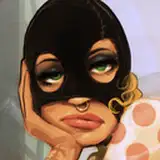
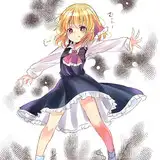
And when I think illustrations in this game, the first thing that comes to my mind is the few shots of the Girl and Bunny VN that Denise and the MC worked on. It features, ahem, amazing characters such as these:

(actually drawn in Paint.Net, and not on line paper as the background suggests).
It was a lot of fun to sketch out these figures from scratch using some basic geometric shapes, and then refine and fill them in a little, knowing full well they would only be seen at very low resolution and under an angle, so I didn't need to worry too much about all the many flaws and rough edges.
But most of the time you don't really have to start from scratch like that, and here's an example of a very simple one where a small modification to a stock image of a warning sign helps to drive the message home (can be seen as a screensaver on Goldie's workstation).

Or this one, slightly more elaborate, where I drew a tongue into a stock image of a cartoon hand flipping the bird, to serve as a restaurant logo that shares its name with a very nice real-world Vietnamese restaurant I visited on occasion, with a name that lends itself very well to a pun like this.

Then there's this one that was a lot of fun to do, and was done from scratch, featured on the coffee cup sleeve of the beverage that Sara offers to the MC in the later chapters.

Somewhat inspired by a large coffee shop franchise we all know and have varied opinions about.
So, maybe this is where I do impart some neat tricks as to how you can get these to show up on an object? Because that's actually something I know how to do. I won't go into too much detail, but I usually use one of these tricks to add an image I created to an object.
1. Directly on the texture. I mention it first because it's the simplest way to get your illustration onto a figure, but most of the time, it doesn't work great, unless the texture of the object is already the material you want for the image you add.

Here's an example of that, where I slightly altered the logo of a well-known delivery company (by just rearranging the existing letters) and added it to a safety vest, poking a bit of fun at the usual orientation of the boxes they deliver when there's a "this side up!" warning on them.
In this case it works because the logo is inked directly onto the fabric, and so it's okay if it takes the properties of the material. But if you want the image to look different, you wanna go with the second option.
2. Which is geoshells. They're, well, shells around whatever you attached them to, that follow the geometry of that thing, but they take their own material shaders.
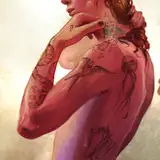
So you can, for instance, make it look like there's a plastic-looking transfer ironed onto to a black cotton tank-top. And this image of Macy is an example of just that that.

3. And there's decals, if option 1 or 2 don't do it for you. For instance because you can't find the UV map to determine where to put that image, or the UV mapping is so borked it distorts the image when you put it on there, or if your image has to go right on top of a seam in the geometry where it's hard to position the image without some fancy 3d painting tooling. In all those cases decals are great to use.
Decals project an image onto an object much like an actual projector would. And that means no worrying about distortions. But also none of the good distortions, so if the clothing is crumpled because the person bends over or twists their torso, the decal is still projecting without any of those crumples and looks weird.

This is an example with a decal, using the mermaid logo we saw before. It was used because the cup sleeve's UV map is a bit of a mess and distorts an image applied directly or through geoshells, so the image was projected onto it using a decal instead.
Last of the useful stuff, I promise.
If you ever find you need the UV maps for an object, and the creator didn't provide any, search for MCJTemplate in your favorite search engine. It's a handy script for daz3d that lets you create those maps.
And if you're wondering what the hell UV maps are, they're a sort of flattened image of that 3d object (often cut into several pieces) that shows you where the texture's image ends up on the object's geometry, and that helps you to figure out where to put your own image so it shows up on the correct spot.
Coming back to illustrations one final time, and coming in the next chapter, we have this one, which again, yes it looks abysmal, but it will only be shown at very low resolution and somewhat out of focus, so that's okay. That was a fun one to slap together real quick.

(note, there's no actual plans to meet this Tammy in the game)
...does it even make sense to have a conclusion to a rambling post like this? Eh, how about, doing some quick and dirty illustrations here and there is a great way add in small jokes, or help to ground some object in a given situation?
Until the next one.
Naughty Road
2025-02-27 08:18:17 +0000 UTCBlacklabyrinth
2025-02-27 07:57:46 +0000 UTC