I wanted to create a little behind-the-scenes of how these digital sculptures come to life or at least how I go about creating them.
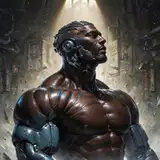
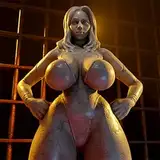
This started with me wanting to sculpt a piece I love from PWCSponson. I like to ask permission every time I do fanart, but I also like to show something tangible before asking. So I Did a rough block out of the entire piece (image 2) and sent it to Sponson. After getting his blessing I could now sink in more time without fearing the artist not allowing me to post it later, it does happen sometimes.
After having everything in place minus details, I go over fixing proportional mistakes and adding in smaller, but important, missing elements. I also throw the rough sculpture, as early as possible, into a rendering software and start working out on lighting and camera composition. This lets me get a feel for how the finished piece is shaping up and the advanced lighting lets me spot further mistakes. I used Blender (free open-source software) to render this piece and I normally sculpt all my pieces in Zbrush.
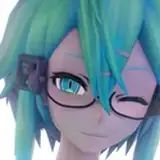
With all the big shapes in place, I can now work on what is probably the most important part of the piece, the face (image 5). There are no secrets to it it's just hard work and in this case trying to interpret Sponson's 2D aesthetics into 3D. Since he has a big body of work and a consistent art style I can reference other pieces from him to see how he solves shapes in different angles and reference that to get a 3D piece that feels like one of his illustrations.
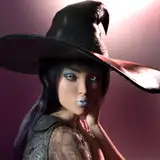
With all that proportions and likeness stuff figured out, it's really hard to mess up the rest of the process, but it is still a significant time investment to polish the piece to its final stage. It's also worth mentioning that in sculpture, especially digital, it's possible to still catch big mistakes from the block-out phase. In this piece, for example, you can compare images 4 and 5 with image 6 and notice that I scaled her head down quite a bit and enlarged her chest. These were things I didn't catch up during my first block-out.
The only other notable thing about this piece was redesigning the stand she is leaning on. In the original artwork, Sponson drew a very simple block shape to represent a table. This works fine for his illustration but for a 3D piece that block of a table would obstruct too much of the character from other angles and for those printing this solid it would be a lot of resin. I started with making the stand as "see-through" as possible but my first design was very goofy and in the end, I went with a somewhat wood worked witness stand look for it.
After the sculpting and rendering work was done I posted it on Twitter with the help of Sponson sharing it around and got a really awesome response from people, It is pretty much the reason I am starting this Patreon and sharing more about my process too btw.
I had already kind of designed the piece with 3D printing in mind, but after the reception, I decided that I would put in the extra work to make it print-ready and release it for free (I also didn't want to further bug Sponson with business deals on selling this, he already helped plenty).
Making a piece ready for printing involves filling in hard to print irrelevant spots, making sure the piece is watertight, splitting the piece into parts, keying the parts, and exporting the files into a desirable scale according to the character's size. It's very technical and not artistic at all, but it means you can bring the artwork into the real world!
This piece took around 20 days to create, it was quite fun to sculpt, I got to meet Sponson, and people seem to like it. So I am pretty happy with it too.
I would like to apologize for the writing mistakes I might have made in this article. I am not a native English speaker and I rarely write, I mostly just make images. I hope you enjoyed this behind-the-scenes look at the creation of this piece from an illustration and a look at modern figure making in general, as most commercial figures nowadays are digitally sculpted too.