Hello everyone!
In my previous post, I talked about creating anime-style textures. This time, I wanted to see if the same technique could be applied to a different character.
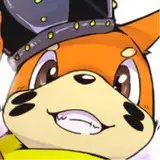
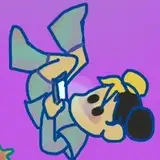
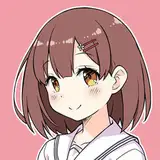
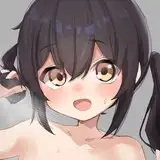
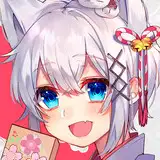
 For this experiment, I used QuQu "NecoMaid" model. She's really cute!
The process I followed can be divided into 3 main steps:
1. Colour planning
2. Applying it to the texture
3. Adding details
Let's go through each step!
First, I needed to decide how to divide the colors. At this stage, I wasn't choosing actual colors yet, so I worked in black and white. It's good to separate parts with different luminosity values.
 After completing the black and white division, I started adding the base colors.
 I made sure to define colors for the eyes and accessories too. Since adding colors can change the luminosity balance, I occasionally switched back to black and white to check and adjust the overall balance.
Once the base colors were set, I determined the shadow colors.
 It's helpful to create reference images of how the final shaded appearance will look as you decide on these shadow colors. When both the base and shadow colors are finalized, I created a "color reference chart."
 ↑ Color Reference Chart
In the rectangular frames, the upper part shows the base color, and the lower part shows the shadow color. Ideally, you'd also define highlight colors and secondary shadow colors, but for this project, I only used primary shadow colors.
If your color planning isn't properly defined, it will affect later stages of the work, so it's worth spending time to get this right, even if it takes longer.
Once the color planning was complete, I moved on to the texture. I used Substance Painter to create the texture, painting each part according to the color reference chart.
 When sampling colors from the reference chart with the eyedropper tool, there can be slight color shifts, so it's more accurate to copy and paste the color code values directly.
 After finishing the base colors, I added shadows to create a three-dimensional effect, using the shadow colors from the reference chart.
 At this stage, the basic anime-style painting was complete.
Next came the addition of details like gradients, which is the key point of this process.

 Adding too many realistic details can diminish the anime look, so I carefully balanced this by adding just enough richness without going overboard. I'll cover this aspect in more detail in a future post.
With this, the texture work was complete! All that remained was to bring it into Unity, apply the material settings, and finalize everything.

This challenge was meant to test "how long it would take" and "whether it could be applied to other characters."
The total work time was about 7 days—2 days for color planning and 5 days for texture work. I experimented a lot during the texture phase, so I think this could be shortened by optimizing the process.
I found that these steps aren't character-specific but can be used universally, meaning the same technique can be applied to other characters as well.
I believe the color planning process, in particular, can be used in any situation, so please feel free to use it as a reference for your own projects!
Dragonfoxxy
2025-03-27 11:57:08 +0000 UTC