The GIF attachment contains more steps (29 steps). Most steps are done in Paintstorm Studio(PSS), so the shared brushes is in PSS format. I switched between three software:
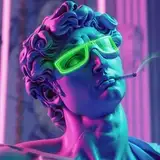
# Linework (PSS)
I found it easier to draw organic lines in PSS, so I used it for the linework. However, the original canvas needs to be very big, or the line stroke will be blurry and harder to control.
# Base color & adjustment (PS)
Turning blue lines into dark brown.
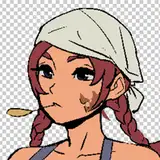
# Base rendering (SAI)
Since the canvas is quite big, it started to lag while working with bigger brushes in PSS. So I switch to PaintTool SAI 2 for base rendering. All brushes are default round with some pressure adjustment, or you can refer to my previous post.
# Contrast adjustment (PS)
I also turned down the opacity of base-render layer.
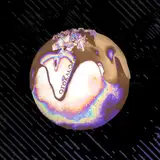
# Over-paint (PSS)
Switched to PSS again for all the rest work. The paint layers are grouped in one folder which is set to about 93% opacity, above linework & base rendering.
I prefer to draw/paint details in PSS, because it's the easiest one for changing brush sizes and gives the most freedom for adjusting pressure. Though it's also the most lagging one when drawing on a big canvas...
p.s.
And...yeah, I'm still using a Cintiq for work. It's easier for quick-sketching, which is essential when doing concepts. I tend to mess up proportions while drawing on a Cintiq, so I had to sync it to another normal monitor for checking.
===================
附件的GIF動畫檔包含更多分解步驟(29步驟),筆刷檔為Paintstorm Studio(以下簡稱PSS)格式。作畫過程在三個不同軟體中切換,以下是過程簡介:
# 線稿 (PSS)
目前覺得較順手的線稿筆刷,是用PSS調出來的。不知為啥用SAI畫起來會過度生硬、用PS畫起來會直接崩掉(體質問題吧大概orz)。是說原稿畫布開得很大,不知為何開太小就畫不順。
# 色指定 & 調整 (PS)
在PS裡把原本的藍色線稿調成深咖啡色。
# 基本渲染 (SAI)
原稿尺寸的關係,在PSS裡使用較大的筆刷會明顯不順。所以換到最不吃資源的SAI,處理大面積的陰影,也順便先把臉部刻好。使用的筆刷可參考之前的這篇文。
# 調整對比 (PS)
除了加強對比以外,也調低了基礎渲染圖層的不透明度。
# 繪製細節 (PSS)
接下來的細化步驟就都是在PSS繪製。細化圖層被統一放進一個資料夾,置於線稿&基礎渲染圖層之上,不透明度93%。
因為PSS的筆壓調整非常自由,變換筆刷尺寸也最直覺,所以個人偏好用它處理最花時間的細化步驟。不過它大概也是我電腦跑最不順的軟體(汗)
p.s.
對啦,由於做設計的時候需要額外快速將點子記下來,這方面使用普通繪板就比較吃虧了,所以這張圖仍是用Cintiq畫的,邊畫邊同步到另一顆普通螢幕檢查比例等問題。


![개성인쥬스[pingkypen]](https://xaiju.com/istorage/106895.jpg)