Paintstorm Studio / Cintiq pro 24"
It's close to the end of this month. Too close I mean. Fortunately, it's not too late for me to redraw this piece, and I learned a lot from finishing it!
想說就一路俗豔下去,乾脆填了一些粉紅色進去。
# Rough ideas 初步構想
 A. Same as before, starting by drawing random poses.
B. Picking one preferred pose and thinking more about the composition.
C. The B pose is a bit stiff so I try to make a more dynamic version.
D. Add more accessories to balance the composition.
A. 和上個月的過程差不多,總之就是隨意畫幾個pose出來。
B. 選一個比較喜歡的姿勢之後,試著畫出更完整的構想。
C. B步驟的姿態和構圖有點死板,所以我畫了一個更具動感的版本。
D. 追加一些裝飾性的結構,如翅膀、尾巴等等。
# Using perspective guides 透視線
 Drawing 2-point perspective lines and sketching. This is how I separated the layers at this step:
針對構想,我決定採用兩點透視來構圖。總之就畫個地平線然後點兩個消失點,接下來的構圖都照著這個透視線來思考。另外圖解這步驟中的圖層區分方式:
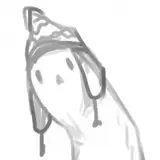
# Inking (canceled) 上墨線(取消的版本)
 Using pure black and flat(knife) shape brushes. You can see a WIP from one of the previous posts. Also I overly twisted Credo's body, then I took a break and decide to correct it with some reference. See the comparison.
使用黑色和平筆刷上墨線,可以從之前的帖子看到這階段的截圖。話說一開始我把朵嫂的上半身畫得太扭曲啦,睡了一晚後隔天爬起來審視一番決定修改回來,以下是比對圖: However, the inking quality and details are very loosely done.
但這步驟畫出來的墨線品質還是很不好,很多地方過度潦草,而且視覺焦點感覺有點跑掉。
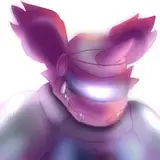
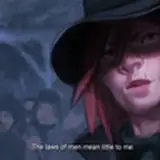
# Using red to redo the sketch 改用紅色打草稿  I'm so glad I posted a WIP of this piece and got very useful advice from you guys! Using saturated red (suggested by DS) seems to does the trick! I no longer being super distracted by the line quality, and am more aware by the whole fluidity and structure. And I don't ignore details and make poor design choice as I did before with cold/neutral colors (blue or green). RED COLOR IS MAGIC! Also, I change the brush shape and it seems triangle works better for those curves of human bodies. You can see more details and download those brushes from this post.
好險我之前先丟了個WIP帖子上來,所以得到了非常實用的建議!是的紅色真的是魔法的顏色!和黑色比較起來,使用飽和的紅色就是比較容易畫出我想要的線條和構圖。和冷色/中性色(綠色、藍色等)比較起來,使用紅色也比較不容易忽視造型設計上的細節。另外我也把筆刷從平筆頭改成三角頭。三角頭似乎比較適合拿來畫人體肌肉的線條,點閱此帖可看到更多關於筆刷的介紹、以及下載目前的線稿筆刷。
# Improved inking 改良版線稿
 I guess red should be only used in the sketching process, but I also found it useful for inking in my case. Maybe it's my bad habit of drawing overly complex forms so I still need to use red for inking. What can I say, I have tunnel vision when using pure black. And red helps me to see more. Here's a comparison of the inking in black and red:
照理說紅色最好只拿來打草稿,但對我來說、紅色好像也可以拿來上墨線。使用黑色上墨線的效果莫名地就是沒有比紅色好,我恐怕在使用黑色時的專注範圍不知為何會變得比較狹隘,而使用醒目突顯的紅色、能幫助我擴展觀察的範圍。以下放個黑色/紅色線稿特寫比較:
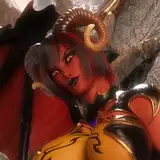
# Design the complex and smaller forms 設計與完成更瑣碎的細節
 The wings, feathers, horns, and tails are done by a circle shape brush, which I found easier to deal with smaller and complex forms.
翅膀、羽毛、尾巴等等是利用圓頭筆尖完成的。比起方頭或三角頭、圓筆尖更適合處理複雜瑣碎的細節。
And the rest is just me changing the red ink to black in Photoshop and cleaning small dots.
剩下就是把線稿丟到Photoshop轉成黑色,還有用白色筆刷清線稿,收工!

K T
2018-10-31 15:26:06 +0000 UTC