Alright I want to do this more often bc I suck at tutorials but I can type all day long
This is a primo example of my process for character design, from sketch to lineart
Pic 1 is the initial sketch that starts the process. I have a thought like "foo dogs are cool" and then shapes arise out of what I see in my head when I think of one. A lot of it is scribbling and notetaking rather than worrying about anatomy or details, which will come in the lineart.
Pic 2 is the beginning of the lineart, and I always start at the head, which is the focal point of the design. I focus on varying my pen pressure to achieve a balance of thin and thick line, and a healthy dose of shadow, which adds depth and can act as a counterweight to certain features.
Pic 3 is more lineart prog where I've turned the brush more on it's "side" which allows me to do light value work, texturing, and create sharper or duller lines. I try to maintain visual clarity at all costs, which means careful placement and a healthy amount of open space, such as in the muzzle and forehead.
Pic 4 is an example of a trick I stole from somewhere, you place down pure shadow color, and erase the interior with a semi-transparent brush. It's another value in your lineart, and it can indicate some bounce light. Bonus texture zone too if your brush has that built into it.
Pic 5 is full lineart, all the above notes are peppered throughout the whole body. I always keep my sketch because it's fun to see it compared to the lineart and to see what I ended up changing. While it looks done, there's one trick I like to finish off each character with.
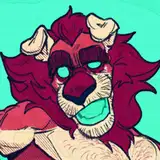
Pic 6 is that trick: the outline. I don't know exactly what it is about it, but the outline just makes it finished vs without it. You can pop between this pic and the last one to see what I mean, maybe it feels more solid? Idk but I just use "expand line width" in CSP and set it to 3.00 usually.
Pic 7 is a closeup that has some good examples of those shadows, and this is it before another finishing move.
Pic 8 is the grain finisher, I add it in a separate layer and erase away in certain spots to create an effect that indicates skin butting up against skin. It's subtle but that's the stuff that tickles my dome.
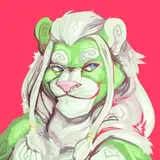
Pic 9 is what everyone sees in the end, which is the final lineart and gradient before the coloring starts. This guy got some extra treatment from me in the lineart and I want to keep that up in the coloring phase.
Will do step by step colors next
M Scott
2022-11-10 17:47:11 +0000 UTCDaoShishi
2022-11-10 16:22:52 +0000 UTCTubbykins
2022-11-10 13:59:51 +0000 UTC