Bunny Toki WIP 5 – Through to Completion (A Way of Thinking to Lower the Hurdle of Using Fluorescent Paints)
Added 2025-07-14 13:30:42 +0000 UTC
At first, I thought I could save some time right from the start, but in the end, it took about the same amount of time to complete as the previous Bunny Toki I made. Well, that’s just how it goes sometimes.
If you're interested in seeing the previous build and the finished photos, please check the links below.
So, this is a continuation of the previous post.
Last time, I finished the painting for the whole figure including the hair, so now let’s go over the remaining parts like the halo, headset, and eye painting.
By the way, I’d love to hear your thoughts:
Do you prefer this kind of regularly updated blog-style progress post,
or do you find it better when everything is compiled into a single spotlight post after the figure is completed?
Let me know if you feel like it — it would be helpful!
You just have to get used to using fluorescent paints casually.
┃If you want to start using fluorescent paints more freely, the quickest way might be to think,
“Well, I just want to match the colors as closely as possible.”

You might be thinking, “Here we go again,” and honestly, I feel the same way.
But I still think it needs to be said:
The color saturation of the illustrations that serve as the basis for sculpting is increasing more and more, so it's becoming easier to recreate them by casually using fluorescent paints.
If you avoid fluorescent paints because you're worried about color fading over time and only use solid paints, you might frequently find that the colors don't match your expectations. That’s why it's better to start getting used to using fluorescent paints now.
By the way, I wonder how many people who say “I don’t want to use fluorescent paints because they fade!” have actually tested them themselves. I suspect quite a few just accept that idea based on knowledge alone without ever trying it.
Honestly, if you store your piece in a place where it's not constantly exposed to light—just occasional exposure—it doesn’t seem to fade noticeably. Of course, if you leave it under direct sunlight for over a year or keep it lit 24/7 for two months, then yeah, fading can happen.
Reference article: The Appeal and Risks of Fluorescent Foil (japanese page)
(This article is about printing ink/foils, but still helpful as a reference.)
If you’re concerned, you can use Creos UV Cut Clear, which should significantly reduce fading.
Just note: if you’re planning to shine a UV light to make it glow, UV protection will obviously block that effect. But in figure painting, that kind of glowing demand is rare, so UV protection is probably enough.
┃Everything fades when exposed to UV light for too long…
It’s not just fluorescent paint—any color will fade when exposed to strong UV light.
That’s why printed materials and figures that are important are best kept in dark or UV-protected places. You can always bring them out into the light when you want to admire them.
Even T-shirts, denim, and building exteriors fade if exposed to light continuously.
It’s probably better to assume some fading will occur and work with that expectation in mind. Of course, opinions will vary on this.
Here’s a helpful video that did an experiment on fluorescent paint fading:
Reference video: "Checking how much fluorescent paint fades over time for Gunpla beginners"
In that video, they tested Gunpla painted with fluorescent paints and stored for 1–3 years, checking for fading under UV light. It’s a little hard to judge from the glowing intensity alone, but the paint doesn’t seem visibly faded in normal light. If it had faded, it would be obvious by eye—and it’s not—so with proper storage and display (i.e., avoiding UV), the paint doesn’t seem to fade over a few years.
So I’d say don’t get too nervous about the fading and just use fluorescent paint with a casual attitude, like “Eh, guess I’ll give it a shot.” If you’re really worried, just use a UV-cut clear coat to protect it.
Limiting your color options is a missed opportunity. So why not shift your mindset just a little and give it a try?
By the way, Gaia Notes sells both lacquer and enamel fluorescent paints. They even have pure enamel colors. Gaia is amazing.
Process of Painting the Halo, Headset, and Eyes
┃Using Fluorescent Paint for the Halo, Headset, and Eye Paint

So, now that we’ve lowered the hurdle for using fluorescent paints, let’s actually try them out.
For the mic part of the headset, I used Mr. Color’s Graphite Black.
Areas where masking would be too much of a hassle are painted with a brush.
 If paint gets outside the lines, you can cover it with enamel white—no problem.
 When it’s easy to fix with enamel, brush painting is totally fine.
 Then I mix enamel fluorescent paint with white to paint the teal interior parts.
I’m using these two plus white.
The reason for mixing in white is to increase opacity against the base color. Fluorescent paints are transparent, so they won’t show correctly unless the base is white.
 By adjusting the color in several steps like this, it's easier to pick the right shade.
 This is how it looks when painted—brushed on. I airbrushed the same color on the back halo.
You know the drill: the kind of part that takes forever to mask but only seconds to paint…

┃By the way, here’s how I masked the halo…
Here’s what it looked like initially.
Because it’s 3D-printed, you can still see print lines, but since the part is delicate, I didn’t sand it much.
A clear coat at the end will smooth it out, so I’m not worried.
 Then I masked only the areas where I didn’t want to apply paint.
The narrow space made it tricky to work, and the tape kept lifting—honestly quite a pain.
There’s no photo, but after that I masked everything except the center ring and painted just that area.
It’s good to paint not just the front and back but also from the sides.

Since I added some white to the mix, the teal pops nicely.
After removing the masking, I masked just the center ring and painted the outer ring.
I used a bluish-purple mixed from cyan and magenta.
This part could be matte-coated or heavily gradiented depending on taste.
This time, I went for a simple tone variation with a gloss finish.
 Once the masking was removed, I applied a full lacquer clear coat for a glossy finish.

Now that painting is done, most of the parts are ready.
All that’s left is the eye painting.

┃I already posted the eye painting process on X, but here’s a rerun!
“Rerun” has a nice ring to it.
I’ve posted this process on X before, but I’ll explain it again here.
Explaining something multiple times also helps reinforce it in my own memory.
Teaching others is one of the best ways to learn, after all.
Honestly, I probably get more out of it than the people I’m teaching—it's wild.
So first, just like last time, I use the decal as a reference and sketch the eyes.
Here’s what it looks like with the decal applied.
 Then I roughly clean it up on my tablet.
 Once I get the overall feel right, I do a bit of touch-up.
Of course, since we’re going from RGB (additive) to CMY (subtractive), the brightness and saturation will drop.
It’s best to use the digital sketch just as a reference.
Since the kit is posed with a turned head, it’s important that the eye direction looks balanced when viewed from that angle.
That’s why an asymmetrical layout works best here.
Using the decal as a guide, making the eyes clearly asymmetrical creates a nice "aha!" moment—so fun!
Once the direction is set, it's time to move quickly.

You can probably tell I subconsciously tried to make them symmetrical here—but it’s okay, I’ll fix it later!
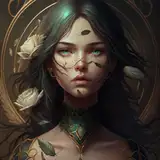
The tricky part about painting this Tokibunny kit’s eyes is that to match the illustration, you have to paint beyond the eye socket.
That recessed edge makes brushwork harder, so take your time and work carefully.
Here’s what it looks like after the sketch is done.
 I corrected the right eye’s lash angles.
Also purposely painted outside the guide lines to balance out the top and bottom of the right eye.
 Painting outside the lines on purpose can be tough at first, but it gets easier with practice.
The key is to view it from multiple angles—top, bottom, sides, diagonals—and make sure it still looks balanced.
Once you’ve nailed that part, the rest is just layering colors—nothing too hard.
The sketch is the only step that really demands care and time.
 I recommend taking multi-angle photos like this for checking your work.
They’re useful not only for verifying progress but also spotting areas you missed.
Think of it like taking notes during study—helps with review and retention.
Once you’re here, apply a clear coat.
Then paint the base colors of the iris and lashes, using mostly enamel from here on.
Apply clear coats between steps.
 Paint the whites of the eyes and shadows.

Paint the pupils, the lower iris “ball” (?), and highlights.

Around the pupil, paint with a light blue made by mixing fluorescent paint and white.
 Add a gradient to the eyelashes.
At this point, it looked too subtle, so I later emphasized the highlight more.
 This eyelash gradient can be recreated with an airbrush using a light layer of blue-purple + white.
It’s just like airbrushing a gradient into the iris—just mask and go.
The only tricky part is carefully wiping the edges so the lashes stay sharp…

Once that’s done, mask the eyes and lashes and paint the skin tone.
(I already did the lash gradients, after all.)
The skin tone is my usual mix of Gaia 059 + 060, applied in a super-thin layer—barely orange-tinted.
Then overcoat with C-12 to achieve a fair-skinned look.
Painted from various angles, the result looks like this:


 …Wait, is the nose area red?
Exactly.
I’ve never really mentioned this before, but when you paint evenly from all angles, the nose tends to collect more paint and look redder.
To fix it, I spray Gaia’s flesh-tone surfacer at the tip of the nose.
Not from the front—but from the side, aiming at the nose tip.
Don’t target the spot directly—instead, let the surrounding mist cover it.
It’s hard to explain in text, but imagine the spray coming in like this:

My PS771 is the MVP here—its 0.18mm nozzle helps avoid overspray.
The flesh-tone surfacer also matches my usual skin mix pretty well, so it’s almost effortless.
Total cheat mode.
Here’s the fixed version—no more weird nose!

Looks natural even from another angle.


Attention to small details like this is important.
At this point, I tried a test assembly.
Hmm… the eyelash highlights barely show…
 So I brushed in a quick highlight, but it needed more punch.

So I re-applied the highlight with an airbrush. Also painted the eyebrows.
 Now the eyelash highlights are visible and don’t look flat—nice!
Personally, I think it’s important to tweak things for balance.
Once things harmonize, that’s when it’s done.
 Everything looked good, so I added blush lines (the diagonal lines on the cheeks) and white highlight dots.
For the blush lines, I used a diluted clear pink to make them subtle.
 Honestly, this part is super hard.
If the mix is too thin, it won’t show up. But if you get one line right, the next one can go wrong—so take your time.
Blush lines really influence the expression depending on their opacity, thickness, and spacing.
I’m probably weirdly obsessed with them compared to others—like, really obsessed.
I know there are a million other things I could focus on, but here we are…
Anyway, I painted the left earring and applied a clear coat.
Then masked the eyes with Gaia Masking Coat and applied a matte coat.
Removed the masking from the eyes, and finally applied lacquer clear to the lips and earrings.
That finishes the eye painting!
Then, assembly—and done!
So cute!

Aside from the tricky hair parts, the color count is relatively low.
And at 28.5 cm, the kit has a serious presence—in many ways.
If you’ve been letting yours sit in a box, it’s time to build it!
Comments
Hello! I'm glad you like the new format. It's a blog-style where I just write about whatever catches my attention, but it makes me happy to know it's been helpful to you. Believing you can do it is important — start with small steps!
SUKIMA SANGYO
2025-08-06 11:26:51 +0000 UTCHey Sukima, i like this new format. Go on it's a huge source of inspiration for me.. and i'll start GK soon, i have more confidence because i can read and watch your works.
Benjamin Barbet
2025-08-06 11:15:13 +0000 UTC