▶Seam removal
After most of the painting is done, the last step is to erase the seams between the chair and the hair.
The material to remove the seams can honestly be any craft UV resin, cyanon fill, or regular epoxy putty. The hair can be adjusted with color surfacer, and the chair can be painted nicely with surfacer black (or gloss black), regardless of the color of the base coat.

I used craft UV resin to fill in the seams on the chairs, but the pullback can be strong when thick coats of surfacer or gloss clear are applied.

Even with a good coat of gloss clear, the rough substrate will show up.
This is an area where I did not expect this, so I may not recommend using craft UV resin for filling such joints.
It is quite effective for repairing minor chipping, though.
So, I think it would be fine to fill such gaps with cyanon or epoxy putty.That way the process is completed without wasting time!


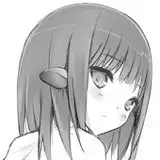
The chair seams are not very noticeable without filling them (although they are visible from the back), but the hair is still noticeable from all angles.
Fill these seams one by one with cyanon, sand them, and finish by spraying them with a color surfacer for the hair.
If the final result looks like this, OK.


Ideally, the seams should not be visible from any angle. Since the elimination of seams brings the hair parts together into one piece, some wide space is required for matte coating.

This is the kind of situation we're in...lol
As for assembly, it is easy if you have already completed the body x 2, chair, and hair as one independent part.

First, install the tail behind the hair. You can glue it on at this point.

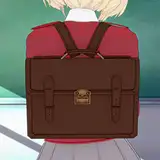
Next, place the hair on the chair. Hook the strand of hair on the left side of the photo onto the cud of the chair (square frame area). Next, pull the strand of hair on the right side of the photo slightly outward and hook it to the cuff.

If it looks like this, it is OK. Now that the chair and hair are almost fixed, it is recommended to transport them as they are.
It would be better to put a thin plastic between the hair and the chair to prevent color migration.

The main body is placed on the hair parts with all but the neck and face parts firmly in place.

Hold back the hair and insert the face part. It may be easier to get the best position if you put a little force around the lower jaw. It is easy to see if the hair is properly secured by looking at the gap between the ears and the hair.

The forelock part easily interferes with the arm on the cheekbones, and the tips of the hair will break if you try to force it in place.
Therefore, first, approach the dowel with the hair at a slight angle.

Insert it carefully to complete the process.
Carefully insert the body and you are done. When replacing the body, remove it in the same manner.
With the forelock removed from the dowel, turn it to an angle that does not hit the left hand part and pull the part out.

Tilt it to this angle before pulling out the part.

These are points to note when assembling!