When it comes to coloring there's a lot of different approaches and every artist follows their own unique routine.
It's often something that comes with time and practice, a form of muscle memory that helps following steps that create satisfying results. I personally - as much as it might surprise with how I mostly like details - usually aren't too keen on hair. It needs a good day and motivation for me to feel up to the challenge and there were times where I took the simple route of keeping it mostly flat colored (which is very valid!).
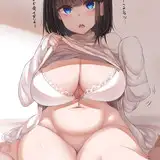
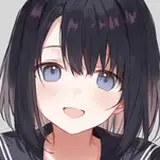
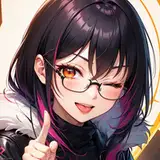
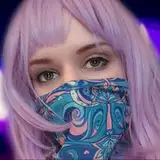
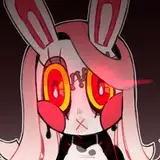
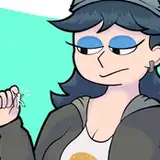
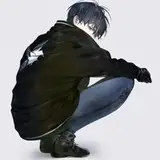
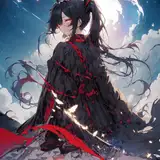
I am trying to tackle this part lately, though: Especially longer hair needs its own attention to detail. Above is a 20 minute real time documentation on rendering hair on one of my latest commissions.
I already laid some groundwork with placing the flat colors and a rough shadow layer before. Doing a rough shadow layer to clean up later can help define values and broad areas before getting lost in being precise.
Especially with hair it's easy to get lost in the small details, so mapping out rougher shapes and areas helps define the body of the hair and it's individual parts. It gives volume and weight that can then be defined by rendering it more proper and adding strands for movement later on.
As you can see I mostly stick to a basic marker brush - my go-to brush for almost anything. I have my fair share of textured brushes but at the end of the day I'm really comfortable with using one or two default brushes for most of my things.
It's more about where light and shadow are placed, how values are contrasting and the flow of the lines for me.
When I finished cleaning up the shadow I love to add some secondary light from surrounding colors that help grounding people and things in their environment. Sometimes I exaggerate to give it more life and play around with some extra colors to enhance, but that really depends on what I'm working at.
I am mostly avoiding adding actual highlights as well. To create the illusion of highlights, I put a soft shadow underneath the sharp shadow and edge out strands.
It's important to note that contrast not only comes from value but also from contrast in sharpness: a hard edge draws more contrast than a soft blur. by edging out individual strands I'm creating focal points of the base color that appear lighter than surrounding parts.
Last but not least I love breaking up my initial forms with some overlayed individual strands to give the hair more texture and volume.
And that's really it!
If you have any questions about the process or would like a more detailed explanation of certain aspects feel free to ask below😊