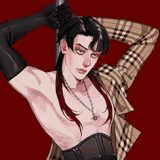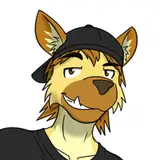
This time on Art Explained, i'll be talking about how easy it is to make half-decent shirt patterns using Blending Modes.
Admittedly the hardest bit, but really it doesn't matter how you do it - since the blended pattern is going to use this for it's own shadow and light it'll 'fit in' no matter what.
The colours you'll use here depend on the blending mode you're using. Soft Light can use light and dark, but i regularly use Multiply where slightly-dark colours work best.
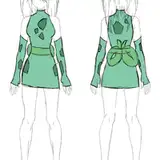
For the check shirt pattern, i've used two separate layers so i can do transparency later.
I've put the pattern in a folder and set that to "Clip to the Layer Below" so that they don't overlap the shirt shading. Why waste time drawing a proper mask eh ;)
Blending Modes are basically magic. In Clip Studio they're in a dropdown menu next to Layer Opacity, and i occasionally mess around with them to see what the different options do. As i've said, Multiply is my go-to choice but Soft Light and Hard Light have helped out in the past.
Because i wanted the overlapping lines of the check pattern, i've made both pattern layers slightly transparent - but transparency is also almost always useful for compensating for going too light or too dark with my pattern's colour.
And there we go - a super easy way to zazz up your clothing patterns :) I've got a technique I use for fur patterns that could also come in handy for clothing, look out for that in future!
Also worth noting, i'm aware some painters ( god tier level ) do all their shading in black and white and add colours afterwards, which both blows my mind and invalidates this technique entirely :P
If you read these posts (and actually enjoy them) let me know. If you don't enjoy them, but by chance have read this far, i still would like that feedback! I've got a couple more ideas for this series but ultimately it exists to give the $3 tier more value and it'd be good to appraise that value.