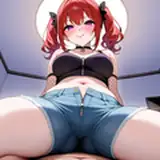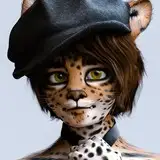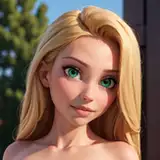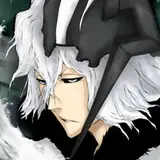
Eclipse is a beautiful Absol inspired avatar base for VRChat on both PC and Quest!
Eclipse includes lots of toggles, textures, and blendshapes to make the avatar your own! You can see all of the features of this avatar below!
Also, check out the community discord (18+) to get help or follow for news on new avatar and clothing/accessory releases, VRChat events, and more! Boosting the server will give access to my WIPs channel! https://discord.gg/dbaNZ8WZGU
Supporting me on Patreon will also give access to WIP content and some assets through exclusive discord channels for as low as $1!:
PatreonThe SFW version of the avatar includes:
The NSFW version includes everything in the SFW version, plus:
This avatar uses Poiyomi 8 shaders! If you want to alter the materials, please download it here
If you want to change the expressions, use FaceEmo
TERMS OF SERVICE
If you have any issues or suggestions for this avatar, please feel free to contact me!
Discord: Arkoren or join the discord!
Telegram: @Arkoren
WebsiteTwitterChange Log:
3/10/24 - v1.1
11/15/23 - No Version Change
10/16/23 - v1.0: Initial Release

Thank you for buying Eclipse! You can find the files for the avatar below and a quick walkthrough on how to use the Setup tool and upload the avatar if you haven't done it before!
If you end up enjoying the avatar, don't forget to rate it! If you have any issues or feedback, please feel free to contact me via my email arkorensnep@gmail.com or through my Discord server or DM (arkoren).
This .unitypackage is the main file you'll need. If you already know what to do, you can just download the package and be on your way! Otherwise, you can follow the tutorial below.
And below are all of the optional files. You won't need these unless you know how to use them for editing and customizing your avatar outside of Unity and VRChat.
When exporting the FBX in blender, make sure to set Apply Scaling to FBX All and turn off Add Leaf Bones in the Armature settings.
Use Embedded Color Profile when opening PSDs using Photoshop!
If you've never uploaded an avatar, or it's been a while, make sure you're using VRChat Creator Companion and have gone through it to install the currently supported version of Unity. Then create a new 2022 Avatar project.
Once the project is open, import the avatar .unitypackage (Double clicking the package file should open it, or go to Assets > Import Package).
Once the files finish importing, you should see a button labeled Open Eclipse Setup in your scene window. Click this button to open the Eclipse Setup Tool with a scene selection. Click on which version you want to open and the Avatar and Quest Avatar boxes will be filled for you automatically.

Once the scene is loaded, the setup tool will be on the Setup tab and show you which packages need to be installed. If you haven't added one of these packages to the Creator Companion before, click the Install button to add it and a tutorial will appear on the tool showing you what to do next. You can also click the Website button if you want to go the the package's website for info or to install it from there.
If you've already added any of these packages to the Creator Companion before, you can just add them from the Manage Project menu.
Alternatively, if you don't want to use any of these features/packages, you can remove the corresponding prefab objects from the root of the avatar.

Once all packages are installed, you can switch to the Textures or Blendshapes tabs to customize your avatars.
In the Textures tab, you can swap textures by pressing the Select button and selecting from the list. Once your textures are selected, you can press the Generate Quest Textures button to automatically apply those textures to the Quest version of your avatar.
In the Blendshapes tab, you can use the sliders to fine-tune the body and face of your avatar. Any changes will automatically sync between the PC and Quest version. Remember that there will also be toggles in game for customizing the avatar's hair, horns, tail, etc.
Note that you may have to position the scene camera to get a better look at what's changing on the avatar.

Now it's time to upload! You can open the VRC Control Panel using the button at the bottom of the setup tool. Then in the control panel, log in and switch to the Build tab, where you will fill out the information to upload your avatar! Make sure you have the PC version of the avatar selected at the top.

If you don't want to capture a thumbnail, one is provided in the scene! Just hit the Capture Thumbnail button and then toggle on the Custom Camera checkbox. If you insert the Thumbnail Camera from the scene into the box, you'll get the pretty rendered thumbnail! You can also just select the file directly from the _Eclipse folder if that's easier for you. Don't forget to hit Capture when you're finished.

And from there you're good to upload the avatar using the button (and checkbox if required) at the very bottom of the Control Panel!
Once you have the PC version of the avatar uploaded, you'll have to do a couple extra steps to make it cross-compatible with quest. First, return to the Setup tab in the Eclipse Setup Tool and press the "Match PC/Quest Blueprint IDs" button to sync both versions to the same VRChat avatar.

Then, make sure you swap to the Quest avatar, and change the build platform to Android (this might take a bit!).

Upload from here and your avatar will be made Quest-compatible! Don't forget to switch platforms back if you ever want to make changes to the PC version of the avatar.
Don't forget that you can ask for help in the Discord or message me if you have any issues uploading. You can use the About tab in the setup tool for all my links.
I hope you enjoy the avatar!

Legacy Versions