XaiJu
IanHubert
IanHubert

patreon


Tips for Optimizing Photoscans

I'm saving "how to shoot photoscans" * until next week (and those cement assets).

Also, huge thanks to Chromfell for turning me on to the usefulness of occlusion maps in de-lighting!

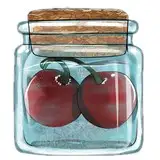
These are most of the techniques I usually use to clean up photoscans! I've got some "just-learned-this" energy in terms of baking, but hopefully I didn't butcher it too bad.

Hope you all are doing well! I am doing decent!

ALSO- Simon Salord commented below:
Hi Ian ! Isn't it easier to just bake the "Diffuse" from the "Bake Type" without any light contributions? I usually do it like that, just keeping "Color" checked in the "Influence" options.

Which definitely sounds better than swapping over to making stuff emissive. Thanks Simon! :D

*Although again, most any tips I have are probably covered in other scanning tutorials, too (mostly, get systematic coverage, avoid things that might confuse reconstruction, and put as much useable data in each image as possible)

Tips for Optimizing Photoscans

Comments

I live in the Seattle area and love going to the military forts so it's really cool to see them photoscanned like this. Now I want to go try it, haha

Evan Tillett

There is a free de-light app from Photoscan company (now called Metashape), easy to use for reducing shadow and light from photogrammetry model. Here is the download link: https://www.agisoft.com/downloads/installer/

Long Wang

YES! Actually want to talk a lot about that soon! Nathan and I have been snagging HDRIs of each lighting setup, so we can do exactly that! And now that Polycam lets you upload images not taken in the app (the built-in auto-exposure killed any hope of a proper de-light :P) and Nathan's linearized the camera data, I think we'll be able to get fairly accurate results?? I think that's going to be a project for tomorrow :D.

Ian Hubert

Hey Ian! I just had a thought. When you do the lighting from your home-scanning-studio, you light the person from below to do the ambient occlusion thing. Wouldn’t you get more accurate and easier results If you recreate your studio light and then use the reverse AO of that? That way, you would actually get the exact opposite and therefore relight the right spots! I hope this made sense and can be useful!

Nickolai bauer

Someone has probably already mentioned this, but as to the "black renders" I had that issue in 2.9 and when I put together a Denise node in compositing to do all the denoising after the frame renders, it does fine for me. I have been using the new Blender 3 beta and the same set up works like a charm.

That as sooo entertaining and informative. Also those tunes where killing me 😂

Frank Frohnhoefer

Hey Ian, I don’t know where to put this message. But have you heard of ACES? I’ve just been going down the workflow rabbit hole of wanting to maintain colour information for colour grading in Resolve, but after doing effects, and it turns out this ACES colour space exists and uses EXR files to maintain it all. It’s also very useful for matching the look of multiple cameras with different colour profiles.

Harry Robins

Recently came across the same issue with renders in Cycles coming out black (time stamp 13:06 of this video). Im not sure if this will work but I used image to image on the Denoise node instead of Noisy image to Image in compositing and it rendered as desired. I'm still learning so don't fully understand why this helped but thought it might solve your problem.

Eireann Hassett

stellar

Manuel Grewer

Instructions unclear: still looking at the Hotel California

was the most beautiful thing ever

Arsh Waseem

dope

alex

Ahh terrific Ian :) love the musical intro :) great info !

Jourdan Biziou

Partner comes in while I'm watching this. Partner: What are you doing? Me: Learning

Sam Goldwater

I haven't!! I was doing all this thinking, "man, there's probably some super great standalone tools that could do this way better"- I'll check it out asap! Thanks, Federico!

Ian Hubert

OH!!! I suspect you're right! I've always wondered what that little camera in the list of UV maps in the data panel was for- that's great to know, thanks. Hopefully that doesn't throw folks trying to follow the video :/

Ian Hubert

you can export cameras from RC as well into FBX format. There is a plugin for blender developed that allows you to paint textures from the chosen image that was used for model creation.

Rafal Janicki

The Expanse and Ian Hubert Patreon are my fave tv shows, so much entertainment on here!!

Sai

Hey Ian, Ive been checking out your assets and have been wondering how do you get your renders to use such little memory while still using very high resolution image textures? especially in assets like your tug asset

michael warneke

Hey Ian, check this tutorial from RC official page. If you export an alembic you can have all the cameras to project in Blender. I think you can include it in your advanced tutorial. https://www.youtube.com/watch?v=yq0XjvBlsiU

Kash

I'm like 80% sure the UV map that the bake uses is the one selected in the uvmaps list, not whatever is plugged into the normal input of the selected image texture.

Hey Ian, have you ever tried Instant Meshes? It's a new open source, lightweight and super fast remesher. Unlike the decimate modifier in Blender, it gives you nice topology and keeps a lot of detail. Then you can bake the textures and normals from the original mesh and you're good to go

Oh that's good to know! I think I found my problem though- when I cancelled a render mid-way through, certain processes wouldn't fully cancel, which wasn't a problem until I tried to render out an animation (at which point it'd render every frame but save it as black). If I close blender and do the render fresh without having cancelled a previous render, it seems to be working alright! I should probably submit a bug report.

Ian Hubert

Huh! I'm exporting objs, but usually at the Medium resolution- my guess is it processes all the scans at high resolution then downrezes, and it might include the normal map as part of that downres process (assuming you're exporting the high quality versions?)

Ian Hubert

When you export use the detail setting ‘Full’ then you should get AO, Normal, Displacement & Roughness

As usual, a dense video packed with bits I can wedge into my own process. One question: how are you exporting from Polycam that it gives you a normal map? I've tried all six of its mesh export formats, and none of them appear to have a normal texture included. Thanks!

Lonnon Foster

Thank you, Ian! Fun, informative and inspirational! 🙂 After a crappy weekend and Monday, this really cheered me up and now I'm eager to disappear into the world of photoscanning for a while.

Mario Taylor

Ian, super image denoiser (SID) works perfectly fine with cycles X and give great results, although a bit slow (done in compositer in post processing).

That intro tho 10/10

Wow great. I was out scanning this weekend. Imported my first scan into blender yesterday. Planned to clean it up this week... This video emerges. Perfect timing! Thanks Ian + others for their comments on workflow and various options! Wow plus original music. What a joy.

Stephan

Ian would you do a lazy modeling tutorial on a hard surface detailing like grooves on space ships and such. Maybe you can run through that drone model where Kate drops her mug. I'm really interested in Prometheus engineer spaceship hull design. How would you approach it.......like laaazzyy

Looking further to see the tutorial for how to shoot photoscan

Sérgio Merêces

Hey Zeke, Displacement baking is totally still possible! I also thought it wasn't for a long time, until I figured it out again. You just have to make sure you use a Multires modifier, as Richard explains in another comment. Works like a charm!

Jan van den Hemel

I love these videos about what to my meagre skillz is next level stuff, which I know while it goes over my head now, once I play with it a bit it'll become part of my workflow. Thanks Ian!

Phil South

Ian, have you ever tried baking down a displacement map? Basically the workflow is - create a low res version of your high-poly mesh, add a multires modifier to the low res mesh and a shrinkwrap modifier that projects the details of the high-poly onto the low-poly, turn up the multires modifier to something high enough to store all the high poly data, and then apply the shrinkwrap modifier. That way the high poly data is now stored in the multires modifier. Then just hit “bake from multires” and you’ve got a nice little displacement map. Works for normals too! My other tip would be to check out Substance Sampler, which lets you convert single images into materials with displacement/ normal / roughness / albedo. It’s amazing for things like manhole covers where you want some depth, but a full scan might be overkill. In general the substance suite is absurdly powerful and it makes me kick myself for not using it sooner. Substance Designer is basically just the Cycles node editor but for textures, and has a lot of features like blurring and image scattering that Cycles lacks. And because it’s all 2D-image based it’s a lot more predictable and graphs are a lot more legible from a distance.

WHOA! Okay totally, yes! Thanks for that. I'm going to add your comment to the description above!

Ian Hubert

Hi Ian ! Isn't it easier to just bake the "Diffuse" from the "Bake Type" without any light contributions? I usually do it like that, just keeping "Color" checked in the "Influence" options.

Simon Salord

I love this kind of thing. It reminds me a lot of extracting spec maps via cross polarized texture subtraction, for high end digital doubles and stuff

Zeke Faust

That idea of using an HDRI for de-lighting purposes - I don’t know if Nathan knows this, but Epic Games did something very similar for their photo scanned assets - they even shared the algorithm they use to subtract the HDRI data from the image texture. Check it out here: https://www.unrealengine.com/en-US/blog/imperfection-for-perfection-part-2

One note about baking to a new UV map: Blender's UV packing is not very efficient, so I like to use an addon like shotpacker or UV Packer to maximize the texel density. You can seriously sometimes double your sharpness (within the exact same resolution) just by changing how the UVs are packed! Great to see you mention baking from one mesh to another, that was always a wall I'd hit when trying to get the texture from a high res scan onto a decimated one (I find that there can be pretty annoying errors in the UVs when you decimate a high res scan). I hope they bring back displacement baking to Blender. You could do it with the old baking system using the Blender Internal renderer, and it was great for capturing super high geometry scan detail into a heightmap. For some reason this isn't possible in cycles and I miss it! Great post as always, thanks Ian

Zeke Faust

YES!! It's so useful, especially for scans!

Ian Hubert

This video has such an awesome variety of stuff in it, I love it! For every feature I was already aware of I feel like I got introduced to one I didn't know about.

Kai Christensen

Absolutely loving this series! It is exactly what I need at this stage.

Ivan Calitz Crockart

A clone stamp in blender! Seeing you mess with the character scans is like watching photoshop in 3d! So incredible. Thank you for making this I'm learning a ton!

Brock

Awesome video, your humor is the best in these "Butt Geometry" :D also, can't wait for those assets :) also, thanks for the follow on Instagram, made my day

You forgot to turn on screen cast keys for the first minute of the video Ian :)

Lightning

Thanks Tanner! It's been lovely! We're finally getting some heavy rain, which is nice (after this hot summer, all the evergreens have been turning red, which seems not good)

Ian Hubert

Oh man, just checked your patreon 5 mins ago hoping there would be something new I missed! Then boom, notification time.

You’re the best, Ian. Hope you had a beautiful weekend!


More Creators