I wanted to clean up a few of the models I have done and tested it this weekend with my large cat 3D model. The model was originally done on Nomad sculpt, but wanted to make a usable mask as well as a mold from it so wanted to clean it up further. Cozy blanket allows me to clean up my topology in a way that makes sense for mask making aside from using it for avatar creation.
Clean topology is important when working with 3D and the cleaner the better for 3D printing. So I imported my 3D model into cozy blanket and started to do the retopology process.

The app is really easy to work with. It created a skin on top of the original mold which makes it really easy to work with on other programs. The app also allows the mirror feature which saves time doing re topology work.


Understanding the basics of topology work is important to really get a good sense on how this program works. Since this mask was not going to be used for animation I did not add extra loops around the mouth or eyes which I would of done in the head was meant to be animated. Since it is just a mask I can go even quicker with the re topology work. When I started with the head the mesh itself was really heavy and messy. Nomad sculpt creates very heavy meshes and most of the time they are very dirty. When mesh is so dense it can make it pretty complicated/messy to work with it on other apps.

I imported the mask back into nomad sculpt. The re topology created a "low poly skin" which is exactly what I wanted. I wanted a bit more detail on the mask itself so I was able to up the resolution by hitting subdivide. Voxel re mesh actually messes with the mesh when it is open like so and ends up trying to close all the holes in the mask making a giant mess.

Once I had subdivided I was able to clean it up a bit more where I felt like I needed it.

At this stage I had masked the other section of the mask after hitting the subdivide and extracted the skin. This way I was able to thicken my paper thin mesh. I wanted to thicken it since this was meant to be worn as a mask. If you were just doing avatar creation there would be no point to thicken the skin. Make sure you have "front facing vertexes" only checked on before extracting the skin to create the thicker mesh in Nomad sculpt. This means it only created a projection from the top layer instead of trying to grab the back facing ones which will create an issue when you extract.

Went ahead and opened up the nose a bit more, eyes and cut out some holes in areas to help with weight. Took the crease tool and adding a few lines here and there to define a few areas. Once I was happy with everything I was able to take it into Cura and prepare it for slicing/printing.

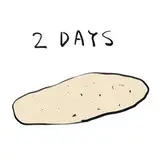
Printed this base as one piece on the Kobra Max as the print size is massive. The downfall with that would be it takes 2 days to fully print. I may still divide it into 2 parts depending on how I want to print it to save on time and materials as it would need less supports. I am also testing new settings on this machine, still getting a lot of stringing which I will alter soon. I have been learning about infill vs wall strength. I am doing 3 walls on each one of these heads and keeping the infill as low as 4% which helps with the weight but the walls make it really strong. In the past I thought that the denser infill was needed to keep it strong but walls are a bit more important in the long run for masks.

Knocked the supports out but did not fully it clean it for the photos. Overall very happy with the results. Happy I was able to get a cleaner mesh with the help of cozy blanket and continue working on it on Nomad Sculpt.

So the process went like this:
-Original sculpt was made on Nomad Sculpt (Ipad)
-Cleaned up the mesh in Cozy Blanket (Ipad)
-Back to Nomad Sculpt for final clean up (Ipad)
-Sent to the computer to prepare for printing, checked the mesh over and resized it in MeshMixer. Then sent it to Cura. (PC)
-Once in Cura, sliced and prepared it for for 3D printing. (PC)
-Saved on an SD card, passed to the printer and new cat mask was printed.
I am still amazed the amount of work that can be done with just the Ipad and how powerful it is. Now that the Feline base is printed and ready we will be offering these as bases very soon.
LatinVixen
2022-07-13 03:12:03 +0000 UTCPowder
2022-07-12 21:10:40 +0000 UTCLatinVixen
2022-06-10 17:39:52 +0000 UTCRoxirin
2022-06-10 11:22:56 +0000 UTC