Rocco Tutorial
Added 2024-10-30 22:07:31 +0000 UTC
Shading techniques
Grade- Intermediate
---
Materials Needed
• Adobe Photoshop, Procreate, Clip Studio, or most art programs can somewhat replicate this.
• Tablet.
---
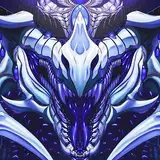
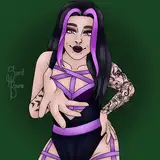
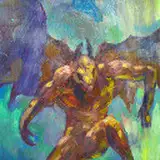
Hey there, my lovely gems! Using this GIF, I'd like to discuss some of the techniques and creative critical thinking I apply as I work on pieces of similar skill level and technicality. I want to discuss shading and how to use it in layers that can later be enhanced.
If you use these techniques, please link me to your work. I'd love to see if they are helpful and how I could better explain them next time.
I hope my offer can benefit you all on your creative journeys.
---
My Initial Setup before Rendering
• Starting with the super rough sketch, I'll make a layer above it after reducing the opacity to see my inking lines better. A huge thing to note, as this comes in handy later, is that I have two types of linear layers. Some who have my PSDs may notice this. And it's usually labeled "Lines" and "Deets" as separate entities. I do this to make things easier to color, separate, and organize so that I do not have to spend hours with a Lasso tool to try and get around tedious details.
• Once the lines are down, I'll create a layer underneath that masks out the shape of the character/entity so I can keep it separate from the Background layer. I refer to this as the "base" and will put a layer on top that remains empty and label it "spare" so I can organize clipping masks. I will also use a similar technique regarding foreground, middle ground, and background elements; for more complex pieces, I will arrange with a similar thought pattern to control the piece's various aspects.
• Usually, during this phase, I'll do the "Deets," Short for Details layer, and draw any sense of shading or details I feel the lines need for shading and rendering later. In this case, it was the scale work for the piece.
• The colors are usually done during this phase on their layer as well. I will also make a folder of block-ins for each character piece, which will be placed in a folder to help make shading cleaner and faster.
• On a layer above the White base layer, I will make a clipping mask layer, fill it with a form of gray, and put a mask on this layer so it's easier to edit. Now, it can be as light or dark as gray as needed; however, there is a point of diminishing returns. But this layer's most important aspect is my "Midtone" layer. The Light and darkness may be determined by the following factors: Character colors, lighting, atmosphere, and BG colors. In this case, I chose a grey around here, #545454, which is usually darker than mid-tones, but since this will be a somewhat dark scene, I wanted something to push the contrast of the bright lights. Bright lights = higher contrast.
- These are some things to remember for the critical thinking aspect when shading. What is my direct light source, and how will it affect the subject matter? IE. Bright sunlight and very high lights, but solid and clear shadows. With less intense lights, shadows may be less indicative. Still, the light helps us break the subject matter away to differentiate it from its surroundings. Things to note for this would be that if you are unfamiliar with how lighting might look, you can look up references for similar subject matters.
EX. I want to draw a character illuminated by fire, but I am unsure how bright or dark to make it. Look up examples such as "Firelight on objects, campfires, fire in setting, to build up some reference.
• Given that this character's colors contrast deep, rich greens on the top of their bodies with a beige tan, I picked a darker grey so that the shadows would show up with the colors. I will use this Midtone layer as the primary shadow, the essential divide between Light and shadow. So, I will do all prominent shadows on this layer, and all core, cast, and ambient occlusion will be done on other layers. From here, I will use White/Black to cut out how I want the grey to look. It makes it easier to edit and keep tidy.
This is where the Block-ins folder comes in as an immense time saver. I don't have to spend an exorbitant amount of time erasing or being too careful with the edges of certain things. They are already blocked in, and using CTRL+Left click on that layer, I can automatically select the area I want to work on and keep edges clean.
• Once the prominent shadows are established, I will make another layer above this one. This will be my Ambient occlusion layer, or in simplest terms, "The darkest of darkest where no light will touch" on this piece. I will usually use a super dark grey, almost black, on this layer, which will lessen the opacity on my brush so I can control the darks far more quickly.
For context, I place this in the deeper parts of the mouth, under the jaw/chin, behind the jaw, and parts of the back of the neck that will be the darker parts of the ambient.
• Once I am satisfied, I will use a Gradient Map over these two shading layers. This feature allows me to add color to my shadows and a little more depth so they do not appear muddy and are more dynamic. In this case, I chose a darker blue for the Ambient, purple-blue for the prominent shadows, and yellow for the lights. Even with this and the colors turned on, it helps convey the Light nicely before I place it.
• Usually, I will have the colors on top of all these, but the layer is set to multiply; from here, I can use a Hue-saturation adjustment to adjust the intensity, brightness, and darkness and adjust the colors as needed best to capture the character/creature with the shadows.
• I will dub this the main light layer. I used the Layer Mode Vivid Light and a beige/tan color to give it that golden tinge. Using CTR+Left, click on the Layer Mask of my Main shadow layer. I put out the Light from the shadows to make it feel more natural.
• For the Blue, green, and ambient light, I used a Layer over this set to Hard Light mode.
---
• Once I have those base components down, I will focus on the Background to better assess what is needed for the rendering process.
• I started with a dark red/purple gradient, and then, Using an Overlay, I added some blues to give it that sort of Smokey stage-like lighting.
• For the Lights themselves, it's a subtle trick, perhaps. Still, it's just the regular Hard Round brush set to 100% opacity, and using a single click of the mouse or stylus, have the circle there. I used a Screen layer with some light blue/turquoise on the layer above those to give the impression of that light halo around the two circles. Then, to lessen the lights' edges, I put a Gaussian blur on them.
• The smoke is simple; it was done on one layer and set to normal. I used an essential Cloud brush that most can find standard and just painted in the ambiance of the smoke.
• Once I had my idea for the BG, I could focus on the rendering aspects.
---
• Usually, with a layer set to Overlay, I use white and black to push the piece's lights and darks for specific pops.
• For the saliva, I had to build it in layers, starting with a low white and a soft round brush to block out the shapes and a smooth round eraser to carve some of the other shapes. While I used to use the Bevel and Emboss setting to do this in the past, I am far more comfortable drawing it out myself now, having done a few studies.
• Once I had the base ideas for the Saliva strands and patches, I made a new layer on top, set it to multiply, and set the layer opacity to 74%. Using purple, I painted the shadows of the saliva.
• For the main highlights on the gums, the tongue, the saliva bubbles, and the jaw muscle, I used a linear dodge layer, a Hard round brush, and a textured brush. I also used another linear dodge to paint the blue rim lighting.
• For the final cleanups, I will use adjustment layers such as curves, color lookup, hue saturation, and sharpening to give the final effect.
----
Once that is complete, you will have a little insight into some of my processes. I hope you all enjoy this kind of content. I enjoy explaining it and hope to do more.
----
FAQ. Of course, you can ask me any questions that come to mind and even ask me to elaborate if needed. Information should be shared, but I only sometimes know what is required. So, if you have a question, please ask away.
Cheers
Noct