download the attached file to watch the process video of april's MOTM painting.
please note: the imovie app for ipad recently updated and something has changed, because i used to be able to get 5-7 minute files at 1080p HD to under 200 MB, which is the size limit for patreon attachments. but this time i couldn't get the file size to below 200 MB without reducing the resolution to 720 HD. you'd think it would be fine anyway, but parts of the video look oddly grainy and it really annoys me. i'm going to look into the matter as soon as i can, cause i'd prefer to keep uploading videos at 1080p -- let me know if anyone has any tips!
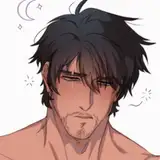
when i first started doing sketches for this piece, i was having a really bad and uncreative day -- i think i did 15-20 doodles before i finally thought of an interesting pose. thankfully, once i had established the basic positioning of their bodies, i had no issues figuring out the rest of the anatomy. i added the close-ups because i wanted to include a more explicit view than the little hint of dick visible on the main image, and since i couldn't decide on rubbing or cream pie ... why not both?
i carefully refined the sketch, layer by layer, and established the basic anatomy before adding anything beyond vague indications of where various details would go. that's why i outlined his shoulder and deltoids, even though i was going to cover them up with ferrofluid spike clusters. once both of their bodies made sense, i started sketching out the spikes, "seams," plates, and nubs.
as mentioned in the design commentary, some of the details of the ferrofluid monster's design are different in the painting than on the concept art. this was partly to make sense of the pose -- i wanted there to be rows of spikes along his thighs, but positioned them in such a way that it would still be possible for his human lover to comfortably straddle his lap. i put more emphasis on the 'creased' areas, distributed the nubs along his neck and chest in a more aesthetically pleasing way, and changed the claws of his fingers to blunt nails.
drawing the large areas of ferrofluid-looking spikes was challenging, since they look so geometric and structured. note the guidelines used to figure out the 'hood' of spikes running from his forehead to the small of his back. but i had to re-do the shoulder 'pauldrons' and face area after initially drawing the spikes too small -- they needed to be big enough that the glossy detail wouldn't look too tiny, messy, and confusing.
this is as good a time as any to say a few words about his dick. the body of this monster is covered in different textures, so it made sense to give his genitals the same treatment; i added a row of ridges, creases, and lines of nubs, all for his lover's pleasure.
i spent literal hours sketching all the details and textures before i could finally move on to the lineart, which was also a time-consuming but important step. i wanted to have it all figured out before i started colouring, so i would have clear guidelines to work with rather than having to wing it.
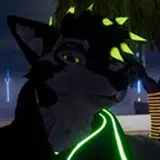
i started rendering the human as per usual, but used greyscale hues for the monster. after blocking in his silhouette i began plotting out the various areas of his body -- the ferrofluid spikes (on a layer of their own), the creased leather bits, the chest 'plating,' and the pale spaces inbetween. at first i simply focused on figuring out what parts should be lighter and darker in order to create interesting contrasts, but without confusing the design. then i gradually started adding more and more detail, 'sculpting' the various surfaces.
i had gotten some practise rendering ferrofluid spikes while drawing the concept art, but it was still tricky. i applied some basic gradients and then went over each spike, one by one, with strokes of darker grey. next, i switched to a lighter hue and started adding highlights -- on a completely new layer, just to be on the safe side. the surface needed to look metallic but with a hint of liquid softness. i ended up duplicating the layer of highlights, changing the layer setting to 'screen,' and lowering the transparency a bit. i also set a new, semi-transparent layer to 'colour burn' and airbrushed some subtle, light grey gradients to the center of the ferrofluid clusters, because i had discovered that this layer effect increased the contrast between the dark base and the pale sheen. finally, i picked an almost white shade of pale grey and went over the spikes with another layer of highlights.
rendering the ferrofluid spikes was a combination of painstakingly painting their metallic surface and using a couple of smart layer setting to make them look even shinier. i wouldn't have known how to apply such layer effects a year ago, when i was still fairly new to using procreate. it's only through trial, error, and gradually familiarising myself with this program that i can guess which layer settings would be useful for achieving a certain effect. so as so many times before, i'm going to encourage experimentation and messing around until you find neat tricks that work for you!
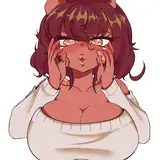
by the time that i had finished the ferrofluid spikes, i had also further refined other parts of the main image, so i caught the close-ups up to the same stage. and then it was finally time to slap some colour onto the greyscale monster! i added hints of purple, pink, blue, and green to several new, semi-transparent layers set to 'overlay' and similar effects. even with such (relatively) subtle undertones he suddenly looks much more alive and vivid, and even if the overall impression is less iridescent than on the concept sketch, the ferrofluid has a cool oily sheen.
speaking of sheen i kept polishing the details, rendering the human's skin, and added a simple background. after deciding on a minty hue for the backdrop, i added green overlays to the monster's tail, back spikes, and the arm and leg that are furthest away from the viewer; this makes the pose easier to read, especially where the characters' bodies overlap. i also added a hint of reflective green to the human's backside, which 'ties' his colour scheme more solidly into the rest of the picture.
by now, a lot of the sketch and lineart had melted into the colouring, so i went over more or less the whole picture to clean things up and polish the linework as needed. i added some more detail to the ferrofluid areas, refined the "seams," and made the other spikes and nubs pop thanks to some small, bright highlights. last but not least i added some Mess™ to the close-ups, and with that the piece was finally done.
if you have any questions about this process, feel free to comment below!
// art + characters © me.