here's the process pack for april's monster of the month painting--download the attached .zip below to access 17 pngs and 1 gif.
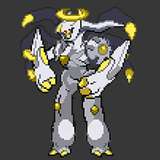
as already discussed in the design commentary, the design of this monster was ultimately rooted in an idea for a setting. the whole 'keeper of candles and skulls' made me think of crypts and catacombs, and i could picture the background i wanted to draw before i had even designed the monster himself. in other words the background would be important for this picture, which was a nice challenge.
i had a mental image of the keeper tending to his lover, a human who would be blindfolded and a bit tied up, laying in the middle of the crypt, surrounded by candles and bones and with niches and urns and tombstones in the background (the whole imagery also seems very witchy and ritualistic and i'm all for it). i could picture the perspective, the composition, and how i wanted the background to 'fade away' in 'layers'--more on that in a bit.
at first i sketched the human on a bed or altar (for extra crypt-y witchyness) with the monster standing beside them. but it felt so impersonal and not intimate enough, so i ended up changing the monster's pose to sitting beside the human, caressing their thigh and letting them suck on his thumb. as a result i moved them both to the floor instead, adding some blankets and pelts. i refined the sketch--note that the ropes are present on the sketch, but that i didnt actually lineart and colour them until step 15. this wasn't forgetfulness on my part--i wanted to colour the human's skin first, without the colouring being "broken up" by the lines of the rope, if that makes sense. as i drew the lineart i changed some things around in the background, adding some elements and details. even as i started colouring in the flats i added another couple of things to both foreground and background, to balance the composition and emphasize the impression of a cluttered crypt.
i mentioned a 'layered' background that 'fades away.' what i mean by that is ... basically imagine the different elements of the background as flat cardboard set pieces in a stage play, placed at different distances from the audience and overlapping one another. those that are the furthest away are pale and desaturated, while those that are closer become successively darker and sliiightly more saturated. i simply used different photoshop layers for each layer of background elements; for example the two tombstones in the middle (with the wreath and the three peaks) are on one layer; the big urn, small urn, and the topmost of the skull-crowned tombstones are on another; and the other two skull-laden tombstones are on a third layer. this method is super useful for creating depth and atmosphere, whether you're colouring a forest, mountains, buildings, or interiors.

i kept adding flat colours to the characters as well. at step 07 the plan was to use mostly cold, blue-ish greys, gold, and pale yellow for the colour scheme, and to add the light of the candles in a kind of stylised way. but i started deviating from that plan already at step 08--i tried using more blue hues for the monster, but he blended into the background too much, so i ended up going for warmer grays. i added some gradients, primarily to render the human's body, and then i started adding rather deep and stark shadows. i found myself questioning the original plan to use a limited colour palette and stylised candlelight, so i began experimenting with a more dramatic lighting instead. i added shadows and light at different layers, setting them to 'multiply' and 'overlay' respectively, and the warm wash of step 13 really made a huge difference.
as i was figuring out the lighting and how to make the image really atmospheric i was also adding details here and there, and colouring parts of the lineart where appropriate, so after i had nailed the candlelit ambiance there honestly wasn't too much left to do. this was definitely one of those images where i spent a lot of time and effort on the lineart, making it rather detailed in a way that meant i wouldn't have to paint in a lot of detail later--the lineart was already getting the job done, if that makes sense. i added some finishing details, brightened the whole image up a little bit, and once i had resized it i added the "speech bubble."
there was a point in this process where i was kind of hating the way the colouring was coming out--specifically steps 09 and 10. i was thinking about scrapping all the gradients and shadows, reverting the image back to flat colours, and add a more comic book type of stylised shading and lighting. but i kept telling myself that it was probably just at the 'ugly stage' that many images go through, and as it turns out i did right in persevering. i kept experimenting with shadows and light and layer settings and photoshop magic and before i knew it i was really loving the look of it. i'm proud of doing an actual background and even if the lighting doesn't make perfect sense it looks cool as hell and that's my main priority tbh.
// art + characters © me.