Lemme start off with saying that I gained the confidence to get into this hobby after watching Leona's Workshop videos. She is not only extremely experienced, she's also the kind of anime nerd that I still nurture within myself. I have mad respect for her and I'll really just be walking through my own experience with my first 2 resin kits here!
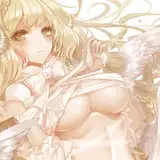
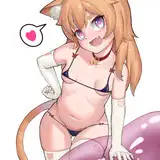
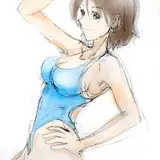
The first kit I attempted was this Tanamushi Mina from Getsumen To Heiki Mina. It's a fictional anime that was in a cult live action movie... that later got its own anime adaptation (and hence became a real anime lmao). I bought this kit in Japan in May of 2019 in a junk pile at a HobbyOff for roughly $15.
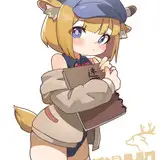
The second kit I attempted was Pastel Ink from Moetan. It's a english language learning game targeted at otaku using cute anime shit to teach. I never played this game but I naturally gravitated towards it because the characters are so cute and from that era of early 2000s weeb shit. I bought this kit off ebay a week or 2 ago for $50. They still have the other one listed here.
They're both cute characters that I wanted to make purely for aesthetic reasons and because I wanted to practice before I started balling out on kits of characters that are more popular. There's a whole conversation about original kits versus re-casts and I'm just going to say it now: I support recasts.
I think as more people get into this hobby, obviously we're all going to buy up more of the kits. Scarcity = Value soooo while I totally understand the collector's mentality of having a rare and real kit and also supporting the original artists etc... I think it's only going to make kits cost even more. I've done 2 and I like want 100 more. I think accessibility is a huuuuge part of any hobby so I support recasting services. For that reason, I bought a few recast kits off of e2046 and I'll give them an honest review once I receive them!
Final statement: I took months slowly collecting all the materials I needed to start this project. I highly recommend you acquire all the necessary tools before starting because this hobby is very precise. I cut corners on the first kit and... it led to me having to paint things twice or completely start over on certain parts. This video was the only one I referenced for what I needed.
Step 1: Cleaning!

Basically when kits are made, they're usually liquid resin poured into a mold. The mold is often waxed with vaseline or some other oily substance so that it'll pop out easier after the resin cures. I washed my kit in a rubbing alcohol bowl for like 20 minutes and scrubbed with a toothbrush to get it off.
Step 2: Sanding & Fitting
Sanding is pretty straight forward, I got a bunch of grades of sandpaper to get all the fine lines. The goal is to polish down the parts you cut off the tabs, the seamlines, and any other gross bumps. Normally this is where you would also use epoxy to close the gaps between parts but... I haven't learned that yet so I'll attempt that step on my 3rd kit.

The next step is to add a metal stick (using wire or paperclips) inbetween the joint connections. This step is super important for structural integrity and I used a paperclip. Here's a picture example of what I mean:

The first kit I did, I did not have the necessary drill bit parts for my Dremel to drill holes into the resin to add the paperclip. So the first kit was all held together by superglue. It was fine because her parts mostly fit snug. For the 2nd kit, none of her parts sat still in the fitting part so she required the wire to hold herself together. I drilled holes where the joints meet and cut a 5mm segment of a paperclip and inserted them. This gives me a surface to safely clip the alligator clamp onto for painting and allows me to strengthen the connection of the parts. Here's how I clamped the first kit vs the second:

I rushed in on the first kit and just clamped wherever I felt like was the "inside" or "back" of the part. This sucked because there were a ton of parts I had to repaint because the clamp covered a visible face of the part. Parts were constantly falling out of the clamp because they were slippery and I was very frustrated. The second kit, it was cakewalk. Everything felt secure and nothing ever fell. The clamp never got in the way of the spray because it was holding onto the wire.
Drilling Shopping List:
Tiny drill bits set + Collet Nut Set
Paperclips! (you probably already have these)
After this, I dumped my whole kit into warm water and dishsoap and gave it another scrub & cleaning. You want to get all the dust from sanding & drilling off now before you paint!!!
Step 3: Primer!!!

I made a cheap "holder" thing out of a little box stuffed with wrapping paper. After using this thing twice to hold all the clips, I really recommend getting something actually made for this. I have yet to get one sooo I have nothing to recommend yet.
For primer, I used Tamiya Surface Primer Paint in Grey on the first kit. On the second kit, I used Krylon COLORMaxx White Primer. After experiencing both, I highly recommend the Krylon ColorMaxx in white because 1. It's way cheaper. Tamiya's can is half the size for the same price and 2. It's pretty much the same so long as you use thin coats + it's better to prime in white.
I think because of oil painting experience, I believed grey to be a better starting surface so I could see the values but no. Painting on top of a grey darkens whatever color you're using because the paint layers are so thin. This is why all the colors for the first kit are darker than what I wanted (not necessarily a bad thing because I still love how she turned out).
Wear a mask and if you're doing this hobby indoors, get one of these bad boys!!! It's a airbrush spray booth that uses fans to suck all your toxic chemicals out through a tube. I set mine up in my bathroom and out my window because I have no back yard, no front yard, no balcony lol. PLEASE save your lungs and your brain cells don't do this without a good mask and ventilation okay???

Step 4: Masking & Painting
For painting you can use a paintbrush or an airbrush. There's no "correct" way to do it. If you use a brush, you have to be patient and apply VERY thin layers. Wait for it to dry and add another one. If you glob it on, you'll end up with runs or bubbles or deformations or just a bad looking result. Airbrushes naturally spray on super thin layers (unless you're really blasting it with hella paint) so it's the same principle. Add thin layers, wait, add another thin layer. For this walkthrough I'm using an airbrush so here's what I used:

I used an Iwata Eclipse (recommended to me by many airbrush friends) and from what I understand, the compressor isn't important. Just any will do because it's primary function is to just blow air into your airbrush. I am a total newbie at this airbrush stuff so I'm not going to talk like I'm a grand master. The air goes into the pen at the bottom and through the needle in the front. On the way to the front tip, there is a gravity feed cup that holds the paint over the needle. The air literally goes through this cup and through the needle, so any paint that's in the cup drips down (via gravity) onto the needle and that gets blasted out the front tip. Two things to note: airbrush cleaner and airbrush thinner.
1. Keep this gravity paint cup thing clean. Air going through the needle is going to dry the paint. Yes, it's also going to carry the paint and blow it out but the nature of paint will dry... when exposed to air. It's actually that simple HAHA you're like working against time. If it dries, it will start to clog and it won't mean the end of the world. Just clean it out and you'll be fine. You'll need a bottle of airbrush cleaner ready to clean every time you switch colors or when it clogs.
2. Thin your paint. If the paint is too thick, it clogs easier and it can get blotchy when it get sprays. I have just been eyeballing the consistency so I don't know the exact ratio but I'll mix in paint and paint thinner and mix it around with a clean paintbrush until it feels a little bit more watery than the paint alone. However, if it's TOO thin, it'll be watery when it gets on your model and it could run... but the paint thinner evaporates so it usually isn't a deal breaker. It just means you need another coat of paint to fix it.
PAINT.
First time I did this, I used this Basic Vallejo Model Paint. It's awesome but the tubes are TINY. Colors are great I had no issues. Second kit I did, I used DecoArt Americana Paint (Popular Picks Set). Just as awesome, slightly bigger bottles and way better deal. Don't use anything cheap. Paint is so important here because you want consistent, even, and opaque coats of paint. These two brands were made for model painting and crafts so they're widely used by hobbyists.
MASKING.
Don't use regular masking tape. Tamiya masking tape is gentle and won't rip off any paint.
Here on my first kit, I did a coat of pink for the ears and then I taped up the pink areas to paint the surrounding blue. I cut the tape into little squares so I can mask the curves.


Note that the way I have the ears clamped, it was super shaky. The bunny ears were the heaviest part on the kit and it fell from my clip twice!!!

Some mistakes I made with painting the first kit: paint was too thick in some parts, alligator clips were clamped to the resin joints and often very insecure (they spun around or moved while spraying), and of course touching something accidentally while the paint wasn't finished drying.
Step 5: Shading
There's multiple ways to shade a figure but I prefer the pastel chalk method. I think it gives me the most control because I am not a master wizard with the airbrush yet so I can't just freehand with the thing and create nice shadows and gradients.... yet. I only did 1 gradient and it was on the hair. I just kept adding more white into the airbrush gravity feed cup so that each coat would be brighter.

I made attempts to shade using the airbrush but honestly... I sucked.
If you wanna check out other ways (pre-shading, airbrush, pastel shading, and drybrushing) you can watch this video. It's one of Leona's older videos (she's been doing this for over a decade) and the music in the background is God Knows from The Melancholy of Haruhi Suzumiya so it's a nostalgic throwback for me.
Pastel Chalk Shading method:
First, I coated my parts in a layer of finishing spray. The spray comes on clear in matte or glossy and when it dries, it levels out giving you a super smooth surface. This is ideal with pastel shading because there WILL be imperfections in your paint job regardless if you use airbrush or paintbrushes. If you skip this step, the pastels will stick to those imperfections giving you a sandy colored pencil effect instead of a smooth gradient.
I used this Krylon UV Matte Finishing Spray. It's toxic! Open a window!
After it dries, I used the end of a brush (the hard side) to scrape the pastel chalk so that I get some loose colored dust. I poke at it with the brush and start brushing it onto the creases and folds. I used a blue for shading in the white folds of her clothes. I used a brown and red to shade the creases of her arms, legs, and the blush on her face. I used blue and black to shade the darker blue parts like her bib and boots.
I used this Faber-Castell Soft Pastel Mini Sticks (24 colors).

This shading method provides WAY better control. If you don't like something, just grab a tissue paper and wipe it off. Most of the chalk is naturally going to deposit itself into the cracks where you want it anyway so it's very forgiving. I couldn't imagine doing this with an airbrush gun I really don't use it for anything other than filling an area with flat color. The best part about this method is everyone thinks you did it with an airbrush anyway because it looks so smooth HAHA
Once you're happy, I would lock everything in with another layer of the UV finishing spray so your hands don't rub your shading away by accident.
Step 6. Detailing.

My first kit on the left and my second on the right. Improvement is CRAZY! I won't recommend you brushes because the ones I used SUCKED. A friend told me the secret is nail art brushes because those things are super super fine. I'll test a few out and comeback with more opinions but for now, uhhh this was so much guess work.
The first time I used really thick paint because it wouldn't go on smoothly unless the brush was soaked and that caused the eyes to look bumpy and uneven. The second time, I used a tiny bit of paint thinner and it helped tremendously.
The first time I applied light colors to dark. I started with red to create the shape and added the little dark brown details after. This is extremely difficult and I had to start over twice. The second time, I applied dark colors to light. I started with a dark blue to create the shape and then used increasingly bright colors to create the gradient in the eyes. This was way easier than trying to draw tiny thin lines around the eyes, instead you're just filling in the center. This also allows you to cover a larger surface and it helps keep the paint from clumping up.
There is no secret to the eyebrows lmao, I just got better at drawing them on. I did rage quit on those little folds above the eyes on the 2nd try... so I used a 0.5 lead pencil to sketch it in because fuck it no one can tell. Next kit i'll use the shiny glossy stuff to cover the eyes at the end. Every garage kit builder uses it but I just haven't bought any yet.
Finally, I used the detail brush to paint in tiny parts that were a pain to mask+paint. These include: little bows and ribbons, shoe lace details, the little bunny badge on the coat, the stripes on the bib, the green orb on the bib, etc. Not everything has to be done with an airbrush if that's what you're using!
Hit that again with UV finishing spray and we're almost done!!!!
Step 7. Assembly.

LAST step. Putting the parts together after the last coat is dry is the ultimate joy. Seeing everything come together is so crazy. I actually was so excited on my first kit that I put her together before I even did the eyes just to see it come together.
There's a lot of options for glue. I used super glue the first time and that was pretty chill, but for the second time, I used gorilla glue which I think is stronger.
And that's pretty much it! I think this was my longest post ever and it took a lot of work to put it together haha but I got soooooo many questions I wanted to make this comprehensive and answer all of them in one go.
Thanks again for supporting me on Patreon! Next post will be previews & updates for happy99 :)