We ultimately decided to just make our own head and use a 24cm obitsu doll body as the base. I got these doll heads and these bodies to remix into our own dolls. I also had to buy hair wefts, which were already sewn together, to create our own tiny wigs. I borrowed a Dremel 3000 from my friend and got to sanding down the facial features so I could draw over it. Center is the original doll face, the left is sanded down, and the right is with some eyes markered in!
I've been watching a ton of videos by Dollightful, who is a really passionate doll maker in Korea. She put me onto a lot of techniques namely the wig making process and painting the body.
I knew I didn't want both our models to be the same skin tone so I picked up some supplies to get to painting. The doll community and gunpla swear by Mr. Super Clear, which is a really neat matte finishing spray used to set the paint jobs. I got a can of basic matte brown (color: montserrat) from Blick and a high gloss acrylic varnish by Liquitex to make their eyes shiny. From there, I took apart the doll and sanded down the body lightly with the finest sandpaper I could find in my tool box (grade 150 but I would recommend going higher like 200-300). After that I went outside and gradually applied layers of spray paint.
Once the body was done, I coated it with the MSC finishing spray and waited for it to dry. While I was waiting, I tried working on hair. I originally tried to root the doll's hair using a reroot tool. This is how Barbies have their hairs applied, permanently into their scalp through little holes. I tried this method because I wanted to be able to part the doll's hair and do cool tied up hair etc but my tool broke and I got impatient. I decided to follow the tutorial on the wig stuff and got a tiny elastic, wrapped it around the head, hand sewed a mesh fabric ontop, and then hand sewed the hair wefts in a spiral formation. Then I boiled some water and poured it over the head to make the hair strands sit down.
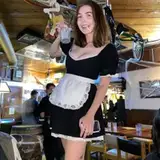
Finally the body paint was done drying and it was time to draw on the face!!! Once you coat anything in MSC, it takes colors very well. I used really sharp watercolor pencils (it has to be watercolor for the finishing spray to set it!) to sketch out the facial features in brown. I was going for a 90s anime eye look and once I was happy I started filling it with darker browns to black as well as white for the outside of the iris. I ultimately decided to use a little bit of black and white acrylic paint to really make the eyes pop. Finally, ofc another layer of MSC to make sure the face doesn't get rubbed off.
Last but not the least... I assembled the painted body. I didn't list all my mistakes because that would make this post a mile long but! I will say my greatest mistake worth mentioning is that I didn't sand the connecting joints nor did I tape them off. I actually completely screwed up the paint job while assembling because the newly painted joints were now thicker from the paint and wouldn't fit into their designated joint holes. I had to not only go back and repaint, I also had to sand down the parts that wouldn't fit so that I could even put her back together.... so yeah.
I'll cover clothes and shoes in the next... next post? It's a lot!